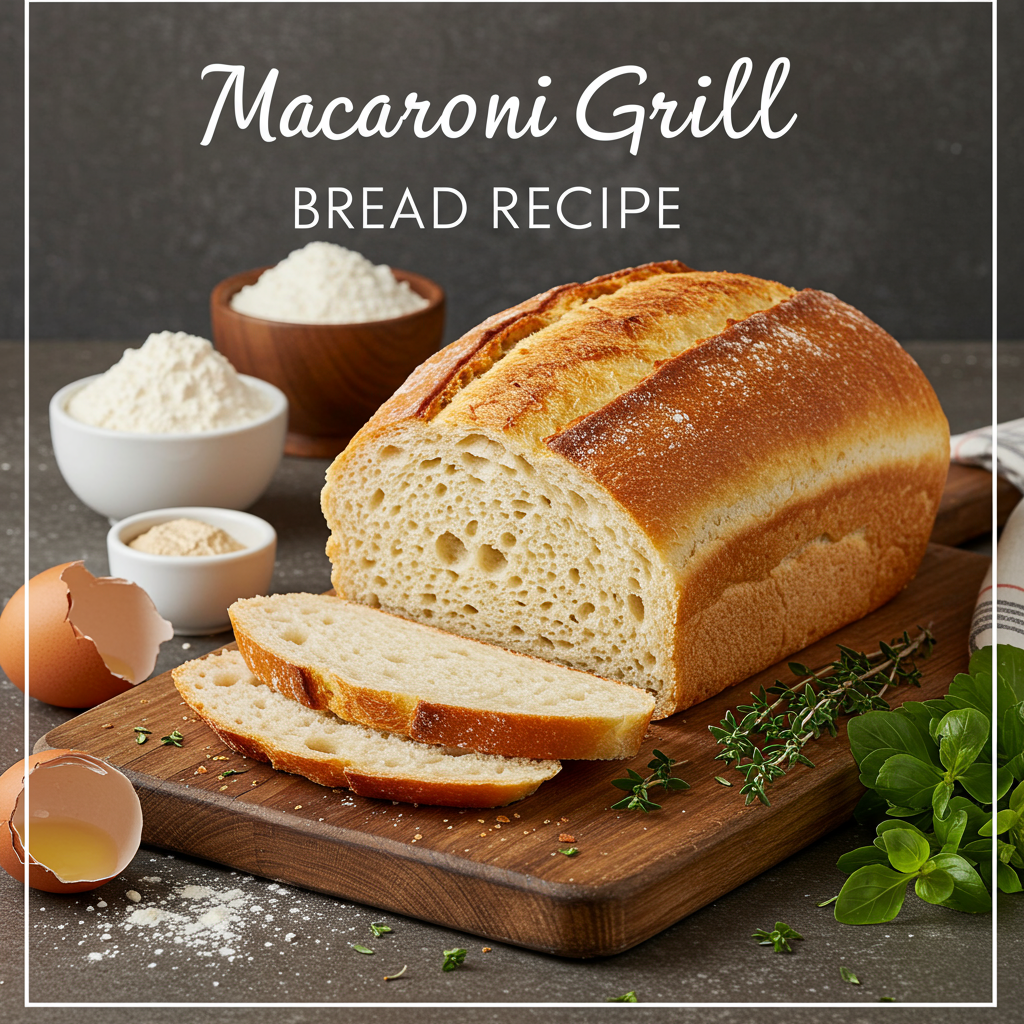
Have you ever sat down at Macaroni Grill, eagerly awaiting your meal, but found yourself completely captivated by that warm, crusty, perfectly seasoned bread and olive oil dip? You’re not alone! That irresistible aroma and taste are legendary. And what if I told you that you could recreate that magic right in your own kitchen? Yes, it’s true!
This comprehensive guide to the Macaroni Grill Bread Recipe is designed specifically for you, whether you’re a seasoned pro or just dipping your toes into the wonderful world of easy baking recipes. Get ready to impress yourself and your loved ones with a loaf that rivals the restaurant’s best. We’ll walk you through every step, providing invaluable baking tips for beginners to ensure your success. Say goodbye to store-bought loaves and hello to the most satisfying, homemade bread experience!
Ingredients You’ll Need
Gathering your ingredients correctly is the first step to baking success. Don’t worry, these are all common pantry staples!
| Ingredient | Quantity | Unit |
|---|---|---|
| Warm Water (105-115°F / 40-46°C) | 1 ½ | cups |
| Active Dry Yeast | 2 ¼ | teaspoons (1 standard packet) |
| Granulated Sugar | 1 | tablespoon |
| All-Purpose Flour (plus extra for dusting) | 3 ½ – 4 | cups |
| Salt | 1 ½ | teaspoons |
| Olive Oil (plus extra for brushing & serving) | 2 | tablespoons |
| Garlic Powder | 1/2 | teaspoon (optional, for flavor) |
| Dried Italian Herbs (like oregano, basil) | 1/2 | teaspoon (optional, for flavor) |
Step-by-Step Instructions: Bake Your Perfect Loaf
Follow these detailed steps, and you’ll be enjoying warm, homemade bread in no time. Read each step carefully before you start!
Step 1: Activate Your Yeast – The Foundation of Great Bread
- In a large mixing bowl, pour in the 1 ½ cups of warm water. It’s crucial that the water is between 105-115°F (40-46°C). If it’s too hot, it will kill the yeast; too cold, and the yeast won’t activate. A kitchen thermometer is your best friend here!
- Sprinkle the 2 ¼ teaspoons of active dry yeast and the 1 tablespoon of granulated sugar over the warm water. The sugar acts as food for the yeast.
- Gently stir once or twice, then let it sit undisturbed for 5-10 minutes. You should see a foamy, bubbly layer form on top. This is a good sign – it means your yeast is alive and ready to work! If it doesn’t foam, your yeast might be old or the water temperature was off. Start over with fresh yeast and check your water temperature.
Step 2: Mix the Dough – Bringing It All Together
- Once your yeast is active, add the 2 tablespoons of olive oil, 1 ½ teaspoons of salt, and optionally the ½ teaspoon garlic powder and ½ teaspoon dried Italian herbs to the yeast mixture. Stir well to combine.
- Gradually add 3 ½ cups of the all-purpose flour, one cup at a time, mixing with a sturdy spoon or a dough hook on a stand mixer after each addition.
- Continue mixing until the dough comes together and starts to pull away from the sides of the bowl. It will be shaggy and a bit sticky at this stage.
- If the dough is still very sticky after adding 3 ½ cups, add the remaining ½ cup of flour, one tablespoon at a time, until the dough forms a cohesive ball. Be careful not to add too much flour, as this can make your bread dense and dry.
Step 3: Knead the Dough – Developing That Perfect Texture
Kneading is essential for developing the gluten in the flour, which gives bread its structure and chewiness.
- Lightly flour a clean work surface (your kitchen counter is perfect!). Turn the dough out onto the floured surface.
- For Hand Kneading (Beginner-Friendly): Fold the dough in half towards you, then push it away with the heels of your hands. Rotate the dough a quarter turn and repeat. Continue this motion for 8-10 minutes. The dough should become smoother, more elastic, and less sticky. It should spring back when gently poked with your finger.
- For Stand Mixer Kneading: Use the dough hook attachment on medium-low speed for 6-8 minutes. The dough should clear the sides of the bowl and become smooth and elastic.
- Beginner Tip: A good test for readiness is the “windowpane test.” Pinch a small piece of dough and gently stretch it. If you can stretch it thin enough to see light through it without tearing, it’s ready! If it tears, keep kneading for another minute or two.
Step 4: First Rise (Bulk Fermentation) – Let the Magic Happen
- Lightly grease a clean large bowl with a little olive oil. Place the kneaded dough into the bowl, turning it once to coat all sides with oil. This prevents it from drying out.
- Cover the bowl tightly with plastic wrap or a clean kitchen towel.
- Place the bowl in a warm, draft-free spot. A slightly warm oven (turned off, but warmed for a minute then turned off again) or a sunny spot on your counter works well.
- Let the dough rise for 1 to 1 ½ hours, or until it has doubled in size. This process allows the yeast to produce carbon dioxide, creating air pockets and flavor. Don’t rush this step! It’s crucial for a light, airy loaf.
Step 5: Shape the Loaf – Getting Ready for the Oven
- Gently punch down the risen dough to release the air. This is called “degassing” and helps create a more even texture.
- Turn the dough out onto a lightly floured surface.
- Gently shape the dough into your desired loaf shape. For a classic Macaroni Grill-style loaf, a rustic oval or round shape works best. You can simply tuck the edges underneath to form a smooth top.
- Lightly grease a baking sheet or line it with parchment paper. Place your shaped dough onto the prepared baking sheet.
Step 6: Second Rise (Proofing) – The Final Stretch
- Cover the shaped loaf loosely with plastic wrap or a clean kitchen towel.
- Let it rise again in a warm, draft-free spot for another 30-45 minutes, or until it has nearly doubled in size. This second rise is called “proofing” and contributes to the final volume and texture of your baked bread.
- About 15 minutes before the end of the second rise, preheat your oven to 375°F (190°C).
Step 7: Bake Your Masterpiece!
- If desired, before baking, you can brush the top of the loaf with a little olive oil or water for a crispier crust. You can also sprinkle a pinch of sea salt, garlic powder, or Italian herbs on top for extra flavor.
- Carefully place the baking sheet with your bread into the preheated oven.
- Bake for 25-35 minutes, or until the crust is golden brown and the internal temperature of the bread reaches 200-210°F (93-99°C). A meat thermometer works great for this!
- Common Mistake: Undercooked bread can be gummy. Always check the internal temperature if you’re unsure.
Step 8: Cool and Enjoy!
- Once baked, immediately transfer the bread from the baking sheet to a wire cooling rack.
- Allow the bread to cool for at least 30-60 minutes before slicing. This is a critical step! Slicing hot bread can result in a gummy texture because the internal cooking process is still happening as it cools.
- Serve warm with your favorite olive oil and a sprinkle of fresh herbs or red pepper flakes. Enjoy your homemade Macaroni Grill Bread Recipe!
Tips & Tricks for Beginner Bread Bakers
Baking bread is an art, but with these simple tips, you’ll master it in no time!
- Check Your Yeast: Always ensure your active dry yeast is fresh. If it doesn’t foam when activated, it’s likely dead, and your bread won’t rise. Store yeast in the refrigerator or freezer for longer shelf life.
- Accurate Water Temperature: Invest in a kitchen thermometer. The 105-115°F (40-46°C) range for yeast activation is non-negotiable for consistent results.
- Measure Flour Correctly: Don’t scoop flour directly from the bag with your measuring cup, as this compacts it, adding too much. Instead, fluff the flour with a spoon, then spoon it into your measuring cup, leveling off the top with a straight edge. This is called the “spoon and level” method.
- Patience is Key: Bread baking requires patience, especially during the rising times. Don’t rush the process. If your kitchen is cold, it might take longer for the dough to rise.
- Create a Warm Environment: For rising, a warm, draft-free spot is ideal. You can turn your oven on to its lowest setting for 1-2 minutes, then turn it off and place the covered dough inside. The residual warmth is perfect.
- Don’t Skip Cooling: As tempting as it is to slice into a hot loaf, resisting the urge allows the internal structure to set, preventing a gummy texture.
- Flavor Variations: Feel free to experiment! Add rosemary, thyme, or sun-dried tomatoes to the dough during the kneading stage for a gourmet twist.
Essential Baking Tools
Having the right tools makes all the difference for a smooth baking experience. Here are a few essentials:
- Mixing Bowl
- Whisk (or sturdy spoon for mixing)
- Baking Sheet (or Pizza Stone for extra crispiness)
- Measuring Cups & Spoons
- Spatula (or Dough Scraper)
- Kitchen Thermometer (for water and internal bread temp)
Nutrition Information (Estimated Per Serving)
Please note: This is an estimated nutritional breakdown for one slice (assuming 12 slices per loaf) and can vary based on exact ingredient brands and measurements.
| Nutrient | Amount |
|---|---|
| Calories | ~160 kcal |
| Carbohydrates | ~30 g |
| Protein | ~5 g |
| Fat | ~3 g |
| Fiber | ~1.5 g |
| Sugar | ~2 g |
Frequently Asked Questions (FAQs)
Q1: My yeast didn’t foam. What went wrong?
A: This is a common issue for beginners! The most likely culprits are either the water temperature was too hot (killed the yeast) or too cold (didn’t activate it), or your yeast is old and no longer active. Always use a thermometer for water, and check the expiration date on your yeast. If it doesn’t foam, discard and start over with fresh yeast and correct water temperature.
Q2: How do I know if I’ve kneaded the dough enough?
A: The dough should feel smooth, elastic, and less sticky. When you gently poke it with your finger, it should spring back. The “windowpane test” is also a great indicator: pinch a small piece of dough, and if you can stretch it thin enough to see light through it without tearing, it’s ready. If it tears easily, knead for another minute or two.
Q3: My dough isn’t rising. What should I do?
A: Lack of rising usually points back to the yeast (not active, too old, or temperature issues during activation). Another factor could be a cold environment. Ensure your rising spot is warm and draft-free. If your yeast was active initially, try moving the dough to a warmer spot, like a slightly warmed (then turned off) oven, and give it more time.
Q4: Can I prepare the dough ahead of time?
A: Yes! After the first rise, you can punch down the dough, place it in an oiled, airtight container, and refrigerate it for up to 24 hours. When you’re ready to bake, take it out, let it come to room temperature for about 30-60 minutes, then proceed with shaping, the second rise, and baking.
Q5: What’s the best way to store leftover bread?
A: Store your cooled bread at room temperature in an airtight container or a bread bag for 2-3 days. For longer storage, slice the bread and freeze it in a freezer-safe bag for up to 2-3 months. You can toast slices directly from frozen!
Q6: Can I add different herbs or spices to this recipe?
A: Absolutely! This recipe is a fantastic base for customization. Feel free to add fresh rosemary, dried oregano, basil, a pinch of red pepper flakes, or even some grated Parmesan cheese to the dough during the kneading stage. Just be mindful not to add too much wet ingredient (like fresh herbs) that might alter the dough consistency significantly.
Your Homemade Macaroni Grill Bread Awaits!
And there you have it! Your very own guide to creating the delightful Macaroni Grill Bread Recipe right in your kitchen. We hope this detailed, beginner-friendly post has equipped you with all the knowledge and confidence you need to embark on your bread-baking journey. There’s truly nothing quite like the smell of fresh-baked bread filling your home, and the taste of a warm, crusty slice is pure comfort.

Don’t be afraid to experiment, and remember that practice makes perfect. Every loaf you bake will teach you something new. So, roll up your sleeves, gather your ingredients, and get ready to enjoy the incredible satisfaction of baking your own bread. We can’t wait to hear about your successful loaves!