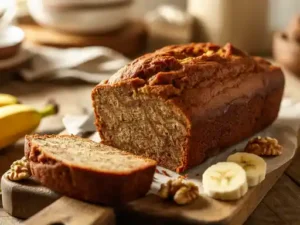
this guide is designed with you in mind. We believe that easy baking recipes should be accessible to everyone, and this banana bread is a fantastic starting point. Throughout this post, we’ll share invaluable baking tips for beginners to ensure your first (or fiftieth!) loaf turns out perfectly moist, flavorful, and utterly irresistible. Get ready to transform those ripe bananas into a masterpiece!
Ingredients You’ll Need
Gathering your ingredients is the first step to baking success. For this no-sugar-added recipe, we rely on the natural sweetness of very ripe bananas. Make sure to choose bananas with plenty of brown spots – the browner, the sweeter!
| Ingredient | Quantity | Unit |
|---|---|---|
| Very Ripe Bananas, mashed | 3 | large |
| Large Eggs | 2 | |
| Unsalted Butter, melted and cooled | 1/2 | cup (1 stick) |
| Pure Vanilla Extract | 1 | teaspoon |
| All-Purpose Flour | 1 1/2 | cups |
| Baking Soda | 1 | teaspoon |
| Ground Cinnamon | 1/2 | teaspoon |
| Salt | 1/4 | teaspoon |
| Optional: Chopped Walnuts, Pecans, or Unsweetened Shredded Coconut | 1/2 | cup |
Step-by-Step Instructions for Your Perfect Loaf
Follow these detailed steps carefully, and you’ll be enjoying warm, fragrant banana bread in no time. We’ve added plenty of extra notes to help beginners every step of the way!
Step 1: Preheat Your Oven and Prepare Your Pan
Before you even think about mixing, let’s get the oven ready! Preheat your oven to 350°F (175°C). While it’s heating up, take a 9×5 inch (23×13 cm) loaf pan and lightly grease it with butter or cooking spray. For extra easy removal, you can also line the bottom with a strip of parchment paper, letting the ends hang over the sides like handles. This is a fantastic trick for beginners!
Step 2: Mash Your Bananas
In a large mixing bowl, take your very ripe bananas and mash them thoroughly with a fork or a potato masher. You want them to be mostly smooth with a few small lumps – that adds character and texture! Beginner Tip: The riper your bananas are (think brown spots and soft to the touch), the sweeter and more flavorful your bread will be. Don’t be afraid of very brown bananas!
Step 3: Combine Wet Ingredients
To the mashed bananas, add the melted butter (make sure it’s cooled slightly so it doesn’t cook the eggs!), the two large eggs, and the vanilla extract. Whisk these ingredients together until they are well combined. It’s okay if it looks a little lumpy from the bananas; just ensure the eggs are fully incorporated. This is your “wet” mixture.
Step 4: Whisk Dry Ingredients Separately
In a separate, medium-sized bowl, whisk together the all-purpose flour, baking soda, ground cinnamon, and salt. Whisking them together ensures that the leavening agents (baking soda) and spices are evenly distributed throughout the flour. This prevents pockets of plain flour or uneven rising in your final bread. Beginner Tip: When measuring flour, spoon it into your measuring cup and then level it off with the back of a knife. Scooping directly from the bag can compact the flour, leading to too much flour and a dry loaf.
Step 5: Combine Wet and Dry Mixtures
Pour the dry ingredients into the wet ingredients bowl. Using a spatula or a wooden spoon, gently fold the mixture together until just combined. This is a critical step for beginner bakers! Do not overmix! Overmixing develops the gluten in the flour too much, which can lead to tough, dense, and chewy banana bread instead of light and tender. A few streaks of flour are perfectly fine – they will disappear during baking.
Step 6: Add Optional Mix-ins (If Using)
If you’re adding chopped nuts or unsweetened shredded coconut, gently fold them into the batter now. Again, be careful not to overmix. These additions add wonderful texture and flavor without introducing extra sugar.
Step 7: Bake Your Banana Bread
Pour the batter into your prepared loaf pan and spread it evenly. Place the pan in the preheated oven. Bake for approximately 55-65 minutes. Baking times can vary depending on your oven, so keep an eye on it. The top should be golden brown, and the edges should start to pull away from the pan.
Step 8: Test for Doneness
To check if your banana bread is fully baked, insert a wooden skewer or a toothpick into the center of the loaf. If it comes out clean or with a few moist crumbs attached (but no wet batter), your bread is done! If it comes out with wet batter, continue baking for another 5-10 minutes and test again. Common Mistake for Beginners: Pulling the bread out too early can result in a soggy, undercooked center.
Step 9: Cool Your Loaf
Once baked, remove the loaf pan from the oven and let it cool in the pan on a wire rack for about 10-15 minutes. This allows the bread to set and prevents it from sticking. After 10-15 minutes, carefully remove the banana bread from the pan (using those parchment paper handles if you added them!) and place it directly onto the wire rack to cool completely. Slicing into hot banana bread can make it crumbly and gummy, so patience is key!
Tips & Tricks for Baking Success
Mastering banana bread is simple with a few insider tricks. Here’s how to elevate your baking experience:
- Banana Ripeness is Key: We can’t stress this enough! The natural sweetness and intense banana flavor come from very ripe bananas. Look for bananas with extensive brown spots or even entirely brown peels. If your bananas aren’t ripe enough, you can speed up the process by baking them in their skins on a baking sheet at 300°F (150°C) for 15-30 minutes until they turn black and soft. Let them cool before mashing.
- Accurate Flour Measurement: Avoid scooping flour directly from the bag with your measuring cup. This can compact the flour, adding too much to your recipe. Instead, spoon the flour into your measuring cup and then level it off with a straight edge (like the back of a knife). This “spoon and level” method ensures you get the right amount for a perfectly tender crumb.
- Don’t Overmix the Batter: Once you combine the wet and dry ingredients, mix only until just combined. Overmixing develops the gluten in the flour, leading to a tough, dense, and chewy loaf. A few small lumps or streaks of flour are completely fine and will bake out.
- Testing for Doneness: Always rely on the toothpick test. Insert a wooden skewer or toothpick into the very center of the loaf. If it comes out clean or with moist crumbs attached, it’s done. If there’s wet batter, bake for a few more minutes. Underbaked banana bread can be gummy in the middle.
- Cooling is Crucial: Allow your banana bread to cool in the pan for 10-15 minutes before transferring it to a wire rack to cool completely. This helps the bread set and prevents it from crumbling or becoming soggy. Slicing too early can also lead to a gummy texture.
- Storage: Store leftover banana bread tightly wrapped in plastic wrap or in an airtight container at room temperature for up to 3 days, or in the refrigerator for up to a week. For longer storage, slice the cooled bread, wrap individual slices, and freeze them for up to 3 months. Thaw at room temperature or gently warm in a toaster oven.
- Flavor Variations: While this is a no-sugar-added recipe, you can still play with flavors! Beyond nuts and unsweetened coconut, consider adding 1/2 teaspoon of nutmeg for extra spice, or a handful of fresh or frozen (not thawed) blueberries for a fruity twist.
Essential Baking Tools
Having the right tools makes baking a breeze, especially for beginners. Here are a few essentials you’ll want to have on hand:
- Mixing Bowls: You’ll need at least two – one for wet ingredients and one for dry.
- Whisk: Essential for combining dry ingredients and smoothing out wet mixtures.
- Baking Pan: A standard 9×5 inch loaf pan is perfect for this recipe.
- Measuring Cups: Accurate measurements are key to successful baking.
- Spatula: Great for scraping down bowls and gently folding ingredients.
Nutrition Information (Estimated per slice, 12 slices per loaf)
Please note that these values are estimates and can vary based on specific ingredient brands and portion sizes. This information is provided for general guidance.
| Nutrient | Amount |
|---|---|
| Calories | ~195 kcal |
| Total Carbohydrates | ~35g |
| Protein | ~4g |
| Total Fat | ~9g |
| Fiber | ~2g |
| Natural Sugars (from bananas) | ~12g |
Frequently Asked Questions (FAQs)
Q1: What if my bananas aren’t ripe enough?
A: Very ripe bananas are crucial for sweetness and moisture in this no-sugar-added recipe. If yours are still green or yellow, you can ripen them quickly! Place them unpeeled on a baking sheet and bake at 300°F (150°C) for 15-30 minutes until their skins turn black and they become soft. Let them cool completely before mashing.
Q2: Can I use whole wheat flour instead of all-purpose flour?
A: Yes, you can! Whole wheat flour will give your banana bread a denser texture and a nuttier flavor. You might need to add an extra tablespoon or two of milk or water if the batter seems too thick, as whole wheat flour absorbs more liquid. Start by substituting half of the all-purpose flour with whole wheat, or go for 100% whole wheat for a more robust loaf.
Q3: Why did my banana bread sink in the middle?
A: There are a few common reasons for this! It could be due to opening the oven door too early during baking (especially in the first 30 minutes), underbaking (always use the toothpick test!), using too much leavening agent (baking soda), or sometimes, too much moisture from the bananas if they weren’t drained slightly after mashing (though rare in this recipe).
Q4: Can I add chocolate chips to this recipe?
A: Since this is a “No Sugar Added” recipe, traditional chocolate chips would reintroduce sugar. However, you can use sugar-free chocolate chips or finely chopped dark chocolate (look for 85% cacao or higher, which has very little sugar) for a similar effect while staying true to the low-sugar goal. Just remember to account for any sugar content in your chosen chocolate!
Q5: How long does homemade banana bread last?
A: Your homemade no-sugar-added banana bread will stay fresh at room temperature, tightly wrapped or in an airtight container, for about 2-3 days. If you keep it in the refrigerator, it can last up to a week. For longer storage, it freezes beautifully for up to 3 months. Just wrap individual slices or the whole loaf tightly.
Conclusion
Congratulations, baker! You’ve just created a truly delicious and wholesome loaf of No Sugar Added Banana Bread. This recipe proves that you don’t need extra sugar to enjoy a sweet, comforting treat. We hope you found these baking tips for beginners helpful and feel more confident in your kitchen adventures. Don’t be afraid to experiment with your favorite add-ins, and remember that practice makes perfect. Share your beautiful creation with loved ones, or simply savor a slice (or two!) with your morning coffee. Happy baking, and enjoy your delightful homemade banana bread!