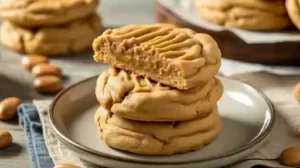
Imagine warm, chewy, peanut butter-packed cookies, fresh from your oven, with that classic criss-cross pattern. And the best part? They start with a simple box of cake mix! This recipe is designed to build your confidence and show you that delicious homemade treats are absolutely within reach, no matter your experience level. Let’s get baking!
Gather Your Simple Ingredients
One of the beauties of this recipe is how few ingredients you need. You likely have most of these in your pantry already!
Ingredients List:
| Ingredient | Quantity |
|---|---|
| Yellow or Vanilla Cake Mix (dry) | 1 box (approx. 15.25 oz / 432g) |
| Creamy Peanut Butter | 1/2 cup (128g) |
| Large Eggs | 2 |
| Vegetable Oil or Canola Oil | 1/4 cup (60ml) |
| Optional: Granulated Sugar (for rolling) | 1/4 cup |
Step-by-Step Instructions for Perfect Peanut Butter Cookies
Follow these detailed steps, and you’ll be enjoying warm, homemade cookies in no time!
Step 1: Preheat and Prep Your Baking Station
- Preheat your oven: Set your oven to 350°F (175°C). It’s important to preheat your oven fully before putting cookies in, as a consistent temperature ensures even baking.
- Prepare your baking sheet: Line a large baking sheet with parchment paper. This prevents sticking and makes cleanup a breeze. If you don’t have parchment paper, you can lightly grease the baking sheet with cooking spray or a little butter.
Step 2: Combine Your Wet Ingredients
- In a large mixing bowl: Add the creamy peanut butter, large eggs, and vegetable oil.
- Mix thoroughly: Use a whisk or a rubber spatula to mix these ingredients until they are well combined and smooth. It might look a little lumpy at first, but keep stirring until it’s a uniform consistency. This step ensures the wet ingredients are evenly distributed before adding the dry mix.
- Beginner Tip: Scrape down the sides of the bowl with your spatula to make sure everything is incorporated.
Step 3: Add the Cake Mix
- Pour in the dry cake mix: Add the entire box of yellow or vanilla cake mix into the bowl with your wet ingredients.
- Mix until just combined: Using a rubber spatula or a sturdy spoon, mix the ingredients until they are just combined. Be careful not to overmix! Overmixing can develop the gluten in the flour (even though it’s pre-mixed in the cake mix), leading to tougher, less tender cookies. Stop mixing as soon as no dry streaks of cake mix are visible. The dough will be thick and sticky.
- Common Mistake & Fix: If your dough feels too dry or crumbly, it might be an issue with measuring or humidity. Add a tiny bit (1 teaspoon at a time) of milk or water until it comes together, but this is rarely needed for this recipe. If it’s too sticky, try chilling it for 15-20 minutes.
Step 4: Form Your Cookies
- Scoop the dough: Using a cookie scoop (about 1.5-2 tablespoons) or two spoons, scoop out uniform balls of dough. Consistency in size is key for even baking!
- Roll in sugar (optional but recommended): If you want that extra sparkle and a bit of crunch, roll each dough ball in a small bowl of granulated sugar. This is a classic touch for peanut butter cookies.
- Place on baking sheet: Arrange the dough balls on your prepared baking sheet, leaving about 2 inches between each cookie. They will spread a bit as they bake.
Step 5: Create the Classic Criss-Cross Pattern
- Flatten with a fork: Take a dinner fork and gently press down on each cookie dough ball, first in one direction, then again perpendicularly, to create the iconic criss-cross pattern. This isn’t just for looks; it helps to flatten the cookies and encourages even baking.
- Beginner Tip: If the fork sticks to the dough, dip the tines of the fork in a little granulated sugar or flour before pressing.
Step 6: Bake to Golden Perfection
- Bake in the preheated oven: Place the baking sheet in the center rack of your preheated oven.
- Bake for 9-12 minutes: Baking time can vary slightly depending on your oven. Look for the edges of the cookies to be lightly golden brown and the centers to appear set, but still soft. They will firm up more as they cool.
- Doneness Check: If they look shiny in the center, they probably need another minute or two. Don’t overbake, or they’ll be dry!
Step 7: Cool and Enjoy!
- Cool on the baking sheet: Once baked, remove the baking sheet from the oven. Let the cookies cool on the baking sheet for about 5 minutes. This allows them to set and prevents them from breaking when you move them.
- Transfer to a wire rack: After 5 minutes, carefully transfer the cookies to a wire cooling rack to cool completely.
- Serve and enjoy: Once cooled (or still slightly warm!), grab a glass of milk and savor your delicious homemade peanut butter cookies!
Tips & Tricks for Baking Success
Even though this is an easy recipe, a few extra pointers can make your baking experience even better!
- Don’t overmix the dough: This is crucial for tender cookies. Mix just until the ingredients are combined and no dry streaks of cake mix remain. Overmixing develops gluten, leading to tougher cookies.
- Use room temperature eggs: While not strictly necessary for this recipe, room temperature eggs incorporate more easily into the wet ingredients, creating a smoother dough. If you forget, just place them in a bowl of warm water for 5 minutes.
- Consistency is key: Try to make your cookie dough balls the same size. This ensures they bake evenly and you don’t end up with some underbaked and some overbaked cookies. A cookie scoop is a great investment for this!
- Watch your oven: Every oven is a little different. The first time you make these, keep a close eye on them towards the end of the baking time. If the edges are browning too quickly, your oven might run a little hot.
- Storage: Store cooled cookies in an airtight container at room temperature for up to 3-5 days. For longer storage, you can freeze the baked cookies for up to 3 months.
- Get creative with flavors: While yellow or vanilla cake mix is classic, don’t hesitate to experiment! A chocolate cake mix with peanut butter would be amazing, or even a spice cake mix for a unique twist.
- Add chocolate chips: For an extra layer of deliciousness, fold in 1/2 cup of chocolate chips (milk, semi-sweet, or dark) with the cake mix.
Essential Baking Tools for Beginners
Having the right tools makes baking much smoother and more enjoyable. Here are a few basics you’ll want to have on hand:
- Mixing Bowl: A sturdy bowl for combining all your ingredients.
- Whisk: Perfect for thoroughly blending wet ingredients.
- Baking Pan: A reliable sheet for baking your delicious cookies.
- Measuring Cups: Essential for accurate ingredient quantities.
- Spatula: Great for mixing dough and scraping down the sides of the bowl.
- Cookie Scoop: (Highly recommended!) For consistently sized cookies.
- Parchment Paper: For non-stick baking and easy cleanup.
Estimated Nutrition Information
Here’s a general estimate for one cookie (makes about 24 cookies). Please note these are approximate values and can vary based on specific brands of cake mix and peanut butter used.
| Nutrient | Amount (per cookie) |
|---|---|
| Calories | 145-160 kcal |
| Carbohydrates | 15-18g |
| Protein | 3-4g |
| Fat | 8-10g |
| Fiber | 1-2g |
| Sugar | 10-12g |
Frequently Asked Questions (FAQs)
Q1: Can I use any flavor of cake mix?
A1: Absolutely! While yellow or vanilla cake mix provides a classic base that lets the peanut butter shine, you can experiment with chocolate, spice, or even strawberry cake mix for a fun twist. Just ensure it’s a standard 15.25 oz box.
Q2: My dough is too sticky/crumbly. What should I do?
A2: If the dough is too sticky to handle, try chilling it in the refrigerator for 15-20 minutes. This helps firm it up. If it’s too crumbly, it might be due to slightly different ingredient ratios or dry air. Add 1/2 to 1 teaspoon of milk or water at a time until the dough just comes together, mixing minimally.
Q3: Do I have to use a fork to make the criss-cross pattern?
A3: No, it’s not strictly necessary for the cookie to bake, but it’s a traditional aesthetic for peanut butter cookies and helps flatten them slightly for even baking. If you skip it, your cookies might be a bit thicker and puffier.
Q4: How can I tell when the cookies are done baking?
A4: Look for the edges to be lightly golden brown and the centers to appear set but still slightly soft. They will continue to firm up as they cool on the baking sheet. Overbaking will result in dry, crumbly cookies.
Q5: Can I add mix-ins like chocolate chips or nuts?
A5: Yes, absolutely! This recipe is very forgiving. You can fold in about 1/2 cup of chocolate chips, chopped peanuts, or even M&M’s along with the cake mix. It adds extra texture and flavor!
Q6: Can I make these ahead of time?
A6: You can prepare the dough and store it in an airtight container in the refrigerator for up to 2-3 days before baking. Alternatively, you can scoop and flatten the dough balls, then freeze them on a baking sheet. Once frozen solid, transfer them to a freezer-safe bag for up to 1-2 months. Bake from frozen, adding a few extra minutes to the baking time.
You Did It! Your Peanut Butter Cookie Journey Begins Now!
Congratulations, you’ve just unlocked the secret to incredibly easy and delicious homemade cookies! This Peanut Butter Cookie Recipe Made With Cake Mix is truly a testament to how simple baking can be. Whether these are your very first cookies or just a quick fix for a craving, we hope you feel proud of your accomplishment.
Don’t be afraid to experiment, share your creations, and most importantly, enjoy every single bite. Happy baking, and we can’t wait to see what other amazing treats you whip up next!