
Welcome, fellow baking enthusiasts (and future enthusiasts)! Are you ready to fill your home with the most incredible aroma of warm spices and sweet, juicy pears? If you’ve been searching for a delightful and incredibly straightforward treat, your journey ends here. This pear bread recipe is not just another quick bread; it’s a hug in food form, perfect for breakfast, a snack, or even a simple dessert. We’ve designed this recipe to be one of the most easy baking recipes you’ll ever try, making it absolutely perfect for beginners. Forget any intimidation you might feel about baking; we’re here to guide you every step of the way with practical baking tips for beginners that will ensure your success. Get ready to bake something truly special!
Gather Your Ingredients for This Delicious Pear Bread
Before we dive into the fun part, let’s make sure you have all your culinary comrades ready to go. Using good quality, fresh ingredients will always yield the best results!
| Ingredient | Quantity | Unit |
|---|---|---|
| All-Purpose Flour | 1 ¾ | cups |
| Granulated Sugar | ¾ | cup |
| Baking Powder | 1 ½ | teaspoons |
| Ground Cinnamon | 1 | teaspoon |
| Ground Nutmeg | ¼ | teaspoon |
| Salt | ½ | teaspoon |
| Large Eggs | 2 | |
| Vegetable Oil (or melted unsalted butter) | ½ | cup |
| Milk (any kind) | ½ | cup |
| Vanilla Extract | 1 | teaspoon |
| Ripe Pears, peeled, cored, and diced | 1 ½ | cups |
| Optional: Chopped Walnuts or Pecans | ½ | cup |
Step-by-Step Baking Adventure: Your Pear Bread Journey!
Don’t be shy! Follow these simple steps, and you’ll be pulling a golden-brown loaf of deliciousness out of your oven in no time. Remember, baking is a science, but it’s also a lot of fun!

Step 1: Get Ready to Bake (Preheat & Prep!)
- First things first, let’s get that oven ready! Preheat your oven to 350°F (175°C). This ensures an even bake from the moment your bread goes in.
- Next, prepare your loaf pan. Take a standard 9×5-inch (23×13 cm) loaf pan. You’ll want to either grease it thoroughly with butter or cooking spray and then dust lightly with flour, or line it with parchment paper, leaving an overhang on the long sides. The parchment paper method makes it super easy to lift the bread out later!
- Beginner Tip: A well-prepped pan prevents your bread from sticking, which is a common frustration for new bakers. Don’t skip this step!
Step 2: Mix the Dry Ingredients
- In a large mixing bowl, combine your all-purpose flour, granulated sugar, baking powder, ground cinnamon, ground nutmeg, and salt.
- Use a whisk to thoroughly combine these dry ingredients. Whisking not only mixes them but also helps to aerate the flour, which contributes to a lighter, fluffier texture in your finished bread.
- Beginner Tip: Ensure there are no lumps of baking powder or clumps of sugar. A good whisking now means better distribution later!
Step 3: Combine the Wet Ingredients
- In a separate, medium-sized bowl, crack your two large eggs. Give them a quick whisk.
- Now, add the vegetable oil (or your melted unsalted butter if you chose that option), milk, and vanilla extract to the eggs. Whisk everything together until it’s well combined and looks uniform.
- Beginner Tip: Using room temperature eggs and milk helps them combine more smoothly with other ingredients, leading to a more consistent batter. If your ingredients are cold, you can warm the milk slightly in the microwave (don’t make it hot!) and let the eggs sit in warm water for a few minutes.
Step 4: Marry the Wet and Dry (Gently!)
- Pour the wet ingredient mixture into the bowl with your dry ingredients.
- Using a spatula or a wooden spoon, gently fold the wet into the dry. The key word here is **gently**. Mix only until the flour streaks have *just* disappeared. A few small lumps are perfectly fine and even desirable!
- Common Mistake & Beginner Tip: **Do NOT overmix!** Overmixing develops the gluten in the flour too much, which can lead to a tough, dense, and chewy bread instead of a moist, tender one. Once you see no more dry flour, stop mixing.
Step 5: Fold in the Pears (and Optional Goodies!)
- Now for the star of the show! Gently fold in your diced pears. Make sure they are evenly distributed throughout the batter.
- If you’re using the optional chopped walnuts or pecans, fold those in now too. You could also add chocolate chips for an extra decadent touch!
- Beginner Tip: To prevent the pears from sinking to the bottom, pear bread recipe you can lightly toss them in a tablespoon of the dry flour mixture before adding them to the batter. This creates a light coating that helps them suspend more evenly .
Step 6: Bake Your Masterpiece
- Pour the batter into your prepared loaf pan. Use your spatula to spread it evenly.
- Place the pan in the preheated oven on the middle rack.
- Bake for approximately 50-60 minutes.
- How to Check for Doneness: The bread is ready when a wooden skewer, toothpick, or thin knife inserted into the center comes out clean or with only moist crumbs attached (no wet batter). The top should be golden brown and spring back lightly when touched.
- Beginner Tip: Avoid opening the oven door too frequently, especially in the first 30-40 minutes, as this can cause the bread to sink in the middle. If the top starts to brown too quickly, you can loosely tent it with aluminum foil for the remaining baking time.
Step 7: Cool Down and Enjoy!
- Once baked, remove the loaf pan from the oven and place it on a wire rack. Let the bread cool in the pan for about 10-15 minutes. This allows it to set up and makes it easier to remove.
- After 10-15 minutes, carefully lift the bread out of the pan (using the parchment paper overhang if you used it, or gently loosening the sides) and place it directly on the wire rack to cool completely.
- Why Cool Completely? Slicing hot quick bread can make it crumbly and seem underbaked. Cooling allows the internal structure to firm up and the flavors to fully develop. Plus, it’s easier to slice!
- Once cool enough to handle, slice, serve, and savor your incredible homemade pear bread!
Pear Bread Perfection: Expert Tips & Tricks for Beginners
Baking is an art and a science, and a few clever tricks can elevate your results from good to absolutely amazing! Here are some actionable tips to ensure your pear bread is a resounding success every time.
- Embrace Room Temperature Ingredients: This is a golden rule for many baking recipes, and our pear bread is no exception. Eggs and milk at room temperature emulsify better, creating a smoother, more uniform batter. This leads to a lighter, more tender crumb. Plan ahead and take them out of the fridge about 30 minutes before you start.
- Measure Flour Accurately: The “spoon and level” method is your best friend. Don’t scoop flour directly with your measuring cup, as this can compact it and lead to using too much flour (which means dry, dense bread!). Instead, spoon flour into your measuring cup until it overflows, then use the back of a knife or a straight edge to level it off.
- Don’t Overmix! (It Bears Repeating): We mentioned this in the instructions, but it’s crucial. Overmixing develops gluten, leading to a tough, rubbery texture. Mix *just* until the dry ingredients are incorporated. Lumps are okay!
- Choose the Right Pears: For this recipe, aim for ripe but firm pears. Varieties like Bartlett, Anjou, or Bosc work wonderfully. If they’re too soft, they can turn mushy during baking. If they’re too hard, they won’t soften enough.
- Enhance Flavor with Zest: For an extra burst of fresh flavor, consider adding 1 teaspoon of orange or lemon zest to your wet ingredients. Citrus zest brightens the pear and spice notes beautifully.
- Storage Secrets: Once completely cooled, store your pear bread in an airtight container at room temperature for up to 3-4 days. For longer storage, wrap individual slices or the whole loaf tightly in plastic wrap, then aluminum foil, and freeze for up to 3 months. Thaw at room temperature.
- Customize Your Loaf: Feel free to experiment! pear bread recipe Add a handful of mini chocolate chips, a sprinkle of ginger, or even a different type of nut. The base recipe is versatile, so make it your own!
Essential Baking Tools for Your Pear Bread Adventure
Having the right tools makes all the difference, especially when you’re starting out. Here are a few basics that will make your baking experience smooth and enjoyable:
- Mixing Bowl (a set of various sizes is very useful!)
- Whisk (for combining dry ingredients and wet ingredients)
- Baking Pan (specifically a 9×5-inch loaf pan)
- Measuring Cups (for flour, sugar, liquids)
- Measuring Spoons (for baking powder, spices, salt, vanilla)
- Spatula (for folding ingredients and scraping bowls)
- Wire Rack (for cooling your bread evenly)
- Parchment Paper (optional, but highly recommended for easy removal)
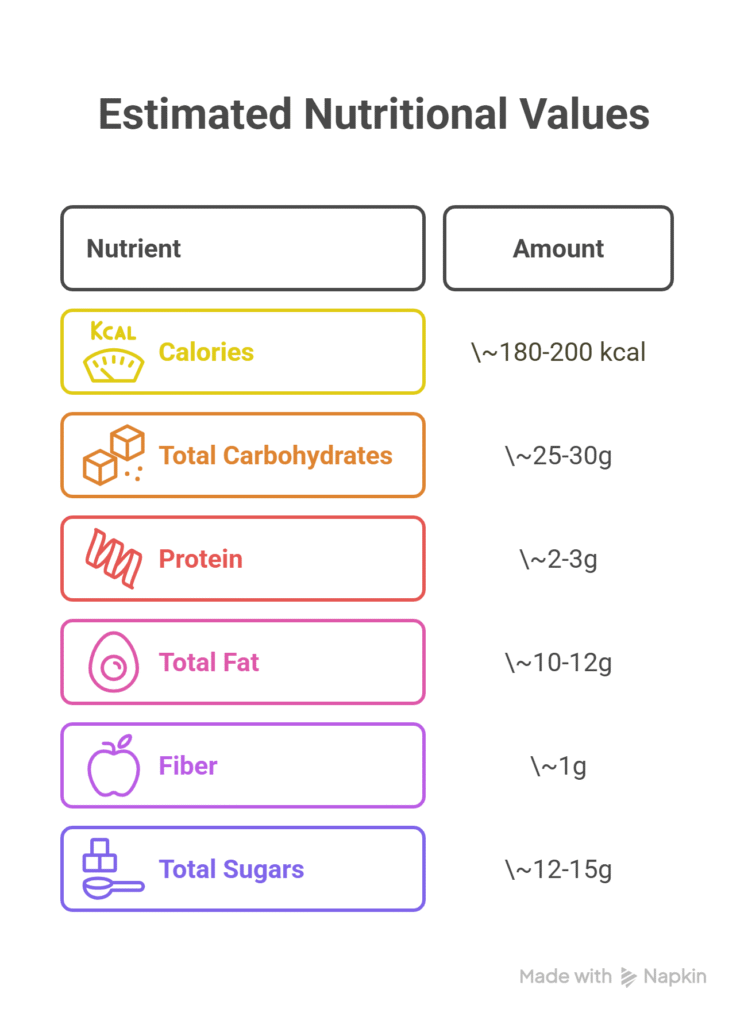
Nutrition Information (Estimated per slice)
Here’s an estimated nutritional breakdown for a single slice of this delicious pear bread (assuming 12 slices per loaf). Please remember these are estimates and can vary based on exact ingredients and portion sizes pear bread recipe .
| Nutrient | Amount |
|---|---|
| Calories | 220 kcal |
| Carbohydrates | 35 g |
| Protein | 4 g |
| Fat | 8 g |
| Fiber |
3 thoughts on “pear bread recipe – Perfect Treats”