
Are you ready to dive into the delightful world of baking with a recipe that’s as charming as it is delicious? Look no further than our incredible Pineapple Cakes Recipe ! These delightful, bite-sized pastries, often celebrated as Taiwanese Pineapple Tarts, feature a buttery, crumbly shortbread crust encasing a sweet and tangy pineapple filling. They’re a true taste of sunshine, perfect for gifting, sharing, or simply treating yourself.
We know that starting out can feel a little daunting, which is why we’ve designed this as one of the most Pineapple Cakes Recipe you’ll find, complete with comprehensive Pineapple Cakes Recipe. Forget complicated techniques; we’ll guide you through each step with clear instructions, helpful hints, and common troubleshooting advice. By the end of this post, you’ll not only have a batch of exquisite pineapple cakes but also a boost of confidence in your baking skills. Let’s get baking!
Ingredients List
Gathering your ingredients is the first step to success. Make sure everything is measured accurately for the best results!
For the Pineapple Filling:
| Ingredient | Quantity | Unit |
|---|---|---|
| Canned Crushed Pineapple (in juice) | 20 | ounces (approx. 560g) |
| Granulated Sugar | 1/2 | cup (100g) |
| Lemon Juice (freshly squeezed) | 1 | tablespoon |
| Unsalted Butter | 1 | tablespoon |
For the Shortbread Dough:
| Ingredient | Quantity | Unit |
|---|---|---|
| All-Purpose Flour | 1 3/4 | cups (210g) |
| Powdered Sugar (Confectioners’ Sugar) | 1/2 | cup (60g) |
| Milk Powder (optional, for richer flavor) | 2 | tablespoons |
| Unsalted Butter, softened | 1 | cup (226g) |
| Large Egg Yolk | 1 | |
| Vanilla Extract | 1/2 | teaspoon |
| Pinch of Salt | 1/4 | teaspoon |
Step-by-Step Instructions: Bake Your Perfect Pineapple Cakes
Follow these detailed steps carefully, and you’ll be enjoying homemade pineapple cakes in no time!
Step 1: Preparing the Pineapple Filling (The Heart of Your Cake!)
- Drain the Pineapple Thoroughly: Open your can of crushed pineapple. Place the pineapple in a fine-mesh sieve set over a bowl. Press down firmly on the pineapple with the back of a spoon to extract as much juice as possible. This step is crucial! Excess moisture will make your filling too wet and can lead to a soggy pastry. Let it drain for at least 15-20 minutes, pressing occasionally.
- Cook the Filling: Transfer the drained pineapple to a non-stick saucepan. Add the granulated sugar and lemon juice. Cook over medium-low heat, stirring frequently. As it heats, the pineapple will release more liquid, then slowly start to thicken.
- Reduce and Thicken: Continue to cook, stirring constantly, for about 20-30 minutes, or until the mixture becomes very thick and jam-like. When you drag a spoon through the mixture, it should leave a clear path that fills slowly. The goal is a firm, spreadable consistency. Towards the end, stir in the tablespoon of butter until melted and fully incorporated.
- Cool Completely: Transfer the cooked pineapple filling to a shallow dish. Spread it out to help it cool faster. Cover with plastic wrap and let it cool completely to room temperature, then chill in the refrigerator for at least 1 hour (or overnight). This firming-up step is essential for easy handling when assembling your cakes.
Step 2: Making the Buttery Shortbread Dough (Your Golden Wrapper!)
- Prepare Your Butter: Ensure your unsalted butter is at room temperature. This means it should be soft enough to indent easily with your finger but not melted or greasy. If it’s too cold, it won’t cream properly; if too warm, your dough will be oily.
- Cream Butter and Sugar: In a large mixing bowl, using an electric mixer (handheld or stand mixer with paddle attachment), beat the softened butter and powdered sugar together on medium speed until light and fluffy. This usually takes about 3-5 minutes. Scrape down the sides of the bowl as needed. This step incorporates air, making your shortbread tender.
- Add Wet Ingredients: Add the egg yolk and vanilla extract to the creamed butter mixture. Beat again until well combined, scraping the bowl. The mixture might look a little curdled at first, but keep mixing until it’s smooth.
- Combine Dry Ingredients: In a separate bowl, whisk together the all-purpose flour, milk powder (if using), and salt. Whisking ensures all ingredients are evenly distributed.
- Add Dry to Wet: Gradually add the dry ingredient mixture to the wet mixture, mixing on low speed until just combined. Do not overmix! Overmixing develops gluten in the flour, which will make your shortbread tough instead of tender and crumbly. Stop mixing as soon as no streaks of flour are visible. The dough will be soft but shouldn’t be sticky.
- Chill the Dough: Gather the dough into a ball, flatten it slightly into a disc, wrap it tightly in plastic wrap, and refrigerate for at least 30 minutes to 1 hour. Chilling makes the dough much easier to handle and prevents it from spreading too much during baking.
Step 3: Assembling the Pineapple Cakes (The Art of Wrapping!)
- Prepare for Assembly: Take the chilled pineapple filling and dough out of the refrigerator. Line a baking sheet with parchment paper. If you have pineapple cake molds (small square or rectangular molds), have them ready.
- Portion the Filling: Using a kitchen scale for accuracy (highly recommended for beginners!), divide the chilled pineapple filling into equal portions. For standard pineapple cakes, aim for about 15-20 grams (about 0.5-0.7 ounces) per portion. Roll each portion into a small ball.
- Portion the Dough: Similarly, divide the chilled shortbread dough into equal portions. Each dough portion should be slightly larger than the filling, about 20-25 grams (0.7-0.9 ounces). Rolling them into small balls can help.
- Wrap the Filling: Take one portion of dough and flatten it into a disc (about 2.5-3 inches in diameter) in the palm of your hand. Place one ball of pineapple filling in the center of the dough disc. Carefully bring the edges of the dough up and around the filling, pinching them together at the top to completely seal the filling inside. Ensure there are no cracks or openings, as the filling could leak out during baking.
- Shape the Cakes:
- Using Molds: Gently press the wrapped dough ball into your pineapple cake mold. Press firmly but carefully to fill the corners and flatten the top, ensuring it’s evenly distributed. Remove from the mold (they usually pop out easily due to the butter content) and place on the prepared baking sheet.
- Without Molds: Gently shape the wrapped dough ball into a small square or rectangular block by hand. You can gently pat and flatten the sides against a clean surface to get a neater shape. Place on the prepared baking sheet.
- Repeat: Continue this process with the remaining dough and filling until all your pineapple cakes are assembled.
Step 4: Baking Your Golden Pineapple Cakes (The Grand Finale!)
- Preheat Oven: Preheat your oven to 340°F (170°C).
- Bake: Place the baking sheet with your assembled pineapple cakes into the preheated oven. Bake for 15-20 minutes, or until the cakes are lightly golden brown on top and around the edges. The exact time can vary depending on your oven and the size of your cakes.
- Cool Completely: Once baked, remove the baking sheet from the oven. Let the pineapple cakes cool on the baking sheet for about 5-10 minutes before carefully transferring them to a wire rack to cool completely. Do not try to handle them when hot, as they will be very fragile and can crumble easily. They firm up beautifully as they cool.
Congratulations! You’ve just made your very own delicious pineapple cakes!
Tips & Tricks for Beginner Bakers
Baking is an art and a science, and a few simple tricks can make all the difference, especially when you’re just starting out!
- Room Temperature Butter is Key: For the shortbread dough, ensure your butter is genuinely at room temperature. This allows it to cream properly with sugar, incorporating air for a light and tender texture. If it’s too cold, it won’t cream; if too warm, it can make the dough greasy.
- Don’t Overmix the Dough: This is a golden rule for shortbread. Once you add the flour, mix only until just combined. Overmixing develops gluten, which leads to a tough, chewy crust instead of the desired melt-in-your-mouth crumbly texture.
- Chill Your Dough (and Filling!): Chilling the dough makes it much easier to handle, preventing it from becoming too sticky or soft. A well-chilled filling is also crucial for easy portioning and wrapping. Don’t skip these steps!
- Use a Kitchen Scale: For consistent results, especially for portioning the dough and filling, a kitchen scale is your best friend. It ensures all your cakes are uniform in size, leading to even baking and a professional look.
- Seal the Filling Securely: When wrapping the filling, take extra care to pinch the dough seams together firmly. Any small gaps can cause the pineapple filling to leak out during baking, which affects both the appearance and texture.
- Don’t Overbake: Pineapple cakes are best when they are just lightly golden. Overbaking can dry them out and make them hard. Keep an eye on them, as oven temperatures can vary.
- Cool Completely Before Handling: Freshly baked shortbread is delicate. Let your pineapple cakes cool on the baking sheet for a few minutes before transferring them to a wire rack. They will firm up considerably as they cool.
- Storage: Once completely cooled, store your pineapple cakes in an airtight container at room temperature for up to a week. They often taste even better the next day as the flavors meld!
Essential Baking Tools
Having the right tools makes baking a breeze. Here are some essentials you’ll need for this recipe:
- Mixing Bowl
- Whisk
- Baking Pan
- Measuring Cups
- Spatula
- Electric Mixer (handheld or stand mixer)
- Fine-Mesh Sieve
- Kitchen Scale (highly recommended!)
- Parchment Paper
- Wire Cooling Rack
- Pineapple Cake Molds (optional, but great for shaping)
Nutrition Information (per serving, estimated for 20 cakes)
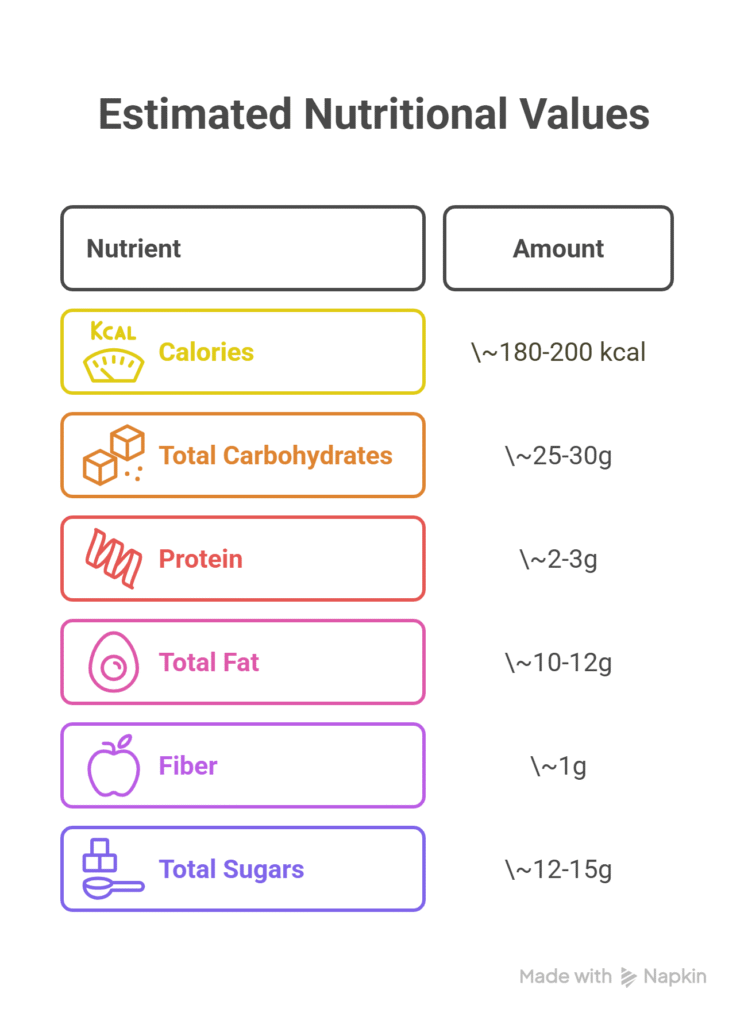
Please note: These are estimated values and can vary based on exact ingredient brands and portion sizes.
| Nutrient | Amount |
|---|---|
| Calories | ~180-200 kcal |
| Total Carbohydrates | ~25-30g |
| Protein | ~2-3g |
| Total Fat | ~10-12g |
| Fiber | ~1g |
| Total Sugars | ~12-15g |
Frequently Asked Questions for Beginner Bakers
Q1: Can I use fresh pineapple instead of canned?
A: Yes, you can! However, fresh pineapple contains an enzyme (bromelain) that can prevent gelling and even break down dairy proteins, potentially affecting your dough. You’ll need to cook fresh pineapple for longer to deactivate this enzyme and reduce the moisture content significantly. It’s often easier for beginners to start with canned, Pineapple Cakes Recipe.
Q2: My dough is too crumbly/too sticky, what went wrong?
A: If your dough is too crumbly, it might be due to too much flour, not enough butter/egg yolk, or the butter wasn’t soft enough. Try adding a tiny bit more egg yolk or a teaspoon of cold water/milk, one at a time, until it comes together. If it’s too sticky, it could be too much butter (especially if it was too warm) or not enough flour. Try chilling it for longer, or add a tablespoon of flour at a time until it’s manageable. Remember, a little adjustment can go a long way!
Q3: How do I prevent the pineapple filling from leaking out during baking?
A: The key is a well-drained and well-cooked filling (very thick!). Also, ensure you completely seal the dough around the filling, pinching all seams together firmly. Double-check for any small cracks in the dough before baking. Overfilling can also cause leakage, so stick to the recommended filling portion size.
Q4: Can I make the filling or dough ahead of time?
A: Absolutely! The pineapple filling can be made up to 3-4 days in advance and stored in an airtight container in the refrigerator. The dough can also be made 2-3 days ahead, wrapped tightly in plastic wrap, and stored in the fridge. Just let the dough come to room temperature for about 15-20 minutes (or until pliable) before attempting to roll and wrap.
Q5: What if I don’t have pineapple cake molds?
A: No worries at all! You can easily shape them by hand. After wrapping the filling, gently pat and shape the dough into small squares, rectangles, or even round cakes. You can use a small, clean, flat surface to help press the sides evenly. They might not be perfectly uniform, but they’ll taste just as delicious!
Your Delicious Journey Has Just Begun!
And there you have it – a complete guide to baking your very own batch of irresistible Pineapple Cakes Recipe! We hope you found these instructions and baking tips for beginners helpful and empowering. There’s truly nothing quite like the aroma of homemade pastries filling your kitchen, and the satisfaction of creating something so delicious from scratch.
Don’t be afraid to experiment and make this recipe your own. Baking is a journey of discovery, and every attempt is a step closer to perfection. Share your creations with loved ones, or simply enjoy them with a cup of tea or coffee. We’re confident that you’ll fall in love with this easy baking recipes and continue to explore the wonderful world of baking. Happy baking, and enjoy every delightful bite!