Welcome, fellow baking enthusiasts and kitchen novices! Are you ready to dive into the wonderfully comforting world of homemade bread? Today, we’re not just making any bread; we’re crafting a delightful and surprisingly simple loaf that’s bursting with flavor and moisture. Get ready to fall in love with our Prune Bread Recipe! This isn’t just one of those easy baking recipes; it’s a gateway to understanding fundamental baking tips for beginners while creating something truly special.
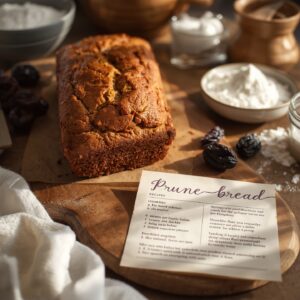
Forget any preconceived notions about prunes – in this bread, they transform into tender, sweet pockets of deliciousness that give the loaf an incredible texture and depth. Perfect for breakfast, a snack, or even dessert, this prune bread is so straightforward, you’ll wonder why you haven’t tried it sooner!
Ingredients List
Gather your ingredients! Using good quality components is the first step to a successful bake. Make sure your eggs and buttermilk are at room temperature for the best results!
| Ingredient | Quantity | Unit |
|---|---|---|
| All-purpose flour | 2 | cups |
| Granulated sugar | 1 | cup |
| Baking soda | 1 | tsp |
| Salt | 1/2 | tsp |
| Ground cinnamon | 1 | tsp |
| Ground nutmeg | 1/2 | tsp |
| Large eggs (room temperature) | 2 | |
| Vegetable oil (or melted unsalted butter) | 1/2 | cup |
| Buttermilk (room temperature) | 1/2 | cup |
| Vanilla extract | 1 | tsp |
| Pitted prunes, roughly chopped | 1 | cup |
| Chopped walnuts or pecans (optional) | 1/2 | cup |
Step-by-Step Instructions
Follow these detailed steps carefully, and you’ll have a perfect loaf of prune bread in no time. Don’t rush, and enjoy the process!
Step 1: Preheat and Prepare Your Pan
- Preheat your oven to 350°F (175°C). This ensures the oven is at a consistent temperature when your bread goes in, which is crucial for even baking.
- Grease and flour a 9×5 inch loaf pan. You can do this by rubbing a thin layer of butter or shortening all over the inside of the pan, then adding a tablespoon of flour and shaking it around until the entire surface is coated. Tap out any excess flour. Alternatively, line the pan with parchment paper, leaving an overhang on the sides for easy lifting. This prevents sticking and makes removal a breeze, especially for beginners!
Step 2: Combine Dry Ingredients
- In a large mixing bowl, whisk together the all-purpose flour, granulated sugar, baking soda, salt, ground cinnamon, and ground nutmeg.
- Beginner Tip: Whisking dry ingredients ensures they are evenly distributed, so you don’t end up with pockets of salt or baking soda in your bread. It’s like a mini-sifting process!
Step 3: Mix Wet Ingredients
- In a separate medium bowl, whisk together the room temperature eggs, vegetable oil (or melted butter), room temperature buttermilk, and vanilla extract until well combined.
- Why room temperature? Room temperature ingredients emulsify (mix smoothly) better, creating a more uniform batter and a finer crumb in your finished bread.
- Beginner Alternative: No Buttermilk? No Problem! If you don’t have buttermilk, you can easily make your own. Add 1/2 tablespoon of lemon juice or white vinegar to a 1/2 cup measuring cup, then fill the rest of the cup with regular milk. Let it sit for 5-10 minutes until it slightly curdles. Voila – homemade buttermilk!
Step 4: Combine Wet and Dry Mixtures
- Pour the wet ingredient mixture into the bowl with the dry ingredients.
- Using a spatula or a wooden spoon, gently mix the ingredients together until they are just combined.
- Crucial Beginner Tip: Do NOT overmix! Overmixing develops the gluten in the flour too much, which can lead to a tough, dense, and chewy bread instead of a soft, tender one. A few lumps are perfectly fine and even desirable! Stop mixing as soon as you no longer see streaks of dry flour.
Step 5: Fold in Prunes and Optional Nuts
- Add the chopped prunes and optional chopped walnuts or pecans to the batter.
- Gently fold them into the batter until evenly distributed.
- Beginner Trick for Even Distribution: If you find your fruit and nuts often sink to the bottom of your baked goods, try tossing them lightly with a tablespoon of flour from your measured dry ingredients *before* adding them to the batter. This light coating helps them suspend more evenly.
Step 6: Bake Your Bread
- Pour the batter into your prepared loaf pan, spreading it evenly.
- Bake for 50-60 minutes, or until a wooden skewer or toothpick inserted into the center of the loaf comes out clean (or with a few moist crumbs, but no wet batter).
- Beginner’s Watch Out: Baking times can vary depending on your oven. Start checking around the 45-minute mark. If the top is browning too quickly, you can loosely tent the loaf with aluminum foil for the remaining baking time.
- Common Mistake & Fix: If your bread sinks in the middle, it might be underbaked. Next time, extend the baking time slightly. If it’s too dry, you might have overbaked it – keep a closer eye on the toothpick test!
Step 7: Cool and Serve
- Once baked, remove the loaf pan from the oven and let the bread cool in the pan for 10-15 minutes. This allows the bread to firm up and prevents it from falling apart when you remove it.
- After 10-15 minutes, carefully invert the pan onto a wire cooling rack, lift the pan, and then turn the bread right-side up to cool completely.
- Why a wire rack? Cooling on a wire rack allows air to circulate all around the bread, preventing the bottom from becoming soggy from condensation.
- Slice and enjoy! This prune bread is delicious on its own, with a smear of butter, cream cheese, or a drizzle of honey.
Tips & Tricks for Perfect Prune Bread
Baking is an art and a science, and these little nuggets of wisdom will help you master this Prune Bread Recipe and many others!
- Measure Accurately: Especially with flour, don’t scoop directly from the bag. Instead, spoon the flour into your measuring cup and then level it off with the back of a knife. This prevents compacting the flour, which can lead to too much flour and a dry loaf.
- Don’t Be Afraid to Soak Prunes: If your prunes seem a bit dry, or you want extra moisture, you can soak them in hot water (or even warm tea/brandy for an adult twist) for 10-15 minutes before chopping. Drain them well before adding to the batter.
- Customize Your Spices: While cinnamon and nutmeg are classics, feel free to experiment with a pinch of allspice, cloves, or ginger for a different flavor profile.
- Storage Secrets: Once completely cooled, store your prune bread in an airtight container at room temperature for up to 3-4 days. For longer storage, slice the bread and freeze individual slices in freezer-safe bags or containers for up to 2-3 months. Thaw at room temperature or gently toast from frozen.
- Add a Glaze: For an extra touch of sweetness, whisk together 1 cup of powdered sugar with 2-3 tablespoons of milk or orange juice until smooth. Drizzle over the cooled bread.
- Check Your Oven Calibration: If your baked goods consistently turn out too dark or too light, your oven temperature might be off. An inexpensive oven thermometer can help you verify its accuracy.
Essential Baking Tools
Having the right tools makes all the difference in your baking journey!
- Mixing Bowl
- Whisk
- Baking Pan (specifically a 9×5 inch loaf pan)
- Measuring Cups
- Spatula (a rubber spatula is great for folding and scraping)
- Wire Cooling Rack
- Measuring Spoons
Nutrition Info (Estimated per slice)
Here’s an estimated nutritional breakdown for one slice of Prune Bread (assuming 12 slices per loaf). Please note these are approximate values and can vary based on exact ingredients and portion sizes.
| Nutrient | Amount (per slice) |
|---|---|
| Calories | 280 kcal |
| Carbohydrates | 45g |
| Protein | 4g |
| Fat | 10g |
| Fiber | 3g |
| Sugar | 25g |
Frequently Asked Questions (FAQs)
1. Can I use fresh plums instead of prunes?
While prunes are dried plums, using fresh plums in this recipe might change the texture and moisture content significantly. Fresh plums contain much more water, which could result in a soggy bread. If you want to use fresh plums, you’d likely need to reduce the other liquid ingredients and potentially increase the flour, which would require recipe adjustments beyond a simple swap.
2. What if my prune bread sinks in the middle?
This is a common issue for beginners! It usually means the bread was either underbaked (not cooked through enough in the center), or the batter was overmixed, causing the gluten to be too developed and then collapse. Ensure your oven temperature is accurate, check for doneness with a toothpick, and remember to mix the batter until “just combined.”
3. How do I know when the bread is perfectly baked?
The best way is the toothpick test. Insert a wooden skewer or toothpick into the very center of the loaf. If it comes out clean or with only a few moist crumbs attached, your bread is done. If it has wet batter, it needs more time. The top should also be golden brown, and the edges should start to pull away slightly from the pan.
4. How long does prune bread stay fresh?
Once cooled completely, store your prune bread in an airtight container at room temperature for up to 3-4 days. For longer freshness, you can wrap it tightly and refrigerate it for up to a week, or freeze individual slices for up to 2-3 months. Thaw at room temperature or toast directly from frozen for a quick treat!
5. Can I add other ingredients to this recipe?
Absolutely! This recipe is very forgiving. Feel free to add other dried fruits like raisins or dried cranberries (up to 1/2 cup), or experiment with different nuts. A tablespoon of orange zest would also be a fantastic addition to complement the prunes and spices.
Conclusion
And there you have it – a truly delicious and surprisingly simple Prune Bread Recipe that’s perfect for any time of day! We hope this detailed guide has given you the confidence and the baking tips for beginners you need to create a masterpiece in your own kitchen. Baking doesn’t have to be intimidating; it’s a rewarding process that yields incredible results, especially when you start with easy baking recipes like this one. So go ahead, preheat your oven, gather your ingredients, and get ready to impress yourself and your loved ones with this wonderfully moist and flavorful prune bread. Don’t forget to share your creations with us – happy baking!