We’ll walk you through every step, providing essential baking tips for beginners to ensure your first (or fiftieth!) Baklava Cake is a resounding success. Forget the fear of complicated layers; we’re making this accessible, fun, and utterly delicious. Get ready for a moist, fragrant, and incredibly satisfying treat that will have everyone asking for more!
Ingredients List
Gather your ingredients before you start – this is a golden rule in baking that makes the process much smoother!
For the Baklava Cake Batter:
| Quantity | Unit | Ingredient |
|---|---|---|
| 1 ½ | cups | All-purpose flour (180g) |
| ½ | cup | Fine semolina (90g) |
| 1 | cup | Granulated sugar (200g) |
| 3 | large | Eggs |
| 1 | cup | Whole milk (240ml, or buttermilk/plain yogurt for a tangier cake) |
| ½ | cup | Vegetable oil (120ml, or melted unsalted butter for richer flavor) |
| 2 | teaspoons | Baking powder |
| 1 | teaspoon | Vanilla extract |
| Pinch | Salt |
For the Nut Topping:
| Quantity | Unit | Ingredient |
|---|---|---|
| 1 | cup | Chopped walnuts (100g, or pistachios/almonds/a mix) |
| 2 | tablespoons | Granulated sugar |
| 1 | teaspoon | Ground cinnamon |
For the Sweet Syrup:
| Quantity | Unit | Ingredient |
|---|---|---|
| 1 ½ | cups | Granulated sugar (300g) |
| 1 ½ | cups | Water (360ml) |
| 1 | tablespoon | Freshly squeezed lemon juice (prevents crystallization) |
| 1 | teaspoon | Orange blossom water (optional, but highly recommended for authentic flavor) |
Step-by-Step Instructions: Baking Your Baklava Cake
Follow these detailed steps carefully, and you’ll be enjoying your homemade Baklava Cake in no time!
Step 1: Prepare the Sweet Syrup (Crucial First Step!)
- In a medium saucepan, combine the 1 ½ cups granulated sugar and 1 ½ cups water.
- Place the saucepan over medium-high heat and bring the mixture to a boil, stirring occasionally until the sugar completely dissolves.
- Once boiling, reduce the heat to low and let it gently simmer for 5-7 minutes. Beginner Tip: Do NOT stir the syrup once it’s boiling to prevent crystallization.
- Remove the saucepan from the heat. Stir in the lemon juice and the orange blossom water (if using). The lemon juice is important as it helps prevent the syrup from crystallizing as it cools.
- Pour the hot syrup into a heatproof bowl and set it aside to cool completely. This is a critical step! The syrup must be completely cool when you pour it over the hot cake. You can even make this a day ahead and store it in the fridge.
Step 2: Preheat Oven and Prepare Your Baking Pan
- Preheat your oven to 350°F (175°C).
- Lightly grease and flour a 9×13 inch baking pan. You can use butter or cooking spray for greasing, then dust with a spoonful of flour, tapping out any excess. This ensures your cake won’t stick! Beginner Tip: Don’t skip this step, especially for moist cakes like this one.
Step 3: Mix the Dry Ingredients for the Cake
- In a large mixing bowl, whisk together the all-purpose flour, fine semolina, 1 cup granulated sugar, baking powder, and a pinch of salt.
- Beginner Tip: Whisking dry ingredients thoroughly ensures that the baking powder and salt are evenly distributed throughout the batter, leading to a perfectly risen and consistently flavored cake.
Step 4: Mix the Wet Ingredients for the Cake
- In a separate medium bowl, whisk together the eggs, whole milk (or buttermilk/yogurt), vegetable oil (or melted butter), and vanilla extract until they are well combined and smooth.
Step 5: Combine Wet and Dry Ingredients
- Pour the wet ingredients mixture into the bowl with the dry ingredients.
- Using a whisk or a rubber spatula, mix until just combined. Beginner Tip: This is arguably the most important tip for a tender cake: DO NOT OVERMIX! Overmixing develops gluten in the flour, which can lead to a tough, dense cake. A few small lumps in the batter are perfectly normal and preferred over overmixing.
Step 6: Prepare the Nut Topping
- In a small bowl, combine the chopped walnuts (or your chosen nuts), 2 tablespoons granulated sugar, and ground cinnamon. Stir well to coat the nuts evenly.
Step 7: Assemble and Bake Your Baklava Cake
- Pour approximately half of the cake batter into your prepared 9×13 inch baking pan, spreading it evenly with your spatula.
- Sprinkle half of the prepared nut mixture evenly over the batter.
- Carefully spoon the remaining cake batter over the nuts, gently spreading it to cover as much of the nut layer as possible without disturbing it too much.
- Finally, sprinkle the remaining nut mixture evenly over the top layer of batter.
- Place the baking pan in your preheated oven. Bake for 35-45 minutes, or until a wooden skewer or toothpick inserted into the center of the cake comes out clean with no wet batter attached. Beginner Tip: Ovens can vary, so start checking for doneness around the 35-minute mark. If the top is browning too quickly, you can loosely tent the cake with aluminum foil for the last 10-15 minutes of baking.
Step 8: The Magical Syrup Drizzle!
- As soon as you remove the hot cake from the oven, immediately and slowly pour the completely cool syrup evenly over the entire surface of the cake. You should hear a satisfying sizzle as the hot cake absorbs the cool liquid – this is exactly what you want! Beginner Tip: The temperature contrast (hot cake, cool syrup) is essential for the cake to absorb the syrup properly without becoming soggy or gummy.
- Let the cake sit undisturbed to absorb all the syrup completely. This will take at least 1-2 hours, but for the best flavor and texture, letting it sit overnight is highly recommended. The longer it sits, the more moist and flavorful it becomes.
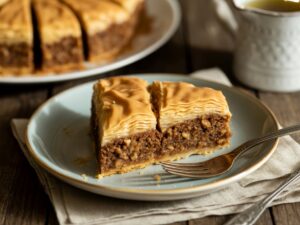
Step 9: Slice and Serve Your Masterpiece!
- Once the cake has fully absorbed the syrup and cooled to room temperature, slice it into squares or diamonds.
- Serve plain, or garnish with a sprinkle of extra chopped pistachios or a dollop of whipped cream for an extra touch of indulgence. Enjoy your magnificent homemade Baklava Cake!
Tips & Tricks for Baklava Cake Success
Baking can be an art, but with a few extra pointers, your Baklava Cake will be a masterpiece every time:
- Syrup Temperature is Non-Negotiable: We can’t stress this enough! The syrup must be cool when it meets the hot cake. This temperature difference allows the cake to soak up the syrup effectively without breaking down its structure, resulting in a perfectly moist and tender crumb.
- Don’t Overmix the Batter: As mentioned in the instructions, mixing cake batter too much develops gluten, leading to a tough, chewy cake. Mix only until the ingredients are just combined. A few lumps are okay!
- Experiment with Nuts: While walnuts are traditional, feel free to use pistachios, almonds, pecans, or a delightful mix. For an extra boost of flavor, lightly toast your nuts in a dry pan or on a baking sheet for 5-7 minutes before chopping.
- Make Ahead for Best Flavor: This Baklava Cake is one of those rare desserts that actually tastes better the next day! The flavors meld and the cake becomes even more moist as it continues to absorb the syrup. It’s a fantastic make-ahead option for parties.
- Flavor Boosters: For an even more aromatic syrup, add a few strips of orange or lemon zest to the syrup while it simmers, removing them before adding the orange blossom water. A pinch of ground cardamom can also be added to the nut mixture for an extra layer of warmth.
- Storage Savvy: Store your Baklava Cake in an airtight container at room temperature for up to 3-4 days. For longer storage, it can be refrigerated for up to a week.
- Even Absorption: When pouring the syrup, try to distribute it as evenly as possible over the entire cake surface. A ladle or a large spoon can help you control the flow.
Essential Baking Tools for Your Baklava Cake
Having the right tools makes all the difference! Here are some basics you’ll need, with links to help you find them:
Nutrition Information (Estimated Per Serving)
Please note: This is an approximate nutritional estimate for one slice (assuming 12-16 slices per cake) and can vary based on specific ingredients and portion sizes.
| Nutrient | Amount |
|---|---|
| Calories | ~380-450 kcal |
| Carbohydrates | ~55-70g |
| Protein | ~6-8g |
| Fat | ~18-25g |
| Fiber | ~2-4g |
| Sugar | ~40-55g |
Frequently Asked Questions (FAQs)
1. Can I use different nuts for this recipe?
Absolutely! While walnuts are traditionally used in baklava, this cake is delicious with pistachios, almonds, or a mix of your favorite nuts. Lightly toasting them before chopping can enhance their flavor significantly.
2. My cake seems dry, what went wrong?
A dry cake usually points to overbaking. Keep a close eye on your cake and start checking for doneness at the lower end of the baking time. Also, ensure your syrup was completely cool and the cake was hot when you combined them – this temperature contrast is key for optimal syrup absorption.
3. How long does Baklava Cake last?
Stored in an airtight container at room temperature, your Baklava Cake is best enjoyed within 3-4 days. If you want it to last longer, it can be refrigerated for up to a week. Its flavor often deepens over time!
4. Can I make this cake ahead of time for a party?
Yes, and we highly recommend it! The syrup can be made several days in advance and stored in the fridge. The cake itself benefits greatly from sitting for at least a few hours, or even overnight, after the syrup is added. This allows the cake to fully absorb the syrup and for the flavors to meld beautifully, making it a perfect make-ahead dessert for entertaining.
5. What if I don’t have semolina flour? Can I substitute it?
While semolina adds a unique, slightly coarser texture that mimics traditional baklava, you can substitute it with an equal amount of all-purpose flour if you don’t have any. The cake will still be delicious, just with a slightly different (but still wonderful!) texture.
6. My syrup crystallized after cooling, how can I prevent this?
Crystallization can occur if sugar crystals are left on the sides of the pan when boiling. To prevent this, try to avoid stirring the syrup once it comes to a boil. You can also brush down the sides of the pan with a wet pastry brush to dissolve any sugar crystals. The lemon juice in the recipe is also a crucial ingredient for preventing crystallization.
Conclusion: Your Baklava Cake Success Awaits!
And there you have it – your very own, absolutely delicious Baklava Cake, made with love and surprisingly little fuss! We hope this Recipe For Baklava Cake has demystified what might seem like a complex dessert and empowered you with fantastic baking tips for beginners. Remember, baking is a journey of discovery, and every cake you bake is a step forward in your culinary adventure.
Don’t be afraid to experiment, and most importantly, enjoy the process and the incredible results. Share your creation with friends and family, and bask in the compliments. You’ve just created a truly special treat. Happy baking!