Ever find yourself with a few leftover donuts that are just a little past their prime? Don’t toss them! We’ve got the perfect solution that transforms those forgotten treats into a truly extraordinary dessert. Get ready to discover the magic of our Recipe For Bread Pudding Made With Donuts!
This isn’t just any dessert; it’s a comforting, sweet, and incredibly satisfying dish that feels gourmet but is surprisingly simple to make. Perfect for anyone looking for easy baking recipes, this guide is packed with baking tips for beginners to ensure your first (or fiftieth!) bread pudding is an absolute triumph. Say goodbye to food waste and hello to your new favorite comfort food!
Ingredients You’ll Need
Gathering your ingredients is the first step to any successful bake. For this delightful donut bread pudding, you’ll need a mix of pantry staples and, of course, those glorious donuts!
| Ingredient | Quantity |
|---|---|
| Stale or Day-Old Donuts (glazed, cake, or plain work best) | 6-8 medium-sized (approx. 1 lb / 450g) |
| Large Eggs | 3 |
| Whole Milk (or 2% milk) | 1 ½ cups (360ml) |
| Heavy Cream | ½ cup (120ml) |
| Granulated Sugar | ¼ – ½ cup (50-100g) (adjust based on donut sweetness) |
| Vanilla Extract | 1 teaspoon |
| Ground Cinnamon (optional, but highly recommended) | ½ teaspoon |
| Pinch of Salt | ¼ teaspoon |
| Unsalted Butter (for greasing pan) | 1 tablespoon |
Step-by-Step Instructions: Making Your Donut Bread Pudding
Follow these detailed steps, and you’ll be enjoying a warm, custardy donut bread pudding in no time. We’ve included plenty of tips to guide you through each stage!
Step 1: Prepare Your Donuts
- Chop the Donuts: Take your donuts and cut them into roughly 1-inch (2.5 cm) cubes. Don’t worry about perfect uniformity; rustic pieces work beautifully.
- Why stale? Slightly stale or day-old donuts are actually ideal for this recipe! They are firmer and will absorb the custard mixture much better without turning completely mushy. If your donuts are super fresh, you can lightly toast them in the oven for 5-10 minutes at 250°F (120°C) to dry them out a bit.
- Arrange in Pan: Lightly grease an 8×8 inch or 9×9 inch baking dish with the tablespoon of butter. Spread the chopped donut pieces evenly into the prepared baking dish.
Step 2: Whisk Up the Custard Mixture
- Combine Wet Ingredients: In a large mixing bowl, crack the three large eggs. Add the whole milk, heavy cream, granulated sugar (start with ¼ cup if your donuts are very sweet, and go up to ½ cup if they are plainer), vanilla extract, ground cinnamon, and a pinch of salt.
- Whisk Thoroughly: Using a whisk, beat the mixture until the eggs are fully incorporated and the sugar has dissolved. You want a smooth, pale yellow liquid.
- Beginner Tip: Don’t over-whisk! You’re not trying to create a meringue; just combine the ingredients. Over-whisking can introduce too much air, which might lead to a less dense custard.
- Common Mistake: Not dissolving the sugar completely can result in a grainy texture. Keep whisking until you don’t feel any sugar granules when you rub a tiny bit of the mixture between your fingers.
Step 3: Assemble and Soak
- Pour Custard Over Donuts: Carefully and evenly pour the custard mixture over the chopped donuts in the baking dish. Gently press down on the donut pieces with a spatula or the back of a spoon to ensure they are all submerged and soaking up the liquid.
- The Crucial Soak: This is where the magic happens! Let the donut pieces soak in the custard mixture for at least 30 minutes at room temperature, or even better, cover the dish with plastic wrap and refrigerate for 2-4 hours, or overnight. The longer the soak, the more flavorful and tender your bread pudding will be.
- Alternative: If you’re short on time, a 30-minute soak is fine, but for the best texture, aim for at least 2 hours.
Step 4: Bake Your Pudding
- Preheat Oven: While the donuts are soaking (or towards the end of the soak time), preheat your oven to 350°F (175°C).
- Bake Until Golden: Place the baking dish in the preheated oven and bake for 40-55 minutes. The baking time can vary depending on your oven and the depth of your dish.
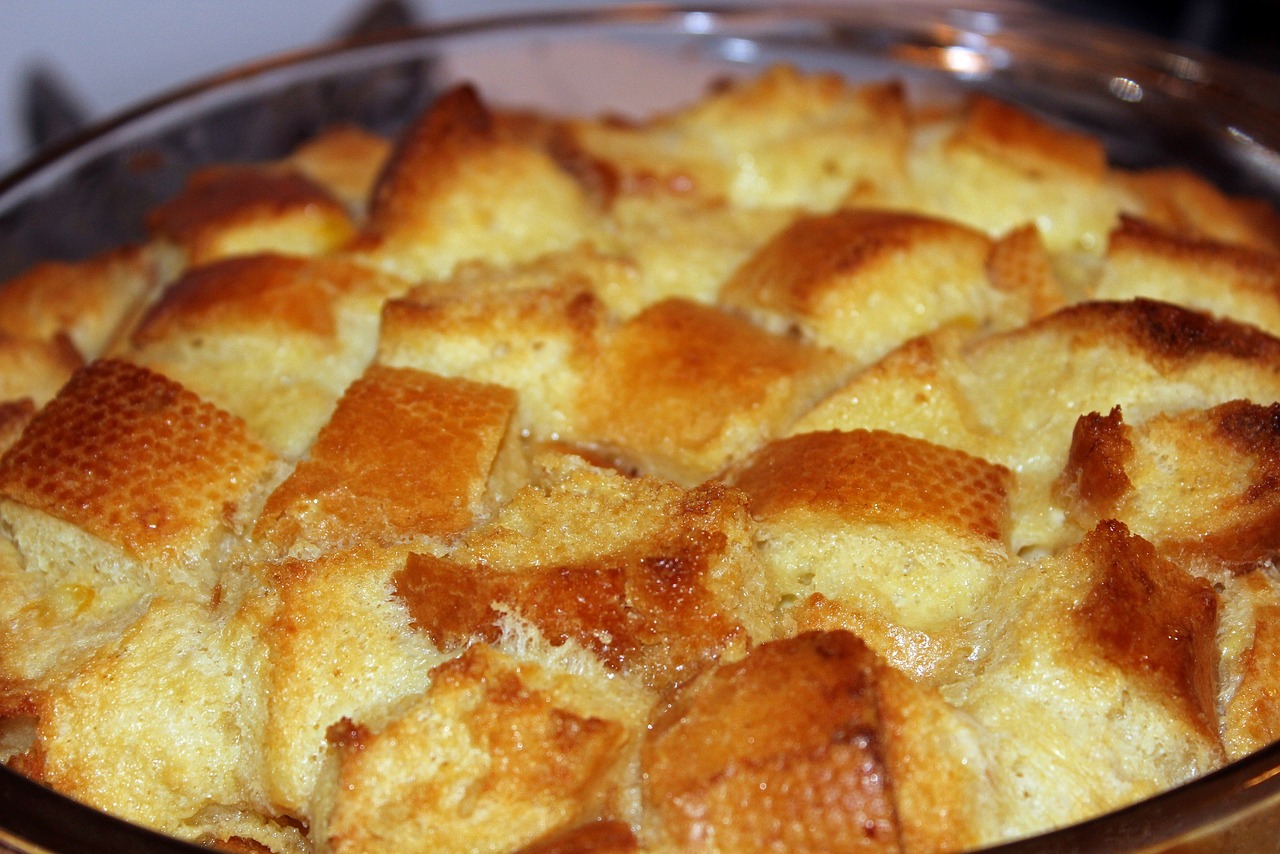
- How to Know It’s Done: The bread pudding is ready when the top is golden brown, the edges are set, and the center has a slight jiggle (like firm Jell-O). A knife inserted into the center should come out mostly clean, with maybe a little bit of moist custard, but not runny liquid.
Step 5: Cool and Serve
- Cool Down: Once baked, remove the bread pudding from the oven and let it cool on a wire rack for at least 15-20 minutes before serving. This allows the custard to fully set and makes for easier, cleaner slices.
- Serving Suggestions: Serve warm with a dusting of powdered sugar, a dollop of whipped cream, a scoop of vanilla ice cream, or a drizzle of caramel or chocolate sauce. Enjoy your delicious creation!
Pro Tips & Tricks for the Perfect Donut Bread Pudding
Even though this is an easy baking recipe, a few expert tips can elevate your donut bread pudding from great to absolutely unforgettable!
- Choose Your Donuts Wisely: Glazed, plain, or cake donuts work exceptionally well. Avoid donuts with jelly, cream fillings, or excessive frosting, as these can make the pudding too soggy or overly sweet. Simple is often best here!
- The Stale Advantage: Don’t underestimate the power of stale donuts. They act like sponges, soaking up all that delicious custard without falling apart. If your donuts are fresh, tear them into pieces and leave them out uncovered for a few hours, or even overnight, to dry them out slightly.
- Don’t Rush the Soak: The soaking time is not optional! It’s crucial for allowing the donuts to fully absorb the custard mixture. This absorption is what gives bread pudding its signature moist, tender, and rich texture. A minimum of 30 minutes, but ideally 2-4 hours, or even overnight in the fridge, will yield the best results.
- Customization is Key: Feel free to get creative! Add a handful of chocolate chips, chopped nuts (like pecans or walnuts), or even some dried cranberries to the donut mixture before pouring in the custard. A pinch of nutmeg or cardamom can also add a wonderful aromatic depth.
- Serving Temperature: While delicious warm, bread pudding can also be enjoyed at room temperature. For the ultimate treat, reheat individual portions slightly in the microwave or oven before serving with your favorite topping.
- Storage: Leftovers can be stored in an airtight container in the refrigerator for up to 3-4 days.
Essential Baking Tools for Your Donut Bread Pudding Adventure
Having the right tools makes baking a breeze! Here are the basic essentials you’ll need for this recipe, complete with convenient links to find them:
- Mixing Bowl: You’ll need at least one large bowl for whisking your custard.
- Whisk: Essential for smoothly combining the eggs, milk, and sugar.
- Baking Pan: An 8×8 or 9×9 inch square baking dish is perfect for this recipe.
- Measuring Cups: For accurately measuring your liquids and solids.
- Spatula: Useful for pressing down donuts and scraping down bowls.
- (Optional) Measuring Spoons: For precise measurement of vanilla, cinnamon, and salt.
Nutrition Information (Estimated Per Serving)
Please note that this is an estimated nutritional breakdown based on typical ingredients and an 8-serving yield. Actual values may vary significantly depending on the type and size of donuts used, specific brands, and any additional toppings.
| Nutrient | Amount |
|---|---|
| Calories | ~350-400 kcal |
| Carbohydrates | ~45-55 g |
| Protein | ~7-9 g |
| Fat | ~18-22 g |
| Fiber | ~1-2 g |
| Sugars | ~28-35 g |
Frequently Asked Questions (FAQs)
Got more questions? Here are some common queries from beginner bakers about making donut bread pudding:
Q1: Can I use fresh donuts instead of stale ones?
A: While stale or day-old donuts are highly recommended because they absorb the custard better without becoming mushy, you can use fresh ones. If you do, try tearing them into pieces and letting them sit out uncovered for a few hours, or briefly toast them in a 250°F (120°C) oven for 5-10 minutes to dry them out slightly. This helps them achieve that desirable bread pudding texture.
Q2: What kind of donuts are best for this recipe?
A: Simple glazed, plain, or cake donuts work best. Their relatively uniform texture and moderate sweetness allow the custard to shine. Avoid donuts with excessive frosting, jelly, or cream fillings, as these can make the pudding overly sweet, soggy, or can melt unevenly during baking.
Q3: How do I know when my donut bread pudding is fully cooked?
A: The pudding is ready when the top is golden brown and puffy, and the edges are set. The center should have a slight jiggle, but it shouldn’t be liquid. You can also insert a knife into the center; it should come out mostly clean, with maybe a little moist custard clinging to it, but no raw liquid.
Q4: Can I prepare this bread pudding ahead of time?
A: Absolutely! This recipe is fantastic for making ahead. You can assemble the entire dish (donuts and custard) and cover it tightly with plastic wrap, then refrigerate for up to 24 hours. When you’re ready to bake, let it sit at room temperature for about 30 minutes while your oven preheats, then bake as directed. This extended soak often results in an even better texture!
Q5: How should I store and reheat leftovers?
A: Store any leftover donut bread pudding in an airtight container in the refrigerator for up to 3-4 days. To reheat, you can warm individual servings in the microwave for 30-60 seconds, or cover and reheat in a 300°F (150°C) oven for 10-15 minutes, until warmed through. It’s delicious reheated!
Time to Get Baking!
There you have it – a wonderfully simple yet utterly decadent Recipe For Bread Pudding Made With Donuts! This dish is a testament to how easy it can be to transform simple ingredients (or even leftovers!) into something truly special. We hope our detailed steps and baking tips for beginners have given you the confidence to dive into your kitchen and create this delightful treat.
Whether you’re looking for a comforting dessert, a brunch showstopper, or just a clever way to use up those extra donuts, this recipe is sure to become a cherished favorite. Don’t be shy – give it a try, and prepare to impress yourself and your loved ones. Happy baking!