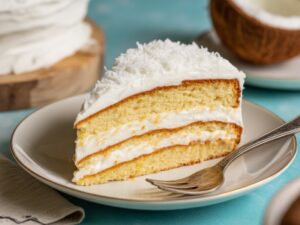
Get ready to whisk up some magic in your kitchen! If you’ve been searching for a show-stopping dessert that’s surprisingly simple to make, look no further. This Recipe For Coconut Cake With Sour Cream is an absolute game-changer. It delivers an incredibly moist, tender crumb with a delightful coconut flavor, all perfectly balanced by the subtle tang of sour cream. We’ve designed this as one of our go-to easy baking recipes, ensuring even the most novice bakers can achieve bakery-worthy results. Forget dry, crumbly cakes – this recipe is packed with moisture and flavor.
With our detailed baking tips for beginners and step-by-step guidance, you’ll be confidently pulling a stunning coconut cake from your oven in no time Ready to bake? Let’s gather our ingredients and get started!
Ingredients You’ll Need
Precision is key in baking, so make sure to measure everything accurately. For best results, ensure your butter, eggs, and sour cream are at room temperature!
For the Moist Coconut Cake:
| Quantity | Unit | Ingredient |
|---|---|---|
| 2 ½ | cups | All-Purpose Flour |
| 1 | tablespoon | Baking Powder |
| ½ | teaspoon | Baking Soda |
| ½ | teaspoon | Salt |
| 1 | cup (2 sticks) | Unsalted Butter, softened to room temperature |
| 1 ¾ | cups | Granulated Sugar |
| 4 | large | Eggs, at room temperature |
| 2 | teaspoons | Vanilla Extract |
| 1 | cup | Full-Fat Sour Cream, at room temperature |
| ½ | cup | Whole Milk, at room temperature |
| 1 ½ | cups | Sweetened Shredded Coconut |
For the Creamy Coconut Cream Cheese Frosting:
| Quantity | Unit | Ingredient |
|---|---|---|
| 16 | ounces | Cream Cheese, softened to room temperature |
| ½ | cup (1 stick) | Unsalted Butter, softened to room temperature |
| 4-5 | cups | Powdered Sugar (Confectioners’ Sugar), sifted |
| 1 | teaspoon | Vanilla Extract |
| ½ | teaspoon | Coconut Extract (optional, but highly recommended for extra flavor!) |
| 1 | cup | Sweetened Shredded Coconut (plus extra for decorating) |
Step-by-Step Instructions: Baking Your Perfect Coconut Cake
Follow these detailed steps, and you’ll be a coconut cake pro in no time!
Part 1: Preparing the Cake Layers
- Preheat & Prep: Preheat your oven to 350°F (175°C). Grease and flour two 9-inch round baking pans. For extra insurance against sticking, you can also line the bottoms with parchment paper. This step is crucial for easy cake release!
- Whisk Dry Ingredients: In a medium bowl, whisk together the all-purpose flour, baking powder, baking soda, and salt. Make sure these are thoroughly combined. Beginner Tip: Whisking aerates the flour and evenly distributes the leavening agents, leading to a lighter, more consistent cake.
- Cream Butter & Sugar: In a large mixing bowl (or the bowl of a stand mixer fitted with the paddle attachment), beat the softened unsalted butter and granulated sugar on medium-high speed until light and fluffy, about 3-5 minutes. Scrape down the sides of the bowl occasionally. This “creaming” process incorporates air, essential for a tender cake.
- Add Eggs & Vanilla: Add the eggs one at a time, beating well after each addition until fully incorporated. Then, stir in the vanilla extract.
- Combine Wet Ingredients: In a separate small bowl, whisk together the full-fat sour cream and whole milk until smooth.
- Alternate Dry & Wet: With the mixer on low speed, gradually add the dry ingredient mixture to the wet mixture, alternating with the sour cream/milk mixture. Start and end with the dry ingredients (e.g., 1/3 dry, 1/2 wet, 1/3 dry, 1/2 wet, 1/3 dry). Mix only until *just combined*. Beginner Tip: Overmixing develops gluten, which can lead to a tough, dry cake. Stop mixing as soon as no streaks of flour are visible.
- Fold in Coconut: Gently fold in the sweetened shredded coconut using a spatula.
- Divide & Bake: Divide the batter evenly between the two prepared baking pans. Bake for 28-32 minutes, or until a wooden skewer or toothpick inserted into the center comes out clean. Beginner Tip: Avoid opening the oven door too early, especially in the first 20 minutes, as this can cause the cake to sink.
- Cool Completely: Remove the cakes from the oven and let them cool in the pans on a wire rack for 10-15 minutes. Then, carefully invert them onto the wire rack to cool completely. This is crucial! Frosting a warm cake will cause the frosting to melt and slide off.
Part 2: Making the Coconut Cream Cheese Frosting
- Beat Cream Cheese & Butter: In a large mixing bowl, beat the softened cream cheese and softened unsalted butter together on medium speed until smooth and creamy, about 2-3 minutes. Ensure there are no lumps of cream cheese.
- Add Extracts: Stir in the vanilla extract and coconut extract (if using).
- Gradually Add Powdered Sugar: With the mixer on low speed, gradually add the sifted powdered sugar, one cup at a time, until fully incorporated and the frosting reaches your desired consistency. You may need more or less depending on your preference. Beat on medium-high speed for another 1-2 minutes until light and fluffy. Beginner Tip: Always sift your powdered sugar to prevent lumps in your frosting!
- Fold in Coconut: Gently fold in the 1 cup of sweetened shredded coconut with a spatula.
Part 3: Assembling & Decorating Your Cake
- Level (Optional but Recommended): Once the cake layers are completely cool, you can use a serrated knife to level the tops if they have domed. This makes for a more stable and professional-looking cake.
- First Layer & Crumb Coat: Place one cake layer on your serving plate or cake stand. Spread a generous amount of frosting evenly over the top. This first thin layer of frosting is called a “crumb coat” and it traps any loose crumbs, preventing them from showing in your final frosting layer.
- Second Layer & Final Frosting: Carefully place the second cake layer on top. Frost the top and sides of the entire cake with the remaining frosting. Use an offset spatula or butter knife to create smooth sides or decorative swirls.
- Decorate: Press extra sweetened shredded coconut onto the sides and top of the cake for a beautiful finish. You can even toast some coconut in a dry pan for a few minutes until golden for an extra pop of flavor and visual appeal!
- Chill & Serve: Chill the cake in the refrigerator for at least 30 minutes before slicing to allow the frosting to set. This makes for cleaner slices.
Tips & Tricks for Baking Success
- Room Temperature is Key: This is not just a suggestion! Room temperature butter, eggs, and dairy emulsify better, creating a smooth, homogenous batter that traps air more effectively, resulting in a lighter, fluffier cake.
- Measure Flour Correctly: Don’t scoop flour directly from the bag. Instead, fluff the flour with a spoon, then spoon it into your measuring cup and level off the top with a straight edge. This prevents over-packing and ensures you don’t add too much flour, which can lead to a dry cake.
- Don’t Overmix: After adding the flour, mix only until just combined. Overmixing develops gluten, making your cake tough and dense. A few small lumps are better than an overmixed batter.
- Sift Your Powdered Sugar: For the smoothest, lump-free frosting, always sift your powdered sugar before adding it to the cream cheese and butter mixture.
- Chill Your Cake Layers: If you have time, pop your cooled cake layers into the freezer for 15-20 minutes before frosting. This makes them firmer and easier to handle, preventing tearing and crumbling during frosting.
- Toasting Coconut: For an enhanced flavor and beautiful golden color, spread some shredded coconut on a baking sheet and toast in a 300°F (150°C) oven for 5-10 minutes, stirring occasionally, until lightly golden. Let it cool completely before using as garnish.
- Storage: Store the cake in an airtight container in the refrigerator for up to 3-4 days. Bring it to room temperature for about 30 minutes before serving for the best texture and flavor.
Essential Baking Tools for Your Kitchen
Having the right tools makes all the difference! Here are a few essentials:
- Mixing Bowl Set (various sizes are super helpful)
- Whisk (for dry ingredients and small mixtures)
- 9-inch Round Baking Pans (two are needed for this recipe)
- Measuring Cups & Spoons Set (accuracy is paramount!)
- Rubber Spatula (for folding and scraping the bowl)
- Electric Mixer (stand mixer or hand mixer – makes creaming butter and sugar much easier!)
- Wire Rack (for cooling cakes evenly)
- Offset Spatula (great for frosting cakes smoothly)
Nutrition Information (Estimated per serving)
This information is an estimate based on standard ingredient calculations for 1/12th of the cake.
| Nutrient | Amount |
|---|---|
| Calories | 480 kcal |
| Carbohydrates | 62g |
| Protein | 6g |
| Fat | 25g |
| Saturated Fat | 16g |
| Cholesterol | 105mg |
| Sodium | 280mg |
| Fiber | 1g |
| Sugar | 42g |
Frequently Asked Questions (FAQs)
- Q: Can I use light sour cream instead of full-fat?
- A: While you technically *can*, we highly recommend full-fat sour cream for this recipe. The fat content contributes significantly to the cake’s moistness and rich texture. Light sour cream may result in a slightly drier cake.
- Q: Can I use unsweetened shredded coconut?
- A: Yes, you can! If you prefer a less sweet cake, unsweetened coconut works well. You might want to slightly increase the sugar in the cake batter by 1/4 cup if you do, but it’s not strictly necessary, especially with the sweet cream cheese frosting.
- Q: How do I know if my cake is overmixed?
- A: An overmixed cake will often have a tough, chewy texture and may not rise as high. When mixing in the dry ingredients, stop as soon as no flour streaks are visible, even if there are a few small lumps. Err on the side of slightly undermixed rather than overmixed.
- Q: How long does this coconut cake last, and how should I store it?
- A: Because of the cream cheese frosting, this cake should be stored in an airtight container in the refrigerator for up to 3-4 days. For best flavor and texture, let it sit at room temperature for about 30 minutes before serving.
- Q: Can I turn this recipe into cupcakes?
- A: Absolutely! This recipe works wonderfully for cupcakes. Line a muffin tin with paper liners and fill each about two-thirds full. Bake for approximately 18-22 minutes, or until a toothpick comes out clean. The yield will be around 24 cupcakes.
- Q: My butter and cream cheese aren’t at room temperature. What can I do?
- A: For butter, cut it into small pieces and let it sit for about 15-20 minutes, or microwave it on 10% power for short bursts (5-10 seconds) until slightly soft but not melted. For cream cheese, remove it from its foil packaging and place it on a microwave-safe plate. Microwave on 10% power for 15-30 seconds, checking frequently, until slightly softened.
Your Delicious Coconut Cake Awaits!
You’ve made it! This Recipe For Coconut Cake With Sour Cream is more than just a dessert; it’s a celebration of flavor and a testament to the joy of homemade baking. We hope these comprehensive instructions and baking tips for beginners have empowered you to create a truly delicious masterpiece. Don’t be afraid to get your hands a little messy, and remember that every bake is a learning experience. Share your beautiful creation with friends and family, or simply savor a slice (or two!) all to yourself. Happy baking, and enjoy every delightful bite!