Are you ready to transform your kitchen into a comforting bakery filled with the irresistible aroma of freshly baked bread? There’s something truly magical about pulling a warm loaf from the oven, especially when it’s a classic like Marble Rye. For many, the idea of baking bread from scratch, let alone something as visually stunning as Marble Rye, can seem daunting. But fear not!
This Recipe For Marble Rye Bread is specifically designed for home bakers of all skill levels, even if you’re just starting your journey with easy baking recipes. We’ve broken down every step, offering clear instructions and plenty of baking tips for beginners to ensure your success. Get ready to impress yourself and your loved ones with a loaf that’s not only beautiful but incredibly delicious!
Why You’ll Love This Marble Rye Bread Recipe
- Beginner-Friendly: Detailed instructions make it easy to follow.
- Authentic Flavor: A perfect balance of hearty rye and subtle sweetness.
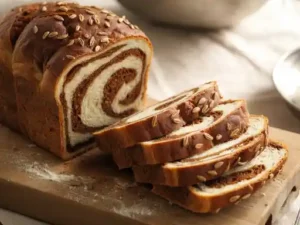
- Stunning Appearance: The beautiful marble swirl is a showstopper.
- Versatile: Ideal for sandwiches, toast, or alongside your favorite soup.
- Rewarding: The satisfaction of baking your own bread is unmatched!
Ingredients You’ll Need for Your Marble Rye Masterpiece
Gathering your ingredients beforehand is a great habit for any baker. It helps ensure you have everything on hand and makes the process smoother. For best results, use good quality ingredients.
| Ingredient | Quantity | Unit |
|---|---|---|
| Warm Water (105-115°F / 40-46°C) | 1 ½ | cups |
| Active Dry Yeast | 2 ¼ | teaspoons |
| Granulated Sugar | 1 | tablespoon |
| Olive Oil (or vegetable oil) | 2 | tablespoons |
| Salt | 2 | teaspoons |
| Caraway Seeds (optional, but recommended for authentic flavor) | 1 | tablespoon |
| Dark Rye Flour | 1 ½ | cups |
| All-Purpose Flour (or Bread Flour) | 2 ½ – 3 | cups |
| Unsweetened Cocoa Powder | 1 | tablespoon |
| Milk (for brushing, optional) | 1 | tablespoon |
Step-by-Step Instructions: Baking Your Perfect Marble Rye Bread
Follow these detailed steps carefully, and you’ll be on your way to a beautiful, delicious loaf of homemade Marble Rye!
Step 1: Activate the Yeast (The Foundation of Great Bread!)
- In a large mixing bowl (or the bowl of a stand mixer), combine the **warm water** (make sure it’s between 105-115°F / 40-46°C – too hot will kill the yeast, too cold won’t activate it), **granulated sugar**, and **active dry yeast**.
- Gently stir and let it sit for 5-10 minutes. You should see a foamy layer form on top. This indicates your yeast is alive and active!
- Beginner Tip: If your yeast doesn’t foam, it might be old or your water temperature was off. Don’t proceed; start with fresh yeast and recheck your water temperature.
Step 2: Combine Wet Ingredients and Flavorings
- Once your yeast is bubbly, add the **olive oil**, **salt**, and **caraway seeds** (if using) to the bowl. Stir everything together gently.
- The caraway seeds are essential for that classic rye flavor, but if you’re not a fan, you can omit them.
Step 3: Gradually Add Flours
- Add the **dark rye flour** to the wet mixture and stir until just combined.
- Now, gradually add the **all-purpose flour**, about half a cup at a time, mixing after each addition.
- Continue adding flour until the dough starts to come together and pull away from the sides of the bowl. It will still be a bit sticky, but manageable. You might not need all 3 cups of all-purpose flour, or you might need a little more – humidity and flour type can affect this.
- Beginner Tip: Resist the urge to add too much flour too quickly. A slightly sticky dough is better than a dry, tough one.
Step 4: Knead the Dough (Developing the Gluten)
- By Hand: Turn the dough out onto a lightly floured surface. Knead for 8-10 minutes. Push the dough away with the heels of your hands, fold it back, rotate, and repeat. You want a smooth, elastic dough that springs back when poked gently.
- With a Stand Mixer: Attach the dough hook. Knead on medium-low speed for 6-8 minutes, or until the dough is smooth, elastic, and pulls cleanly from the sides of the bowl.
- Common Mistake: Not kneading enough results in dense bread. Over-kneading is rare for home bakers, so focus on getting it smooth and elastic.
Step 5: First Rise (Bulk Fermentation)
- Lightly oil a large clean bowl. Place the kneaded dough in the bowl, turning it once to coat the top with oil.
- Cover the bowl tightly with plastic wrap or a clean kitchen towel.
- Place the bowl in a warm, draft-free spot for 1 to 1.5 hours, or until the dough has **doubled in size**.
- Beginner Tip: A slightly warm oven (turned off, with just the light on) or a sunny spot on your counter are great places for dough to rise.
Step 6: Divide and Prepare for Marbling
- Once the dough has doubled, gently punch it down to release the air.
- Divide the dough into two portions: one larger portion (about 2/3 of the dough) and one smaller portion (about 1/3 of the dough).
- To the smaller portion, add the **unsweetened cocoa powder**. Knead this smaller dough piece until the cocoa powder is fully incorporated and you have a uniformly dark brown dough. This will take a few minutes of kneading.
- Alternative: For a more pronounced dark color and flavor, you can dissolve the cocoa powder in a tablespoon of warm water before kneading it into the dough.
Step 7: Shape the Marble Loaf
- On a lightly floured surface, roll out the larger (plain) dough into a rectangle, approximately 12×8 inches (30×20 cm).
- Separately, roll out the smaller (cocoa) dough into a rectangle of similar size.
- Carefully layer the dark dough on top of the plain dough.
- Starting from a long edge, tightly roll up the layered dough into a log. Pinch the seam closed to seal it.
- Now, gently twist the log a few times to create the marble effect. Don’t over-twist, or the patterns will blend too much.
- Shape the twisted log to fit into a standard 9×5 inch (23×13 cm) loaf pan that has been lightly greased or lined with parchment paper.
Step 8: Second Rise (Proofing)
- Cover the loaf pan loosely with plastic wrap or a clean kitchen towel.
- Let the dough rise again in a warm, draft-free spot for another 45-60 minutes, or until it has nearly doubled in size and looks puffy.
- Beginner Tip: The “poke test” can help. Gently poke the dough with a floured finger. If the indentation slowly springs back, it’s ready. If it springs back quickly, it needs more time. If it collapses, it’s over-proofed (but usually still salvageable!).
Step 9: Preheat Oven and Bake
- About 15 minutes before the second rise is complete, preheat your oven to **375°F (190°C)**.
- If desired, brush the top of the risen loaf with **1 tablespoon of milk**. This helps create a beautiful, shiny, soft crust.
- Bake for 30-35 minutes, or until the crust is deeply golden brown and the internal temperature of the bread reaches **200-210°F (93-99°C)** when measured with an instant-read thermometer.
- Common Mistake: Pulling bread too early. An underbaked loaf will be gummy inside. Always check the internal temperature.
Step 10: Cool the Bread (Crucial for Texture!)
- Once baked, immediately remove the loaf from the pan and place it on a wire cooling rack.
- Allow the bread to cool completely before slicing, ideally for at least 1-2 hours.
- Why this is important: Slicing hot bread can lead to a gummy texture inside, as the steam needs time to escape and the starches to set. Patience is key for perfect slices!
Tips & Tricks for Bread Baking Success
Baking bread is an art and a science, and these little nuggets of wisdom can make a big difference, especially for beginners!
- Measure by Weight: While cup measurements are provided, using a kitchen scale to measure flour (and even water) by weight (grams) is far more accurate and will give you consistent results. Flour compaction in a measuring cup can vary wildly.
- Don’t Rush the Rise: The rising time isn’t just about size; it’s crucial for flavor development. If your kitchen is cooler, it might take longer. Be patient!
- Oven Temperature Matters: Ovens can be notoriously inaccurate. An inexpensive oven thermometer can be a game-changer for ensuring your bread bakes at the correct temperature.
- Listen to Your Dough: Pay attention to how your dough feels. Is it too sticky? Add a tiny bit more flour. Too dry? A teaspoon of water might help. Dough consistency is more important than exact flour quantity.
- Embrace Caraway Seeds: For true deli-style rye flavor, don’t skip the caraway seeds. If you’re hesitant, start with half the amount and adjust next time.
- Storage: Store your cooled Marble Rye bread at room temperature in an airtight container or bread bag for up to 3-4 days. For longer storage, slice the bread and freeze it in an airtight bag for up to 3 months. Toast slices directly from frozen.
- Don’t Over-Flour Your Surface: When kneading or shaping, use just enough flour to prevent sticking. Too much extra flour can make your dough tough and dry.
Essential Baking Tools for Your Kitchen
Having the right tools makes baking much more enjoyable and efficient. Here are some essentials:
- Mixing Bowl
- Whisk (or sturdy spoon)
- 9×5 Inch Loaf Pan
- Measuring Cups and Measuring Spoons
- Rubber Spatula (or Dough Scraper)
- Instant-Read Thermometer (for checking internal bread temperature)
- Wire Cooling Rack
- Kitchen Scale (highly recommended for accuracy!)
Nutrition Information (Approximate per serving)
Please note that these values are estimates and can vary based on specific ingredients and portion sizes. A typical serving is considered 1/12th of the loaf.
| Nutrient | Amount |
|---|---|
| Calories | 180-220 kcal |
| Carbohydrates | 35-45 g |
| Protein | 6-8 g |
| Fat | 3-5 g |
| Fiber | 2-4 g |
| Sugar | 2-4 g |
Frequently Asked Questions About Baking Marble Rye Bread
Don’t let common concerns stop you! Here are answers to some beginner questions:
Q1: Why didn’t my yeast foam or activate?
A: The most common reasons are using water that’s too hot (which kills the yeast) or too cold (which won’t activate it), or simply using old, inactive yeast. Always check your yeast’s expiration date. Water temperature between 105-115°F (40-46°C) is ideal.
Q2: My dough is too sticky/dry. What should I do?
A: Dough consistency is key. If it’s too sticky after kneading for a while, add a tablespoon of all-purpose flour at a time until it’s manageable. If it’s too dry and crumbly, add a teaspoon of warm water at a time until it comes together. Remember, humidity and flour brands can affect how much flour you’ll need.
Q3: How do I get a good marble swirl?
A: The key is to roll out both doughs into similar rectangles, layer them, roll them up tightly, and then gently twist the log a few times. Don’t twist too much, or the colors will blend entirely. A few good twists are enough to create distinct swirls.
Q4: Can I make this bread ahead of time?
A: Yes! After the first rise and shaping, you can place the loaf pan (covered tightly with plastic wrap) in the refrigerator for a slow, overnight proof (8-12 hours). Take it out about an hour before baking to let it come to room temperature while your oven preheats.
Q5: What’s the difference between dark rye and light rye flour?
A: Dark rye flour is milled from the whole rye grain and contains more bran and germ, giving it a stronger, bolder flavor and darker color. Light rye flour has most of the bran and germ removed, resulting in a milder flavor and lighter color. For an authentic, robust Marble Rye, dark rye flour is preferred.
Q6: My bread is dense. What went wrong?
A: Density can be caused by several factors: insufficient kneading (not enough gluten development), not allowing enough time for the dough to rise (first or second proof), or adding too much flour, which makes the dough heavy. Ensure your yeast is active and you’re letting the dough rise until doubled.
Conclusion: Your Delicious Journey Begins Here!
Congratulations, future bread baker! You now have all the tools and knowledge to embark on your very own journey of baking a magnificent Marble Rye Bread. Don’t be intimidated; every loaf you bake is a learning experience. The aroma filling your home, the pride of presenting a homemade loaf, and the sheer joy of that first bite of warm, fresh bread are truly unmatched.
This Recipe For Marble Rye Bread is more than just instructions; it’s an invitation to create, to learn, and to savor. So tie on your apron, gather your ingredients, and get ready to create a masterpiece. We can’t wait to hear about your baking success!