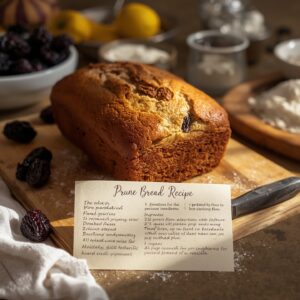
The crisp autumn air, cozy sweaters, and the irresistible scent of pumpkin spice – it’s a feeling we all cherish. But let’s be honest, traditional baking can sometimes feel daunting, especially if you’re just starting out. Measuring, mixing, waiting for dough to rise, transferring to pans… it can be a lot! That’s why we’re so excited to share our ultimate Recipe For Pumpkin Bread In Bread Machine. This isn’t just another recipe; it’s your gateway to effortless fall baking.
If you’re looking for truly easy baking recipes that deliver delicious results every time, your bread machine is about to become your new best friend. This guide is packed with not just simple steps, but also essential baking tips for beginners, ensuring your pumpkin bread comes out perfectly moist, fragrant, and utterly delightful. Say goodbye to complicated kitchen adventures and hello to stress-free, homemade goodness!
Ingredients List
Accuracy is key in baking, even with a bread machine! Make sure to measure all ingredients carefully. We recommend using room temperature ingredients for the best results, especially the eggs and pumpkin puree.
| Ingredient | Quantity | Unit |
|---|---|---|
| All-Purpose Flour | 2 ½ | cups |
| Granulated Sugar | 1 | cup |
| Baking Soda | 1 | teaspoon |
| Salt | ½ | teaspoon |
| Ground Cinnamon | 1 ½ | teaspoons |
| Ground Nutmeg | ½ | teaspoon |
| Ground Cloves (optional) | ¼ | teaspoon |
| Canned Pumpkin Puree (NOT pie filling) | 1 | cup |
| Large Eggs (room temperature) | 2 | |
| Vegetable Oil (or other neutral oil) | ½ | cup |
| Vanilla Extract | 1 | teaspoon |
| Chopped Pecans or Walnuts (optional) | ½ | cup |
| Chocolate Chips (optional) | ½ | cup |
Step-by-Step Instructions: Baking Pumpkin Bread in Your Bread Machine
Follow these detailed steps for a perfect loaf every time. Remember, bread machines are designed to do most of the work for you, but understanding the process will help you achieve the best results.
1. Gather and Prepare Your Ingredients
- Read Your Bread Machine Manual: Before you begin, take a quick peek at your bread machine’s instruction manual. Some machines recommend adding wet ingredients first, others dry. This recipe assumes a “wet ingredients first” approach, but always defer to your specific machine’s guidance.
- Measure Precisely: Baking is a science! Use proper measuring cups and spoons. For flour, spoon it into the measuring cup and then level it off with the back of a knife. Don’t pack it down. Packing flour can add too much, making your bread dense and dry.
- Room Temperature Matters: Ensure your eggs and pumpkin puree are at room temperature. This helps them incorporate better with other ingredients, leading to a more evenly textured and consistently moist loaf. If your eggs are cold, place them in a bowl of warm water for 5-10 minutes.
2. Load Your Bread Machine Pan
This is where the magic begins! Most bread machine recipes for quick breads (like pumpkin bread) recommend adding wet ingredients first, followed by dry ingredients. This prevents the yeast (if using) or leavening agents from activating too early, and ensures even mixing.
- Add Wet Ingredients: Pour the pumpkin puree, eggs, vegetable oil, and vanilla extract into the bread machine pan first. Make sure the mixing paddle is correctly installed at the bottom of the pan. This forms the base layer.
- Add Dry Ingredients (Layered): Carefully layer the dry ingredients on top of the wet ones. This layering helps prevent premature mixing and ensures the leavening agent is activated at the right time.
- First, add the granulated sugar, salt, cinnamon, nutmeg, and optional cloves. Spread them evenly over the wet ingredients.
- Next, add the baking soda. Try to place it in a small mound, away from the wet ingredients initially. This helps prevent it from reacting with the liquid too soon.
- Finally, gently spoon the all-purpose flour over everything, covering all the wet and dry ingredients below. This creates a protective layer until the machine starts mixing.
- Important Tip for Leavening: Ensure the baking soda is not directly touching the liquid when you first put it in, as this can cause it to activate too early. The bread machine will mix it thoroughly when it starts, ensuring proper activation.
3. Select Your Bread Machine Setting
Choosing the correct setting is crucial for quick breads. Quick breads don’t use yeast; they rely on baking soda or baking powder for leavening, so they don’t require a long rise cycle. Using a yeast bread cycle will result in a collapsed, heavy loaf.
- “Quick Bread” or “Sweet Bread” Setting: Most modern bread machines have a specific “Quick Bread,” “Sweet Bread,” or “Cake” setting. These cycles typically involve a mixing phase, a short rest, and then a baking phase, without the long rising times of yeast breads. Consult your manual to find the best option.
- If No Specific Setting: If your machine doesn’t have one of these, you have a good alternative. You can use the “Dough” cycle just for mixing. Once the “Dough” cycle finishes (it will just mix, not bake), remove the batter, place it in a greased standard loaf pan (like an 8.5×4.5 or 9×5 inch pan), and bake it in a conventional oven at 350°F (175°C) for 50-60 minutes, or until a toothpick inserted into the center comes out clean. This method requires more hands-on work but is a reliable fallback.
- Crust Color: Select your desired crust color (light, medium, or dark). Medium is usually a good starting point for pumpkin bread, providing a nice golden-brown exterior without being too hard.
- Loaf Size: Most quick bread recipes are designed for a 1.5 lb or 2 lb loaf. Ensure your machine is set for the appropriate size, if applicable, to ensure the cycle length matches the volume of batter.
4. Add Optional Mix-ins (If Using)
If you’re adding chopped nuts or chocolate chips, your bread machine will likely beep partway through the mixing cycle, signaling it’s time to add them. This ensures they are evenly distributed throughout the batter without being crushed too much during the initial vigorous mixing.
- Listen for the Beep: Once you hear the beep (usually after the first mixing phase, about 5-15 minutes into the cycle), carefully open the lid and add your ½ cup of chopped pecans/walnuts or chocolate chips.
- Close Promptly: Close the lid quickly to maintain the internal temperature. The machine will continue mixing them in for the remainder of the cycle.
- Manual Addition: If your machine doesn’t have a beep function, you can gently open the lid about 5-10 minutes into the main mixing cycle and add them. Be careful not to interfere with the paddle or splash batter.
5. The Baking Process
- Hands-Off Time: Now, let your bread machine do its work! This is the beauty of the bread machine – minimal effort for maximum reward.
- Avoid Opening the Lid: Resist the urge to open the lid during the baking cycle, especially during the last half. Opening the lid can cause the temperature to drop, potentially leading to a sunken loaf or an underbaked center. Trust the machine!
- Aroma Alert: Get ready for your kitchen to fill with the most wonderful, warm pumpkin spice aroma! This is your signal that deliciousness is on its way.
6. Check for Doneness and Cool
- Cycle Completion: Once the bread machine cycle finishes, the machine will usually beep again, indicating your bread is ready.
- Remove the Pan: Carefully remove the bread pan from the machine using sturdy oven mitts. It will be very hot!
- Invert and Release: Immediately invert the pan onto a wire cooling rack. If the bread doesn’t slide out easily, give the bottom of the pan a gentle tap. If the mixing paddle is stuck in the bread, carefully remove it once the bread has cooled slightly. A butter knife or a small spatula can help dislodge it.
- Cool Completely: This step is crucial for texture. Allow the pumpkin bread to cool completely on the wire rack for at least 1-2 hours (or even longer) before slicing. Slicing too early can result in a gummy, dense texture, as the internal structure is still setting and steam needs to escape properly.
7. Slice and Enjoy!
Once completely cooled, slice your beautiful, fragrant pumpkin bread with a serrated knife. It’s perfect on its own, with a smear of cream cheese, a dollop of butter, or even a drizzle of maple syrup. Enjoy the fruits of your effortless labor – a truly satisfying homemade treat!
Tips & Tricks for Perfect Bread Machine Pumpkin Bread
Want to elevate your bread machine pumpkin bread from good to absolutely amazing? Here are some expert tips and tricks, especially helpful for beginners, to ensure every loaf is a masterpiece:
- Avoid Pumpkin Pie Filling: This is a common and critical mistake! Always use 100% pure pumpkin puree, not canned pumpkin pie filling, which contains added sugar and spices that will severely throw off your recipe’s flavor balance, sweetness level, and moisture content. Always double-check the label!
- Don’t Over-Mix (the Machine Won’t Either!): One of the beauties of a bread machine for quick breads is that its “Quick Bread” or “Sweet Bread” cycle is specifically designed to mix just enough. Over-mixing can develop gluten too much, leading to a tough, rubbery bread. Trust the machine to do its job perfectly.
- Spice It Up: Feel free to adjust the spices to your liking. Love cinnamon? Add a little extra! Want a bolder, more complex flavor? Increase the nutmeg and cloves slightly. You can also experiment by adding a pinch of ground ginger, allspice, or even a tiny bit of cardamom for an exotic twist.
- Add-ins Galore: Beyond classic nuts and chocolate chips, consider other delicious additions! Dried cranberries, golden raisins, chopped dates, or even a sprinkle of toasted shredded coconut can add wonderful flavor and texture. Just ensure the total amount of mix-ins doesn’t exceed 1 cup to prevent weighing down the batter.
- Don’t Peek! Resist the urge to open the bread machine lid frequently during the baking cycle. Each time you open it, heat escapes, which can cause the internal temperature to drop. This fluctuation can negatively affect the bread’s rise and texture, potentially causing it to sink in the middle.
- Storage: Once completely cooled, store your pumpkin bread in an airtight container or wrapped tightly in plastic wrap at room temperature for up to 3-4 days. For longer storage, you can easily freeze it. Wrap individual slices or the whole loaf tightly in plastic wrap, then in aluminum foil, and freeze for up to 3 months. Thaw at room temperature or gently warm individual slices in the microwave or toaster oven.
- Grease the Paddle: If you frequently find the mixing paddle stuck in your finished loaf, try lightly greasing the paddle with a little vegetable oil or butter before adding your ingredients to the pan. This can sometimes help it release more easily from the baked bread.
Essential Baking Tools
While your bread machine does most of the heavy lifting, a few basic tools will make your baking experience even smoother and more enjoyable:
- Mixing Bowl (useful for pre-mixing wet ingredients if preferred, or for holding your add-ins)
- Whisk (perfect for combining dry ingredients evenly or for light mixing)
- Baking Pan (only if you’re using the “Dough” cycle and baking your loaf in a conventional oven)
- Measuring Cups (absolutely essential for accurate ingredient quantities – precision is key!)
- Spatula (great for scraping down bowls, folding, and general kitchen use)
- Measuring Spoons (crucial for precise measurements of spices, salt, and leavening agents)
- Wire Cooling Rack (critical for allowing your bread to cool properly and prevent a soggy bottom)
- Oven Mitts (for safely removing the hot bread pan from the bread machine)
Nutrition Information (Estimated per serving)
Please note: These values are estimates based on the ingredients listed for a plain loaf (without optional nuts/chocolate chips) and assuming a loaf yielding 12 servings. Actual nutritional content may vary based on specific brands, exact measurements, and any additional ingredients or substitutions you choose to add.
Sugar29 g
| Nutrient | Amount |
|---|---|
| Calories | 310 kcal |
| Carbohydrates | 48 g |
| Protein | 4 g |
| Fat | 12 g |
| Fiber | 2 g |
Frequently Asked Questions (FAQs) for Bread Machine Pumpkin Bread
Q1: Can I use pumpkin pie filling instead of pure pumpkin puree?
A: Absolutely not! This is one of the most common mistakes in pumpkin recipes, and it’s vital to avoid it. Pumpkin pie filling is already sweetened and spiced, and its consistency is different from pure pumpkin puree. Using it will completely throw off the flavor balance, sweetness level, and most importantly, the texture of this recipe, likely resulting in a dense, overly sweet, and possibly soggy loaf. Always look for “100% Pure Pumpkin” on the can.
Q2: My pumpkin bread sank in the middle. What went wrong?
A: A sunken loaf can be caused by a few common factors, especially for quick breads:
- Too much liquid: Double-check your measurements, especially for the pumpkin puree and oil. Even a slight excess can make the batter too heavy.
- Old leavening agent: Baking soda loses its potency over time. If your baking soda is old or expired, it won’t produce enough lift. Test it by adding a spoonful to a bit of vinegar; if it fizzes vigorously, it’s still good.
- Opening the lid: Peeking too often or for too long during the baking cycle can cause a sudden temperature drop, leading to a collapse in the bread’s structure.
- Incorrect setting: Using a yeast bread cycle (which includes long rise times) for a quick bread that relies on chemical leavening will also cause it to over-rise and then collapse.
Q3: Can I add different mix-ins, like dried fruit or different nuts?
A: Yes, absolutely! This recipe is very forgiving with mix-ins. Feel free to substitute or add other ingredients like dried cranberries, golden raisins, chopped dates, or different types of nuts (like pecans, walnuts, or even almonds). Just ensure the total amount of mix-ins doesn’t exceed 1 cup to avoid weighing down the batter too much, which can affect the bread’s rise. Add them when your bread machine beeps during the mixing cycle.
Q4: My bread machine doesn’t have a “Quick Bread” or “Sweet Bread” setting. What should I do?
A: If your machine lacks these specific settings, you have a couple of excellent options:
- Use the “Cake” setting: Many bread machines have a “Cake” setting which functions very similarly to a quick bread cycle, often involving mixing and baking without significant rising periods. This is usually your best direct alternative.
- Use the “Dough” cycle then oven bake: If no suitable baking cycle exists, use the “Dough” cycle to mix the ingredients thoroughly. Once the cycle finishes, remove the batter from the bread machine pan, place it into a greased standard loaf pan (8.5×4.5 or 9×5 inches), and bake it in a preheated conventional oven at 350°F (175°C) for 50-60 minutes, or until a wooden skewer or toothpick inserted into the center comes out clean.
Q5: How long does homemade pumpkin bread last, and how should I store it?
A: Once completely cooled (this is important!), store your pumpkin bread in an airtight container or wrapped tightly in plastic wrap at room temperature for up to 3-4 days. For longer storage, you can easily freeze it. Wrap the whole loaf or individual slices tightly in plastic wrap, then in aluminum foil, and freeze for up to 3 months. Thaw at room temperature or gently warm individual slices in the microwave or toaster oven for a fresh-baked feel.
Wrap Up and Happy Baking!
There you have it! A truly effortless and incredibly delicious Recipe For Pumpkin Bread In Bread Machine that will