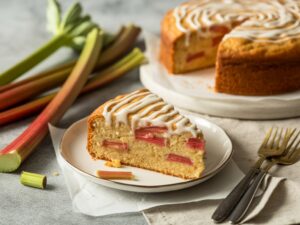
Rhubarb, with its delightful tartness, is a spring and early summer favorite. Paired with the convenience of a cake mix, it transforms into a beautifully balanced dessert that tastes like you spent hours in the kitchen (we won’t tell!). Forget complicated steps and fancy techniques; our goal is to make your baking journey enjoyable, successful, and utterly delicious. Get ready to impress yourself and your loved ones with this simple yet sensational rhubarb cake!
Ingredients List: Gather Your Goodies!
Before you begin, gather all your ingredients. This practice, known as “mise en place,” makes the baking process smoother and helps prevent forgotten steps!
For the Rhubarb Filling:
| Quantity | Unit | Ingredient |
|---|---|---|
| 3 | cups | Fresh or frozen rhubarb, chopped into ½-inch pieces (no need to thaw if frozen!) |
| ½ | cup | Granulated sugar |
| 2 | tablespoons | All-purpose flour or cornstarch (cornstarch provides a clearer filling) |
| 1 | teaspoon | Vanilla extract |
| ½ | teaspoon | Lemon zest (optional, for extra brightness) |
For the Cake Batter:
| Quantity | Unit | Ingredient |
|---|---|---|
| 1 | (15.25 oz) box | Yellow or White Cake Mix (any brand you prefer!) |
| 3 | large | Eggs |
| ½ | cup | Vegetable oil (or any neutral oil like canola or sunflower) |
| 1 | cup | Milk (whole or 2% works best, but water as per box instructions also fine) |
For the Crumb Topping (Optional, but highly recommended!):
| Quantity | Unit | Ingredient |
|---|---|---|
| ½ | cup | All-purpose flour |
| ¼ | cup | Granulated sugar |
| ¼ | cup | Packed light brown sugar |
| ½ | teaspoon | Ground cinnamon |
| ¼ | cup | Unsalted butter, melted |
Step-by-Step Instructions: Let’s Get Baking!
Follow these detailed steps carefully, and remember, baking is a journey, not a race. Take your time and enjoy the process!
Step 1: Prepare Your Oven and Pan
- Preheat your oven: Set your oven to 350°F (175°C). It’s important to give your oven enough time to reach and maintain the correct temperature.
- Prepare your baking pan: Lightly grease and flour a 9×13 inch baking pan. To grease, you can use butter, cooking spray, or shortening. Then, sprinkle a tablespoon or two of flour into the pan and tilt it around until the entire greased surface is coated. Tap out any excess flour. This step prevents your cake from sticking, a common beginner’s frustration!
Step 2: Create the Rhubarb Filling
- In a medium bowl, combine the chopped rhubarb, ½ cup granulated sugar, 2 tablespoons flour or cornstarch, vanilla extract, and lemon zest (if using).
- Stir gently until the rhubarb pieces are evenly coated. The sugar will help draw out some moisture from the rhubarb, and the flour/cornstarch will thicken the juices during baking, preventing a soggy cake.
- Beginner Tip: If using frozen rhubarb, there’s no need to thaw it first! Just toss it directly with the other ingredients. It might release a bit more liquid, but the flour/cornstarch will handle it.
Step 3: Mix the Cake Batter
- In a large mixing bowl, empty the contents of the cake mix box.
- Add the 3 large eggs, ½ cup vegetable oil, and 1 cup milk (or water, if you prefer, as per the box instructions).
- Using an electric mixer (handheld or stand mixer with a paddle attachment) on low speed, mix until the ingredients are just combined. Then, increase the speed to medium and beat for about 2 minutes, or until the batter is smooth and lump-free.
- Crucial Beginner Tip: Do not overmix your cake batter! Overmixing develops the gluten in the flour, which can lead to a tough, dry cake. Mix just until combined and smooth. A few small lumps are okay, but larger lumps should be gently whisked out.
Step 4: Assemble the Cake
- Pour about half of the cake batter into your prepared 9×13 inch baking pan, spreading it evenly with a spatula.
- Carefully spoon the rhubarb filling mixture over the batter in the pan. Try to distribute it as evenly as possible. Don’t worry if some pieces sink a little; that’s normal.
- Pour the remaining cake batter over the rhubarb layer. Gently spread it to cover most of the rhubarb, but don’t obsess over perfection.
Step 5: Make the Crumb Topping (If Using)
- In a separate small bowl, combine the ½ cup all-purpose flour, ¼ cup granulated sugar, ¼ cup packed light brown sugar, and ½ teaspoon ground cinnamon. Whisk them together until well mixed.
- Pour in the ¼ cup melted unsalted butter. Use a fork or your fingertips to mix until coarse crumbs form. The mixture should resemble wet sand with some larger clumps.
- Beginner Tip: If your crumbs aren’t forming well, add a tiny bit more melted butter (½ teaspoon at a time) until they come together. If it’s too wet, add a tiny bit more flour.
- Evenly sprinkle the crumb topping over the top layer of cake batter in the pan.
Step 6: Bake Your Rhubarb Cake
- Place the baking pan in the center of your preheated oven.
- Bake for 40-50 minutes. Baking times can vary depending on your oven, so keep an eye on it.
- How to check for doneness (Beginner’s Guide):
- The top should be golden brown and the cake should look set.
- A wooden skewer, toothpick, or thin knife inserted into the center of the cake (avoiding a thick piece of rhubarb) should come out clean or with a few moist crumbs attached, but no wet batter.
- The cake should also spring back lightly when gently pressed in the center.
- If the crumb topping starts to get too dark before the cake is done, you can loosely tent the pan with aluminum foil for the last 10-15 minutes of baking.
Step 7: Cool and Serve
- Once baked, carefully remove the cake from the oven.
- Place the pan on a wire rack and allow the cake to cool completely in the pan before slicing and serving. This is a very important step! Slicing a warm cake can cause it to crumble and fall apart, especially with a fruit filling.
- Beginner’s Patience: Resist the urge to cut into it immediately! Cooling allows the cake to set, the flavors to meld, and the rhubarb filling to fully thicken. It usually takes 1-2 hours.
- Once cooled, slice into squares and enjoy! It’s delicious on its own, or with a dollop of whipped cream or a scoop of vanilla ice cream.
Tips & Tricks for Baking Success!
Elevate your baking game with these handy hints, perfect for anyone just starting out or looking to refine their skills:
- Read the Entire Recipe First: Before you even get out a single ingredient, read through the recipe from start to finish. This helps you understand the flow, anticipate steps, and ensure you have everything you need.
- Accurate Measuring is Key: Baking is a science! Use proper measuring cups for dry ingredients (levelled off with a straight edge) and liquid measuring cups for wet ingredients (read at eye level). Don’t pack down flour; spoon it into the cup and then level.
- Room Temperature Ingredients: While this recipe uses a cake mix and is forgiving, many baking recipes benefit from eggs and milk being at room temperature. They emulsify better with other ingredients, creating a smoother, more uniform batter.
- Don’t Open the Oven Door Too Often: Every time you open the oven door, the temperature drops, which can affect how your cake rises and bakes. Only open it when it’s time to check for doneness towards the end of the baking time.
- Oven Thermometer: Ovens can be notoriously inaccurate. An inexpensive oven thermometer can tell you the true temperature inside your oven, helping you avoid under or over-baked goods.
- Customize Your Crumb: Feel free to add a pinch of nutmeg to your crumb topping for extra warmth, or a tablespoon of finely chopped nuts (like pecans or walnuts) for added crunch.
- Storage Savvy: Store any leftover cake covered at room temperature for up to 2-3 days, or in the refrigerator for up to 5 days. It also freezes well for up to 3 months!
- Embrace Imperfection: Your first few attempts might not look like magazine photos, and that’s perfectly okay! Every bake is a learning experience. The most important thing is that it tastes good and you had fun.
Essential Baking Tools: Your Kitchen Arsenal
Having the right tools makes all the difference! Here are some basic, yet essential, items you’ll want in your baking toolkit:
- Mixing Bowl: A set of various sizes is incredibly useful for different stages of your recipe.
- Whisk: Perfect for combining dry ingredients, making crumb toppings, or light mixing.
- Baking Pan: A sturdy 9×13 inch pan is versatile for cakes, brownies, and more.
- Measuring Cups: Both dry (for flour, sugar) and liquid (for milk, oil) measuring cups are indispensable.
- Spatula: A flexible rubber spatula is great for scraping down bowls and folding ingredients.
- Measuring Spoons: Crucial for accurate measurements of smaller quantities like vanilla extract or cinnamon.
- Electric Hand Mixer: While not strictly essential, it makes mixing batter much easier and quicker.
- Wire Rack: For cooling your baked goods evenly and preventing a soggy bottom.
Nutrition Information (Estimated per serving)
Please note: These are approximate values based on standard ingredients for a cake mix cake with fruit filling and crumb topping, divided into 12 servings. Actual values may vary based on specific brands and ingredient choices.
| Nutrient | Amount |
|---|---|
| Calories | ~380-420 kcal |
| Carbohydrates | ~55-65 g |
| Protein | ~4-6 g |
| Fat | ~18-25 g |
| Fiber | ~1-2 g |
| Sugar | ~35-45 g |
Frequently Asked Questions (FAQs) for Beginner Bakers
1. Can I use frozen rhubarb for this recipe?
Absolutely! You can use frozen rhubarb without thawing. Just chop it if the pieces are too large and toss it directly with the sugar and flour/cornstarch mixture. It might release a bit more liquid, but the added thickener will help manage it.
2. How do I know when my cake is truly done baking?
The best way is the “toothpick test.” Insert a wooden skewer or toothpick into the center of the cake. If it comes out clean or with just a few moist crumbs attached (no wet batter), your cake is done. Also, the edges should be golden brown, and the center should spring back slightly when gently pressed.
3. My cake sank in the middle! What went wrong?
A sunken cake is a common issue for beginners. It often happens if the cake is underbaked, if the oven door was opened too early during baking, or if too much leavening agent was used (though less likely with a cake mix). Make sure your oven temperature is accurate and try to avoid opening the oven door until at least two-thirds of the baking time has passed.
4. Can I make this cake dairy-free or gluten-free?
For dairy-free, you can use a plant-based milk substitute (like almond or soy milk) instead of dairy milk. For gluten-free, look for a gluten-free cake mix and ensure your flour for the crumb topping is also a gluten-free all-purpose blend. Always double-check all ingredient labels for hidden allergens.
5. What if I don’t have cornstarch for the rhubarb filling?
All-purpose flour can be used as a substitute for cornstarch in the rhubarb filling. While cornstarch provides a clearer, glossier finish, flour will still do the job of thickening the juices. Use the same quantity as specified for cornstarch.
6. How should I store leftover rhubarb cake?
Once completely cooled, store the cake in an airtight container at room temperature for up to 2-3 days. For longer storage, you can refrigerate it for up to 5 days. If you plan to keep it for longer, it freezes beautifully. Wrap individual slices or the entire cake tightly in plastic wrap, then foil, and freeze for up to 3 months.
Conclusion: You Did It!
Congratulations, baker! You’ve successfully created a delicious Rhubarb Cake using a simple cake mix recipe. We hope this detailed guide, packed with beginner-friendly tips, has made your baking experience enjoyable and empowering. This cake is a testament to how easy and rewarding baking can be, even if you’re just starting out.
Don’t be afraid to experiment with other fruits or flavors as you gain confidence. The kitchen is your playground! Share your creation with friends and family, and bask in the compliments. Happy baking, and we can’t wait to see what you whip up next!
“`