
There’s nothing quite like the aroma of freshly baked bread filling your home. It’s a comforting, wholesome experience that many believe is reserved for expert bakers. But what if we told you that creating a beautiful, crusty loaf of Rustic Italian Bread Recipe is entirely within your reach, even if you’ve never baked bread before This comprehensive guide is designed specifically for you, packed with easy baking recipes principles and invaluable baking tips for beginners.
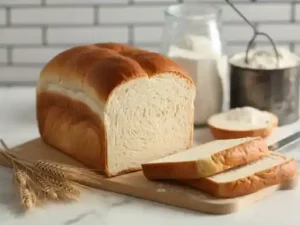
Forget store-bought loaves! Our recipe will walk you through every step, demystifying the process and empowering you to bake a bread that boasts a wonderfully crisp crust, a soft, chewy interior, and that unmistakable rustic charm. Get ready to impress yourself and your loved ones with this incredibly satisfying baking project!
Ingredients You’ll Need
Gathering your ingredients correctly is the first step to baking success. Here’s what you’ll need for your Rustic Italian Bread:
| Ingredient | Quantity | Unit |
|---|---|---|
| Warm Water (105-115°F / 40-46°C) | 1 ½ | cups |
| Active Dry Yeast | 2 ¼ | teaspoons (1 standard packet) |
| Granulated Sugar (optional, for yeast activation) | 1 | teaspoon |
| All-Purpose Flour (plus extra for dusting) | 3 ½ – 4 | cups |
| Salt | 1 ½ | teaspoons |
| Olive Oil (plus extra for greasing) | 2 | tablespoons |
Step-by-Step Instructions: Your Path to Perfect Bread
Follow these detailed steps carefully, and you’ll be enjoying your homemade Italian bread in no time. We’ve included plenty of tips to guide beginners!
Step 1: Activate Your Yeast – The Spark of Life
In a large mixing bowl, combine the **warm water** (make sure it’s not too hot or too cold – think warm bathwater), **granulated sugar** (if using, it helps “feed” the yeast), and **active dry yeast**. Stir gently and let it sit for 5-10 minutes. You’re looking for a foamy, bubbly layer to form on the surface. This means your yeast is active and ready to work!
- Beginner Tip: If your yeast doesn’t foam, your water might be too hot (killing the yeast) or too cold (preventing activation), or your yeast might be old. Discard and start again with fresh yeast and correctly tempered water.
Step 2: Combine Dry Ingredients
While the yeast is activating, in a separate medium bowl, whisk together the **all-purpose flour** and **salt**. Whisking ensures the salt is evenly distributed throughout the flour, preventing salty pockets in your bread.
Step 3: Mix the Dough – Bringing it All Together
Once your yeast is foamy, pour in the **olive oil** into the yeast mixture. Then, gradually add the dry flour mixture to the wet ingredients, about 1 cup at a time, stirring with a wooden spoon or a sturdy spatula. Mix until a shaggy, sticky dough forms and all the flour is incorporated. It doesn’t need to be perfectly smooth yet.
- Beginner Tip: Don’t be tempted to add too much flour at this stage, even if the dough seems sticky. A sticky dough is often a good thing for rustic bread!
Step 4: Knead the Dough – Building Strength
Turn the dough out onto a lightly floured surface. Now comes the fun part: kneading! Knead the dough for 8-10 minutes until it becomes smooth, elastic, and less sticky. The dough should spring back when gently poked.
- How to Knead: Push the dough away from you with the heel of your hand, fold it back over itself, give it a quarter turn, and repeat. If it’s too sticky, add just a tiny sprinkle of flour to your hands or the counter.
- Beginner Tip: A good way to check if it’s kneaded enough is the “windowpane test.” Pinch off a small piece of dough and gently stretch it. If you can stretch it thin enough to see light through it without tearing, your gluten is well-developed, and you’re good to go!
- Common Mistake: Not kneading enough. Undernourished dough will result in a dense, crumbly bread. Keep kneading!
Step 5: First Rise (Bulk Fermentation) – Letting it Grow
Lightly grease a large clean bowl with olive oil. Place the kneaded dough in the bowl, turning it once to coat the top with oil. Cover the bowl tightly with plastic wrap or a clean kitchen towel. Place it in a warm, draft-free spot for 1 to 1.5 hours, or until the dough has doubled in size.
- Beginner Tip: A warm spot could be near a sunny window, in a slightly warm (but turned off!) oven, or even on top of your refrigerator.
- Alternative: Slow Cold Rise. For a more complex flavor, you can cover the dough and refrigerate it for 8-24 hours for its first rise. Let it come to room temperature for about an hour before proceeding to the next step.
Step 6: Punch Down & Shape – Preparing for the Loaf
Once the dough has doubled, gently punch it down to release the air. Turn the dough out onto a lightly floured surface. Gently shape it into a round or oval loaf. You can do this by folding the edges of the dough towards the center and then flipping it over, using the tension of the surface to create a smooth, taut top.
- Beginner Tip: Handle the dough gently at this stage to avoid deflating it too much. You want to preserve some of that airy structure.
Step 7: Second Rise (Proofing) – The Final Puff
Lightly flour a baking sheet or line it with parchment paper. Carefully transfer your shaped loaf to the prepared sheet. Cover it loosely with plastic wrap or a clean towel and let it rise again in a warm, draft-free spot for another 30-45 minutes, or until it looks visibly puffy and slightly larger (about 50% increase in size).
- Beginner Tip: To check if it’s proofed enough, gently poke the dough with a floured finger. If the indentation slowly springs back halfway, it’s ready. If it springs back completely, it needs more time. If it collapses, it’s over-proofed.
Step 8: Preheat Oven & Prepare for Baking
About 20 minutes before the end of the second rise, preheat your oven to **450°F (232°C)**. If you have a baking stone or a Dutch oven, place it in the oven to preheat as well. For extra crustiness, you can place an oven-safe pan on the bottom rack of your oven.
- Beginner Tip: Creating Steam: Just before placing the bread in the oven, pour about ½ cup of hot water into the empty pan on the bottom rack. This creates steam, which helps the crust develop beautifully and keeps it from hardening too quickly. Be careful of the hot steam!
Step 9: Score and Bake – The Grand Finale
Just before baking, use a sharp knife or a bread lame to make a few shallow cuts (scores) on the top of your loaf. This helps the bread expand evenly and creates a beautiful pattern.
Carefully transfer the bread to the preheated oven. If using a baking stone, slide the bread onto it. If using a Dutch oven, carefully lower the loaf into the hot pot (be very careful!).
Bake for 20 minutes with steam (if using, keep the water pan in). Then, carefully remove the water pan (if you used one) and reduce the oven temperature to **400°F (200°C)**. Continue to bake for another 15-25 minutes, or until the crust is golden brown and the internal temperature reaches 200-210°F (93-99°C).
- Beginner Tip: Don’t open the oven door too frequently, especially during the first 15-20 minutes, as this can cause the oven temperature to drop and affect the rise.
Step 10: Cool – The Crucial Last Step
Once baked, immediately transfer the bread to a wire rack to cool completely. This is perhaps the hardest step, but also one of the most important! Cooling allows the internal structure of the bread to set and prevents a gummy texture.
- Beginner Tip: Resist the urge to cut into your bread too early! Cooling for at least 1-2 hours will give you the best texture and flavor.
Tips & Tricks for Beginner Bread Bakers
Baking bread is a journey, and these tips will help you along the way:
- Accuracy is Key: Especially for flour, use a kitchen scale for the most accurate measurement. If you don’t have one, spoon flour into your measuring cup and level it off with a straight edge – don’t scoop directly from the bag, as this compacts the flour.
- Warmth Matters: Yeast loves warmth. Ensure your water temperature is correct and your dough is rising in a warm, draft-free environment. Too cold, and it slows down; too hot, and it can kill the yeast.
- Don’t Be Afraid of Sticky Dough: A slightly sticky dough often results in a more tender crumb. Resist the urge to add too much extra flour during kneading. Only add small amounts if the dough is unmanageable.
- Listen to Your Dough: Learn to recognize the signs. Is it doubling in size? Does it pass the windowpane test? Does it spring back when poked? These visual and tactile cues are more important than strict timings.
- Steam for Crust: Creating steam in your oven (as described in Step 8) is a game-changer for achieving that desirable crispy, golden-brown crust.
- Patience, Patience, Patience: Bread baking teaches patience. Don’t rush the rising times or the cooling process. Good things come to those who wait!
- Storage: Once completely cool, store your Italian bread at room temperature in a paper bag for a day or two for a crisp crust, or in an airtight container if you prefer a softer crust. For longer storage, slice and freeze.
Essential Baking Tools
Having the right tools can make your baking experience smoother and more enjoyable. Here are a few essentials:
- Large Mixing Bowl
- Whisk
- Baking Sheet or Dutch Oven
- Measuring Cups and Spoons
- Sturdy Spatula or Wooden Spoon
- Kitchen Scale (highly recommended for accuracy)
- Wire Cooling Rack
- Instant-Read Thermometer (for checking internal bread temperature)
Nutrition Information (Estimated per 1/12 of Loaf)
This is an estimated nutritional breakdown for a serving of our Rustic Italian Bread. Values can vary based on exact ingredients and portion sizes.
| Nutrient | Amount |
|---|---|
| Calories | 220 kcal |
| Carbohydrates | 40 g |
| Protein | 7 g |
| Fat | 4 g |
| Fiber | 2 g |
| Sugar | 0 g |
Frequently Asked Questions (FAQs)
Q1: My yeast didn’t foam. What went wrong?
A: This usually means your water was either too hot (killing the yeast) or too cold (not activating it), or your yeast is old/expired. Always check the temperature with a thermometer (105-115°F is ideal) and ensure your yeast is fresh. If it doesn’t foam, discard and start again.
Q2: How do I know if I’ve kneaded the dough enough?
A: The “windowpane test” is your best friend! Take a small piece of dough and gently stretch it. If you can stretch it thin enough to see light through it without tearing, your gluten is well-developed, and the dough is properly kneaded. It should also feel smooth and elastic, springing back when poked.
Q3: My dough isn’t rising. What should I do?
A: The most common reasons for dough not rising are inactive yeast (see Q1) or a too-cold environment. Ensure your rising spot is warm and draft-free. If it’s very cold in your kitchen, try placing the bowl in an oven that’s been warmed to its lowest setting for a minute or two and then turned off.
Q4: Can I use whole wheat flour for this recipe?
A: Yes, but with some adjustments. Whole wheat flour absorbs more liquid and has less gluten. You might need to add a little extra water (start with 1-2 tablespoons) and knead a bit longer. The resulting bread will be denser and have a different texture and flavor profile.
Q5: How can I get a really crispy crust?
A: Several factors contribute to a crispy crust: high initial oven temperature, creating steam in the oven (by adding water to a hot pan), and baking on a preheated baking stone or in a Dutch oven. Also, ensure the bread cools completely on a wire rack.
Q6: Can I prepare the dough ahead of time?
A: Absolutely! After the first rise, you can gently punch down the dough, place it in an oiled bowl, cover it tightly with plastic wrap, and refrigerate it for up to 24 hours. When you’re ready to bake, take it out, let it come to room temperature for about an hour, and then proceed with shaping and the second rise.
Your Homemade Bread Journey Begins Now!
Congratulations, future bread baker! You now have all the tools and knowledge to embark on your very own Rustic Italian Bread Recipe adventure. Don’t be discouraged if your first loaf isn’t picture-perfect; every bake is a learning experience. The joy of creating something so delicious and satisfying from scratch is truly unmatched.
Imagine the delightful scent, the crusty bite, and the soft, airy interior – all made by your own hands. This isn’t just baking; it’s a therapeutic, rewarding process that brings warmth and comfort to your home. So roll up your sleeves, embrace the flour, and get ready to enjoy the incredible taste of homemade Italian bread. Happy baking!