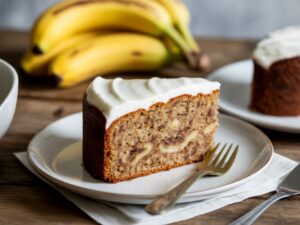
Welcome, fellow dessert lovers and aspiring bakers! If you’ve ever savored the delightful, comforting taste of a classic banana cake and wished you could recreate that magic at home, you’re in the right place. Today, we’re diving into a Sara Lee Banana Cake Recipe that captures all the beloved moistness and flavor of your favorite store-bought treat, but with the incredible satisfaction of a homemade touch.
Don’t let baking seem daunting! This recipe is designed to be one of those truly easy baking recipes perfect for anyone, especially if you’re looking for solid baking tips for beginners. We’ll walk through every step, ensuring your first (or fiftieth!) banana cake is a resounding success. Get ready to fill your kitchen with the irresistible aroma of sweet, ripe bananas and warm spices. Let’s bake some delicious memories!
Gather Your Goodies: Ingredients for Your Banana Cake
Before we begin our baking adventure, let’s make sure we have all our ingredients ready. Room temperature ingredients are often key for a smooth batter, so take out your butter, eggs, and buttermilk (or sour cream) about 30-60 minutes before you plan to start.
For the Moist Banana Cake:
| Ingredient | Quantity | Unit |
|---|---|---|
| All-Purpose Flour | 2 ½ | cups |
| Granulated Sugar | 1 ½ | cups |
| Baking Soda | 1 | teaspoon |
| Salt | ½ | teaspoon |
| Ground Cinnamon | ½ | teaspoon |
| Unsalted Butter (softened) | ½ | cup (1 stick) |
| Large Eggs (room temperature) | 2 | |
| Very Ripe Bananas (mashed) | 1 ½ | cups (about 3-4 medium) |
| Buttermilk (room temperature) | ½ | cup |
| Vanilla Extract | 1 | teaspoon |
For the Cream Cheese Frosting:
| Ingredient | Quantity | Unit |
|---|---|---|
| Cream Cheese (softened) | 8 | ounces |
| Unsalted Butter (softened) | ½ | cup (1 stick) |
| Powdered Sugar (confectioners’ sugar) | 3-4 | cups |
| Vanilla Extract | 1 | teaspoon |
| Milk or Cream (optional, for consistency) | 1-2 | tablespoons |
Let’s Get Baking! Step-by-Step Instructions for Beginners
Follow these detailed steps, and you’ll be on your way to a perfectly baked banana cake. Remember, baking should be fun, so don’t stress!
Step 1: Prep Your Oven and Pan (The Foundation of Success!)
First things first, let’s get that oven ready. Preheat your oven to 350°F (175°C). This ensures your cake starts baking immediately at the correct temperature, which helps with proper rising. Next, prepare your baking pan. You’ll want a 9×13 inch baking pan for this recipe. Grease it generously with butter or non-stick cooking spray, then lightly flour it. This creates a non-stick barrier, making it much easier to remove your cake later. For extra insurance, you can also line the bottom with parchment paper after greasing, then grease and flour the paper too!
Step 2: Whisk Your Dry Ingredients (No Lumps Allowed!)
In a large bowl, combine your all-purpose flour, granulated sugar, baking soda, salt, and ground cinnamon. Use a whisk to mix them thoroughly for about 30 seconds. This step is crucial because it evenly distributes the leavening agents (baking soda) and spices throughout the flour, ensuring a consistent rise and flavor in every bite. Beginner Tip: Don’t skip sifting if your flour tends to be clumpy, but a good whisking usually does the trick for most all-purpose flours.
Step 3: Cream the Butter and Sugar (Light and Fluffy is the Goal!)
In a separate, medium-sized bowl (or the bowl of a stand mixer), add your softened unsalted butter and granulated sugar. Using an electric mixer (handheld or stand mixer with a paddle attachment), beat them together on medium speed for about 2-3 minutes. You want the mixture to become light, pale, and fluffy. This process, called “creaming,” incorporates air into the butter and sugar, which contributes to the cake’s tender texture.
Step 4: Incorporate Eggs and Vanilla (Building Flavor!)
Once your butter and sugar are creamy, add the large eggs, one at a time, beating well after each addition until fully incorporated. Scrape down the sides of the bowl with a spatula as needed to ensure everything is mixed. Finally, stir in the vanilla extract. Remember, using room temperature eggs helps them emulsify better with the butter, creating a smoother batter.
Step 5: Mash Those Bananas (The Star of the Show!)
Now for the bananas! In a separate bowl, mash your very ripe bananas with a fork until they are mostly smooth with a few small lumps remaining. Overripe bananas (the ones with lots of brown spots) are essential here, as they are sweeter and more flavorful, making your cake truly shine. Alternative: If you don’t have very ripe bananas, you can bake slightly underripe ones in their peels at 300°F (150°C) for 15-20 minutes until they turn black and soft. Let them cool before mashing.
Step 6: Combine Wet and Dry Ingredients (The Art of Not Overmixing!)
With your mashed bananas ready, it’s time to bring everything together. Add half of your dry ingredient mixture to the wet mixture (butter, sugar, eggs, vanilla). Mix on low speed until just combined. Then, add half of the buttermilk and mix until just incorporated. Repeat with the remaining dry ingredients and buttermilk. Finally, gently fold in the mashed bananas. Crucial Beginner Tip: Do NOT overmix! Overmixing develops the gluten in the flour too much, which can result in a tough, dense cake. Mix only until no streaks of flour remain.
Step 7: Bake Your Banana Cake (Patience is a Virtue!)
Pour the batter evenly into your prepared 9×13 inch baking pan. Place it in the preheated oven and bake for 30-35 minutes, or until a wooden skewer or toothpick inserted into the center of the cake comes out clean. The top should be golden brown and spring back slightly when gently pressed. Common Mistake: Opening the oven door too early can cause the cake to sink. Try to wait until at least 25 minutes have passed.
Step 8: Cool Down (Resist the Urge to Frost Immediately!)
Once baked, remove the cake from the oven and let it cool in the pan on a wire rack for about 15-20 minutes. This allows the cake to set and prevents it from crumbling when you try to remove it. After 15-20 minutes, carefully invert the cake onto the wire rack to cool completely. It’s vital that the cake is completely cool before frosting, otherwise, your beautiful cream cheese frosting will melt into a messy puddle!
Step 9: Prepare the Cream Cheese Frosting (The Icing on the Cake!)
While your cake cools, make the frosting. In a large bowl or stand mixer, beat the softened cream cheese and softened butter together on medium speed until smooth and creamy, about 2-3 minutes. Gradually add the powdered sugar, about a cup at a time, beating on low speed until combined, then increasing to medium until smooth. Add the vanilla extract. If the frosting is too thick, add milk or cream one tablespoon at a time until you reach your desired spreading consistency. If it’s too thin, you can add a bit more powdered sugar. Beat until light and fluffy.
Step 10: Frost and Enjoy! (The Sweet Reward!)
Once your cake is completely cool, spread the cream cheese frosting evenly over the top. You can use an offset spatula or the back of a spoon to create pretty swirls. Slice, serve, and bask in the glory of your homemade **Sara Lee Banana Cake Recipe**!
Pro Tips & Tricks for a Perfect Banana Cake Every Time
Achieving baking perfection is easier with a few insider secrets. Here are some actionable tips to ensure your banana cake is consistently delicious:
- Embrace Overripe Bananas: The browner and spottier, the better! Overripe bananas are sweeter and more fragrant, giving your cake a deeper, more intense banana flavor. Don’t throw them out; bake with them!
- Room Temperature Ingredients: This is a golden rule for many baking recipes. Softened butter, room temperature eggs, and buttermilk create a smoother, more emulsified batter, resulting in a finer crumb and better texture.
- Accurate Measuring: Baking is a science. Use proper measuring cups and spoons. For flour, spoon it into your measuring cup and then level it off with a straight edge (like the back of a knife) – don’t scoop directly from the bag, as this compacts the flour and you’ll end up with too much.
- Don’t Overmix: Once you add the flour, mix only until just combined. Overmixing develops gluten, leading to a tough, dense cake. A few small lumps of flour are better than an overmixed batter.
- Pan Preparation is Key: Always grease and flour your pan thoroughly. For extra peace of mind, line the bottom with parchment paper. This prevents sticking and ensures your beautiful cake comes out in one piece.
- Cool Completely Before Frosting: Patience is paramount here! If your cake is even slightly warm, your cream cheese frosting will melt and slide right off.
- Storage: Store frosted banana cake in an airtight container in the refrigerator for up to 4-5 days. Unfrosted cake can be kept at room temperature for 2-3 days or frozen for longer.
Essential Baking Tools for Your Kitchen
Having the right tools makes all the difference! Here are some essential items you might need:
- Mixing Bowl
- Whisk
- Baking Pan (9×13 inch recommended)
- Measuring Cups & Spoons
- Spatula (rubber and offset)
- Electric Mixer (handheld or stand mixer)
- Wire Rack
Nutrition Information (Per Serving, estimated)
Please note: This is an estimated nutritional breakdown for one slice (1/12th of the cake with frosting) and can vary based on exact ingredient quantities and brands used.
| Nutrient | Amount |
|---|---|
| Calories | 380-450 kcal |
| Carbohydrates | 55-65 g |
| Protein | 4-6 g |
| Fat | 18-25 g |
| Fiber | 1-2 g |
| Sugar | 40-50 g |
Frequently Asked Questions (FAQs) for Beginner Bakers
Q1: My cake turned out dry. What went wrong?
A: A dry cake is often a sign of overbaking or using too much flour. Make sure you’re measuring your flour correctly (spoon and level!), and always check for doneness with a toothpick rather than relying solely on the timer. Ovens can vary!
Q2: Can I use frozen bananas?
A: Absolutely! Frozen ripe bananas are excellent for baking. Just thaw them completely at room temperature (they’ll release some liquid, which you can discard) and mash as usual. Their texture will be softer, making them even easier to mash.
Q3: What if I don’t have buttermilk?
A: No problem! You can easily make a substitute. Add 1 tablespoon of lemon juice or white vinegar to a liquid measuring cup, then fill the rest of the way to ½ cup with regular milk. Let it sit for 5-10 minutes until it curdles slightly before using.
Q4: How do I know when the cake is perfectly baked?
A: The best test is the toothpick test! Insert a wooden skewer or toothpick into the center of the cake. If it comes out clean (without wet batter attached), your cake is done. If there’s still wet batter, bake for a few more minutes and retest.
Q5: Can I make this into cupcakes?
A: Yes, this recipe works wonderfully for cupcakes! Line a muffin tin with paper liners and fill each about two-thirds full. The baking time will be shorter, typically 18-22 minutes, so keep a close eye on them and use the toothpick test.
Q6: How should I store leftover banana cake?
A: Because of the cream cheese frosting, it’s best to store your frosted banana cake in an airtight container in the refrigerator. It will stay fresh for 4-5 days. If unfrosted, it can be kept at room temperature for 2-3 days.
Your Homemade Banana Cake Awaits!
There you have it! A comprehensive, beginner-friendly guide to making a truly delicious Sara Lee Banana Cake Recipe right in your own kitchen. Baking can be such a rewarding experience, and there’s nothing quite like the smell and taste of a fresh, homemade cake.
Don’t be afraid to get a little messy, follow the steps, and most importantly, have fun with it! We’re confident that with these baking tips for beginners, you’ll create a moist, flavorful banana cake that will impress everyone who tries it. So, tie on your apron, gather your ingredients, and let’s make some magic. Happy baking!