Are you ready to transform those forgotten, overripe bananas on your counter into a masterpiece? Look no further. This Sourdough Banana Nut Bread Recipe is designed specifically for you, whether you’re a seasoned baker or just starting your adventure with easy baking recipes.
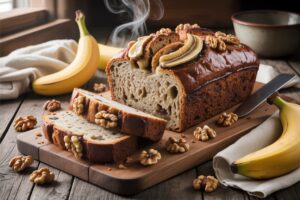
Combining the comforting sweetness of classic banana bread with the subtle tangy complexity of sourdough discard, this recipe elevates a humble treat into something truly special. We’ve packed this post with all the essential baking tips for beginners to ensure your success, from measuring ingredients correctly to understanding what makes your bread perfectly moist and delicious. Get ready to impress yourself (and everyone else!) with this incredible loaf!
Ingredients List
Gather your ingredients! Using room temperature items where specified will make a big difference in the final texture of your bread.
| Quantity | Unit | Ingredient |
|---|---|---|
| 1/2 | cup | Unsalted butter, softened |
| 3/4 | cup | Granulated sugar |
| 2 | large | Eggs, room temperature |
| 1 | teaspoon | Vanilla extract |
| 1 | cup | Sourdough discard (unfed, 100% hydration) |
| 3 | medium | Very ripe bananas, mashed (about 1 cup) |
| 1 1/2 | cups | All-purpose flour |
| 1 | teaspoon | Baking soda |
| 1/2 | teaspoon | Ground cinnamon (optional, but recommended!) |
| 1/2 | teaspoon | Salt |
| 1/2 | cup | Chopped walnuts or pecans (plus extra for topping, optional) |
Step-by-Step Instructions: Baking Your Perfect Sourdough Banana Nut Bread
Follow these detailed steps carefully for the best results. Don’t rush, and remember, baking is a joyful process!
Step 1: Prep Your Oven and Pan
- Preheat your oven to 350°F (175°C). This ensures the oven is at the correct temperature when your batter goes in, promoting even baking.
- Grease and flour a 9×5 inch loaf pan, or line it with parchment paper for easy removal. Greasing and flouring prevents sticking, while parchment paper gives you handles to lift the bread out.
Step 2: Cream Butter and Sugar
- In a large mixing bowl, using an electric mixer (or a whisk and some elbow grease!), cream together the softened unsalted butter and granulated sugar until the mixture is light and fluffy. This usually takes about 2-3 minutes. Creaming properly incorporates air, which contributes to the bread’s tender crumb.
- Beginner Tip: Softened butter means it’s pliable but not melted. If it’s too cold, it won’t cream properly. If it’s too warm, your batter might become greasy.
Step 3: Add Wet Ingredients
- Beat in the eggs one at a time, mixing well after each addition. This helps emulsify the mixture and prevents it from separating.
- Stir in the vanilla extract.
- Add the sourdough discard and mix until just combined. Don’t worry if it looks a little curdled at this stage; it will smooth out.
- Finally, fold in the mashed ripe bananas. Make sure your bananas are very ripe (brown spots are a good sign!) as they are sweeter and easier to mash, contributing more moisture and flavor.
- Common Mistake: Using under-ripe bananas will result in less flavor and a drier bread. If your bananas aren’t ripe enough, you can speed up the process by baking them unpeeled on a baking sheet at 300°F (150°C) for 15-30 minutes until they’re black and soft.
Step 4: Combine Dry Ingredients
- In a separate medium bowl, whisk together the all-purpose flour, baking soda, ground cinnamon (if using), and salt. Whisking ensures these ingredients are evenly distributed, especially the leavening agents (baking soda), which are crucial for the bread to rise properly.
- Beginner Tip: When measuring flour, spoon it into your measuring cup and then level it off with a straight edge (like the back of a knife). Scooping directly with the measuring cup can compact the flour, leading to too much flour and a dry, dense bread.
Step 5: Gently Combine Wet and Dry
- Add the dry ingredients to the wet ingredients in three additions, mixing on low speed or by hand with a spatula just until combined after each addition.
- Once almost combined, gently fold in the chopped walnuts or pecans.
- Crucial Beginner Tip: DO NOT OVERMIX! Overmixing develops the gluten in the flour too much, leading to a tough, dense, and chewy bread instead of a tender, moist one. A few lumps are perfectly fine!
- Alternative: Not a nut fan? You can omit the nuts or substitute them with chocolate chips, dried cranberries, or a mix of your favorite add-ins!
Step 6: Bake Your Bread
- Pour the batter into your prepared loaf pan. You can sprinkle a few extra chopped nuts on top for a nice presentation, if desired.
- Bake for 55-70 minutes, or until a wooden skewer or toothpick inserted into the center comes out clean or with moist crumbs attached (no wet batter).
- Beginner Tip: Baking times can vary depending on your oven. Start checking around the 50-minute mark. If the top is browning too quickly, you can loosely tent the loaf with aluminum foil.
Step 7: Cool and Serve
- Once baked, remove the loaf pan from the oven and let the bread cool in the pan for about 10-15 minutes. This allows the bread to set and makes it easier to remove.
- After 10-15 minutes, carefully invert the loaf onto a wire rack to cool completely.
- Beginner Tip: Cooling completely on a wire rack is important for texture. Cutting into a hot loaf can make it seem gummy and dense. Patience will be rewarded with perfect slices!
- Slice and enjoy your delicious homemade Sourdough Banana Nut Bread! It’s fantastic on its own, with a smear of butter, or even a dollop of cream cheese.
Tips & Tricks for Sourdough Banana Nut Bread Success
Baking is an art and a science, and these little tips can make a big difference!
- Embrace the Overripe: The browner your bananas, the sweeter and more flavorful your bread will be. Don’t be shy about using bananas that look past their prime – they’re perfect for this recipe!
- Room Temperature Matters: Ensure your butter and eggs are at room temperature. This allows them to cream together smoothly, creating a uniform emulsion that traps air for a lighter, fluffier texture. Cold ingredients can lead to a lumpy batter and a denser bread.
- Don’t Overmix: We can’t stress this enough! Mix the wet and dry ingredients just until combined. Overmixing develops gluten, resulting in a tough, chewy bread. A few lumps in the batter are perfectly normal and actually preferred.
- Measure Flour Correctly: Use the “spoon and level” method for flour. Spoon flour into your measuring cup until overflowing, then level it off with a straight edge. Scooping directly can compact the flour, adding too much and making your bread dry.
- Sourdough Discard Flexibility: While this recipe uses 100% hydration discard (equal parts flour and water), a slightly different hydration will still work. The key is to use unfed discard for that signature tang without over-proofing the bread.
- Patience with Cooling: Resist the urge to slice into your warm bread immediately. Allowing it to cool completely on a wire rack continues the cooking process and allows the crumb to set, preventing a gummy texture.
- Storage: Store your Sourdough Banana Nut Bread in an airtight container at room temperature for up to 3-4 days, or in the refrigerator for up to a week. It also freezes beautifully for up to 3 months!
Essential Baking Tools
Having the right tools makes baking a breeze. Here are a few essentials you’ll need, with links to help you find them easily:
- Mixing Bowl
- Whisk
- 9×5 Inch Loaf Baking Pan
- Measuring Cups and Spoons
- Rubber Spatula
- Electric Mixer (Handheld or Stand Mixer) (Optional, but highly recommended for creaming butter and sugar)
Nutrition Information (Estimated per slice, 12 slices per loaf)
Please note: These are estimated values and can vary based on specific ingredients and portion sizes.
| Nutrient | Amount |
|---|---|
| Calories | 250 kcal |
| Carbohydrates | 35g |
| Protein | 4g |
| Fat | 11g |
| Fiber | 2g |
| Sugar | 20g |
Frequently Asked Questions for Beginner Bakers
Can I use active sourdough starter instead of discard?
While technically possible, it’s generally recommended to use unfed sourdough discard for this recipe. Active starter might cause the bread to rise too much or too quickly, potentially leading to an undesirable texture or even collapsing. Discard provides the flavor and moisture without the strong leavening power, allowing the baking soda to do its job effectively.
My bananas aren’t ripe enough. What can I do?
No problem! You can quickly ripen bananas by baking them. Place unpeeled bananas on a baking sheet and bake at 300°F (150°C) for 15-30 minutes, or until their skins are completely black and shiny. Let them cool, then peel and mash. They’ll be incredibly sweet and perfect for your bread!
Why is my Sourdough Banana Nut Bread dense or dry?
The most common culprits for dense or dry bread are overmixing the batter (which develops too much gluten) or overbaking. Make sure to mix the wet and dry ingredients only until just combined, and start checking for doneness around the 50-minute mark to avoid overbaking.
Can I add other mix-ins besides nuts?
Absolutely! This recipe is very versatile. Feel free to swap nuts for chocolate chips, dried cranberries, shredded coconut, or a combination. Just keep the total volume of mix-ins around 1/2 to 3/4 cup to avoid overwhelming the batter.
What exactly is sourdough discard?
Sourdough discard is the portion of your sourdough starter that you remove before feeding it. It’s unfed and less active, but still packed with flavor. Using discard in recipes like this is a fantastic way to reduce waste and add a unique tangy depth to your baked goods.
Happy Baking!
There you have it! A comprehensive, beginner-friendly guide to making the most delicious Sourdough Banana Nut Bread Recipe. We hope this detailed post, full of easy baking recipes tips and tricks, empowers you to step into the kitchen with confidence. Don’t be afraid to experiment, and remember that every bake is a learning experience. Share your creations, enjoy the process, and most importantly, savor every slice of your homemade masterpiece. Happy baking!