Making sourdough bread from scratch can feel daunting, but with the help of a bread machine, it becomes a simple, almost hands-off experience. This method not only saves you time but also ensures consistent results, making it perfect for those new to the wonderful world of sourdough. Let’s get baking!
Ingredients You’ll Need
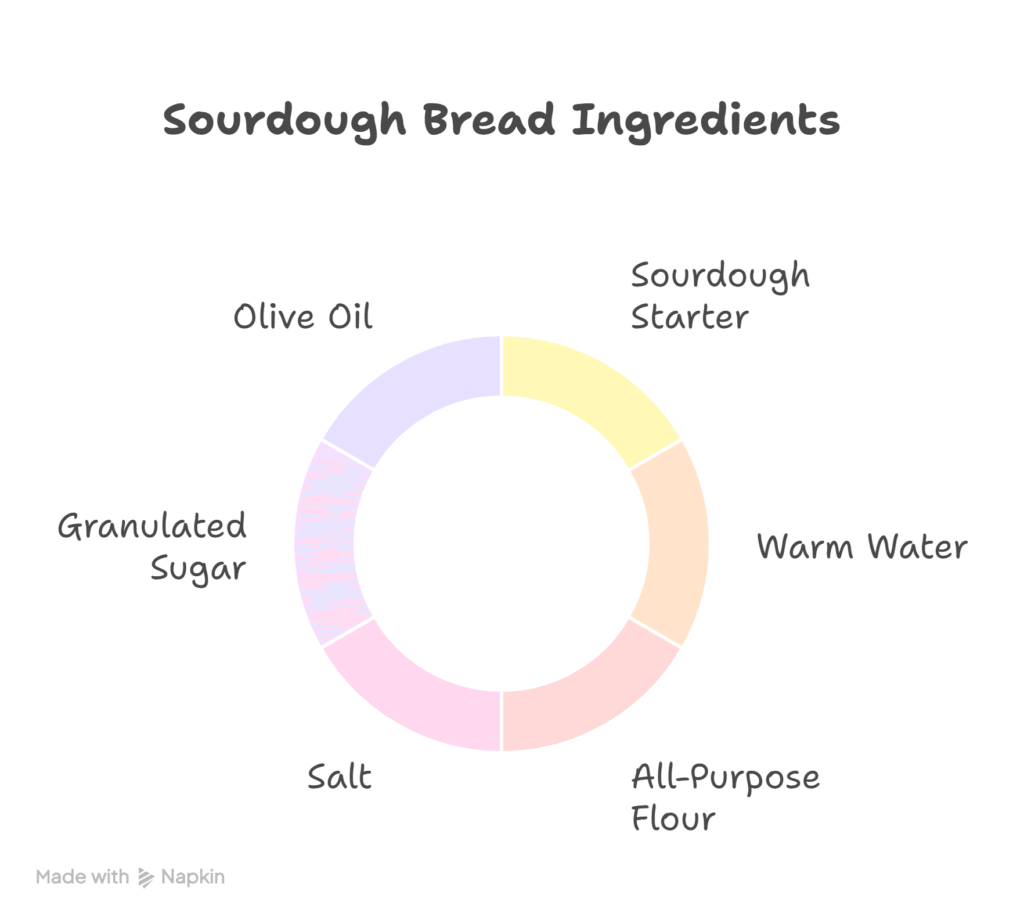
Gathering your ingredients beforehand is a great habit for any baker. For this recipe, ensure your sourdough starter is active and fed. A fed and active starter should be bubbly and double in size a few hours after feeding.
| Ingredient | Quantity | Unit |
|---|---|---|
| Active Sourdough Starter (100% hydration) | 1 | cup |
| Warm Water (100-110°F / 38-43°C) | 1 | cup |
| All-Purpose Flour (or Bread Flour) | 3 | cups |
| Salt (fine sea salt recommended) | 1.5 | teaspoons |
| Granulated Sugar (optional, for a slightly softer crumb and to boost starter) | 1 | tablespoon |
| Olive Oil or Vegetable Oil (optional, for a softer crust) | 1 | tablespoon |
Ingredient Notes for Beginners:
- Sourdough Starter: Ensure your starter is active and bubbly. If it’s been in the fridge, feed it 4-12 hours before you plan to bake and let it sit at room temperature until it’s very active. It should smell pleasantly sour and yeasty.
- Flour: Bread flour will give you a chewier, more structured loaf. All-purpose flour works well for a softer crumb. Weighing your flour is always more accurate than using measuring cups.
- Water Temperature: Warm water helps activate the starter and yeast (if using dry yeast as a boost, though not in this specific recipe, it’s a good general tip). Too hot will kill it, too cold will slow it down.
- Salt: Essential for flavor and controlling fermentation. Don’t skip it!
Step-by-Step Instructions for Your Bread Machine Sourdough
Follow these detailed steps to create a beautiful, tangy sourdough loaf with minimal effort. Remember, baking is a journey, and every loaf teaches you something new!
Step 1: Prepare Your Sourdough Starter
First and foremost, your sourdough starter needs to be active and ready to work! This is the most crucial step for a successful sourdough loaf. About 4-12 hours before you plan to bake, feed your starter as usual (e.g., 1:1:1 ratio of starter, water, flour). Let it sit at room temperature until it’s bubbly, has noticeably grown in volume (often doubled), and passes the “float test” – drop a small spoonful into a glass of water; if it floats, it’s ready! If it sinks, it might need more time or another feeding.
Beginner Tip: An inactive starter is the most common reason for a dense, flat sourdough loaf. Don’t rush this step!
Step 2: Add Ingredients to Your Bread Machine Pan
The order in which you add ingredients to your bread machine is important to prevent the salt from inhibiting the starter’s activity initially. Always check your specific bread machine manual for any brand-specific recommendations, but generally, this order works best:
- Liquids First: Pour the warm water into the bread machine pan.
- Add Starter: Spoon your active sourdough starter directly into the water.
- Dry Ingredients (Layered): Carefully add the flour, completely covering the liquid. This creates a barrier.
- Add Sugar and Salt: Place the granulated sugar (if using) and salt on separate sides of the flour, away from each other and the starter. Salt can inhibit fermentation if it comes into direct contact with the starter too early.
- Add Oil (Optional): If using olive oil, drizzle it over the flour.
Common Mistake & Fix: If your bread doesn’t rise, it might be that the salt came into direct contact with the starter. Ensure you layer your ingredients carefully as described above.
Step 3: Select the Correct Cycle
This is where your bread machine does its magic! Most bread machines have a “Basic” or “White Bread” cycle that works well for sourdough. If your machine has a dedicated “Sourdough” cycle, even better – use that! The “Basic” cycle typically includes kneading, several proofing (rising) periods, and baking.
- Cycle Selection: Choose the “Basic,” “White Bread,” or “Sourdough” cycle.
- Crust Setting: Select your desired crust color (light, medium, or dark). Medium is usually a good starting point.
- Loaf Size: Ensure your machine is set to the correct loaf size (usually 1.5 lb or 2 lb for this recipe, depending on your machine’s capacity).
Beginner Tip: The total time for these cycles can range from 3 to 4.5 hours. Be patient and resist the urge to open the lid during the baking phase!
Step 4: Monitor the Dough During the Kneading Cycle
During the initial kneading cycle (usually the first 15-20 minutes), keep an eye on your dough. This is your chance to make minor adjustments that can significantly impact the final texture of your bread.
- Too Dry? If the dough looks very stiff, isn’t forming a smooth ball, or the machine seems to be struggling, add water 1 teaspoon at a time until it forms a soft, pliable ball.
- Too Wet? If the dough looks very sticky, gloopy, and isn’t forming a cohesive ball, add flour 1 tablespoon at a time until it’s less sticky and kneads into a smooth ball.
Alternative: If you prefer a more artisanal shape, you can use the “Dough” cycle. Once the cycle finishes, remove the dough, shape it into a boule or batard, let it proof for another 1-2 hours in a proofing basket or on a baking sheet, then bake in a preheated oven at 450°F (232°C) for 30-40 minutes (with steam initially, if possible). This gives you more control over the crust and shape.
Step 5: The Magic Happens (Proofing and Baking)
Once you’ve made any necessary adjustments, close the lid and let your bread machine do its job! The machine will go through several cycles of rising (proofing) and punching down, followed by the final bake. Avoid opening the lid during these stages, especially during the baking cycle, as it can cause the bread to deflate.
Step 6: Remove and Cool Your Sourdough Loaf
Once the bread machine beeps to signal completion, carefully remove the pan from the machine using oven mitts. The pan and loaf will be very hot!
- Remove Loaf: Invert the pan onto a wire cooling rack and gently shake or tap until the loaf slides out. Be careful of the kneading paddle sometimes stuck in the bottom of the loaf – you can carefully remove it with tongs once the loaf is out.
- Cool Completely: This is a crucial step for achieving the best texture and flavor. Let your sourdough loaf cool on the wire rack for at least 1-2 hours, or even longer, before slicing. Slicing hot bread can result in a gummy texture.
Why Cooling Matters: During cooling, the internal structure of the bread sets, and the flavors develop. Patience here is truly rewarded!
Step 7: Enjoy Your Homemade Sourdough!
Once cooled, slice your beautiful, tangy sourdough and enjoy! It’s perfect with butter, olive oil, as a base for sandwiches, or simply on its own. Congratulations, you’ve just baked a delicious sourdough loaf with your bread machine!
Tips & Tricks for Sourdough Bread Machine Success
To ensure every loaf is a masterpiece, here are some actionable tips and tricks, especially helpful for beginners navigating the world of sourdough and bread machines:
- Use an Active, Happy Starter: This cannot be stressed enough. A weak starter leads to a weak rise. Feed your starter regularly, keep it at a consistent temperature, and always use it when it’s at its peak activity (bubbly, doubled, passes float test).
- Weigh Your Ingredients: While cup measurements are provided, using a kitchen scale for flour and water is far more accurate. Small discrepancies in hydration can significantly affect the dough’s consistency and the final bread.
- Water Temperature Matters: Aim for warm water (around 100-110°F / 38-43°C). This helps your starter kick into gear. Too hot will kill it; too cold will slow it down considerably.
- Humidity and Altitude Adjustments: If you live in a very humid environment, you might need slightly less water. At high altitudes, dough tends to rise faster, so you might need slightly less starter or a cooler water temperature. Pay attention to your dough’s consistency during the knead cycle.
- Don’t Be Afraid to Adjust: The “look” and “feel” of your dough are your best guides. If it seems too dry, add a teaspoon of water. If it’s too sticky, add a tablespoon of flour. Do this during the first kneading cycle.
- Clean Your Machine: Regularly clean the bread pan and kneading paddle to prevent build-up and ensure optimal performance.
- Store Your Loaf Properly: Once completely cooled, store your sourdough in a breathable bread bag or wrapped in a clean kitchen towel at room temperature for 2-3 days. For longer storage, slice and freeze.
These small adjustments and habits will elevate your bread machine sourdough from good to absolutely fantastic!
Essential Baking Tools
While your bread machine does most of the heavy lifting, a few basic tools can make your baking experience even smoother. Here are some essentials:
- Mixing Bowl (for feeding your starter or initial mixing)
- Whisk (for combining dry ingredients or stirring starter)
- Baking Pan (if you choose to bake in the oven after a dough cycle)
- Measuring Cups (for liquids and larger quantities of dry goods)
- Measuring Spoons (for precise measurements of salt, sugar, etc.)
- Spatula (for scraping down bowls or transferring ingredients)
- Kitchen Scale (highly recommended for accuracy, especially with flour)
- Wire Cooling Rack (essential for proper cooling)
Nutrition Information (Estimated per slice, 12 slices per loaf)
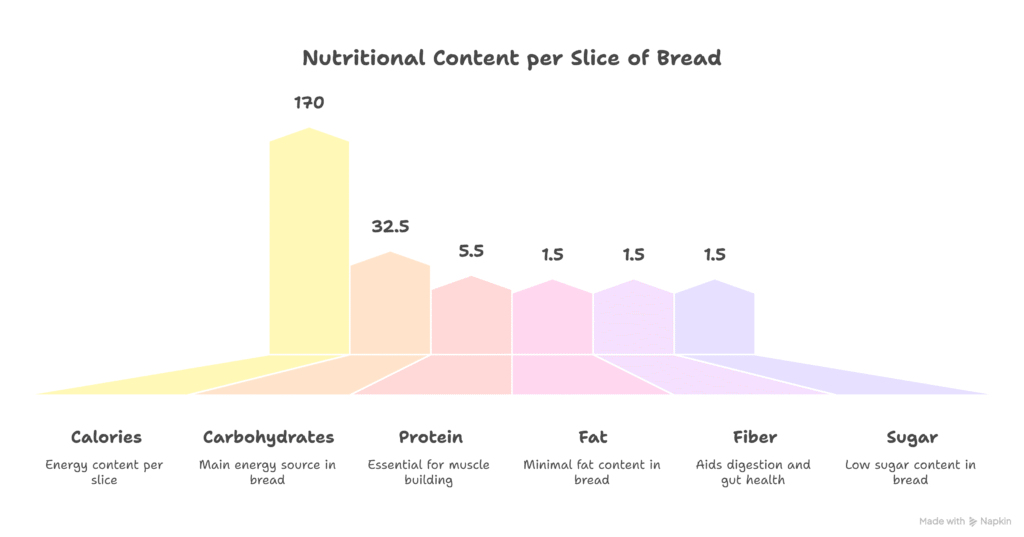
Please note that these are approximate values and can vary based on specific ingredient brands, exact measurements, and loaf size.
| Nutrient | Amount |
|---|---|
| Calories | 160-180 kcal |
| Carbohydrates | 30-35 g |
| Protein | 5-6 g |
| Fat | 1-2 g |
| Fiber | 1-2 g |
| Sugar | 1-2 g |
Frequently Asked Questions (FAQs)
Q1: My bread came out dense and flat. What went wrong?
A: This is sourdough bread machine recipe! The primary culprit is usually an inactive sourdough starter. Ensure your starter is very bubbly, has doubled in size after feeding, and passes the float test before using it. Other reasons could be too much flour (dough was too stiff) or using water that was too hot, which can kill the beneficial microbes in your starter.
Q2: Can I use whole wheat flour in this recipe?
A: Yes, absolutely! Whole wheat flour adds a lovely nutty flavor and more nutrients. However, whole wheat flour absorbs more water than all-purpose or bread flour. You’ll likely need to increase the water by 1-2 tablespoons (or even more) when substituting. Watch the dough during the knead cycle and adjust as needed until it forms a soft, pliable ball.
Q3: How do I know my sourdough starter is active enough for baking?
A: An active starter will be full of bubbles, have a pleasant yeasty-sour smell, and will have significantly risen (often doubled) in its jar a few hours after feeding. The best test is the “float test”: drop a small spoonful of your starter into a glass of water. If it floats, it’s ready! If it sinks, it needs more time or another feeding.
Q4: My bread machine doesn’t have a “sourdough” setting. What should I use?
A: No problem at all! Most bread machines will work perfectly with the “Basic” or “White Bread” cycle. These cycles typically provide the necessary kneading, proofing times, and baking temperature for a successful sourdough loaf. If you want more control over the final shape and crust, you can use the “Dough” cycle, then remove the dough, shape it, and bake it in your oven.
Q5: How long does homemade sourdough bread last, and how should I store it?
A: A fresh sourdough loaf is best enjoyed within 2-3 days at room temperature. To store it, once completely cooled, place it in a breathable bread bag, a paper bag, or wrap it in a clean kitchen towel. Avoid airtight plastic bags unless you plan to freeze it, as they can make the crust soft and promote mold. For longer storage, slice the cooled loaf and freeze the slices in an airtight freezer bag. You can then toast slices directly from frozen.
Conclusion: Your Sourdough Success Story Starts Now!
Congratulations, aspiring baker! You’ve just unlocked the secret to effortless, delicious sourdough with your bread machine. This sourdough bread machine recipe is designed to be your stepping stone into the wonderful world of artisan bread, proving that homemade doesn’t have to mean complicated. With our detailed steps and helpful baking tips for beginners, you’re well on your way to enjoying warm, tangy loaves straight from your kitchen.
Don’t be discouraged if your first loaf isn’t perfect – every bake is a learning experience! The joy of sourdough is in the process, the incredible aroma, and the unmatched taste of bread made with your own hands (and a little help from your trusty machine). So go ahead, give this recipe a try, experiment with flours, and savor the satisfaction of creating something truly special. Happy baking!
6 thoughts on “sourdough bread machine recipe – Easy Homemade Dessert”