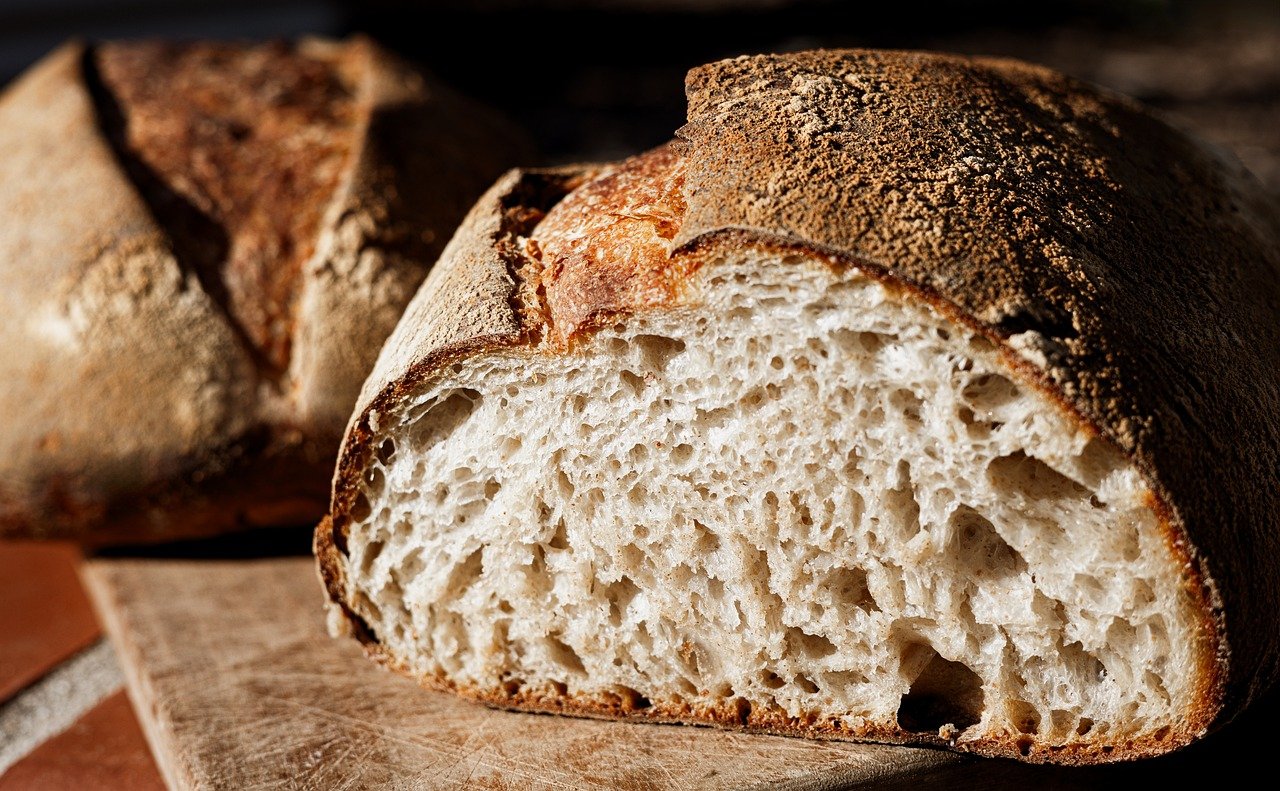
Are you ready to elevate your home baking game and impress everyone with a loaf that’s as beautiful as it is delicious? You’ve come to the right place! This Sourdough Marble Rye Bread Recipe might sound intimidating, but trust us, it’s one of those incredibly rewarding easy baking recipes that even novices can master with a little patience. We’re breaking down every step, offering essential baking tips for beginners, and guiding you through the magic of creating a stunning, flavorful marble rye right in your own kitchen. Forget store-bought; your homemade version will boast a perfect balance of tangy sourdough, rich rye flavor, and an eye-catching swirl that makes every slice a masterpiece. Let’s get baking!
We know starting with sourdough can feel like a big leap, but this detailed guide simplifies the process. We’ll cover everything from how to ensure your starter is ready to the best way to achieve that iconic marble swirl. Prepare to fall in love with the aroma of freshly baked bread filling your home and the incredible satisfaction of pulling a gorgeous loaf from your oven.
Ingredients List
Gather your ingredients! Precision is key in sourdough baking, so using a kitchen scale for flour and water is highly recommended.
| Ingredient | Quantity (Light Rye Dough) | Quantity (Dark Rye Dough) |
|---|---|---|
| Active Sourdough Starter (fed & bubbly) | 50g | 50g |
| Warm Water (90-95°F / 32-35°C) | 175g | 175g |
| Bread Flour | 200g | 180g |
| Dark Rye Flour | 50g | 70g |
| Fine Sea Salt | 5g | 5g |
| Unsweetened Cocoa Powder | – | 1 Tbsp |
| Blackstrap Molasses (or dark treacle) | – | 1 Tbsp |
| Caraway Seeds (optional, but recommended) | 1 tsp | 1 tsp |
Step-by-Step Instructions for Sourdough Marble Rye
Patience is your best friend in sourdough baking. Read through all steps before you begin!
Step 1: Prepare Your Sourdough Starter
Ensure your sourdough starter is active and bubbly. This means it should have been fed 4-8 hours prior and has roughly doubled in size, showing visible bubbles throughout. If it’s not active, give it another feeding and wait. An inactive starter will lead to a dense, flat loaf.
Step 2: Autolyse (The Initial Mix) – 30 minutes
In two separate large mixing bowls:
- For the Light Rye Dough: Combine 50g active sourdough starter, 175g warm water, 200g bread flour, and 50g dark rye flour. Mix with a spatula until no dry streaks of flour remain. It will be shaggy and sticky.
- For the Dark Rye Dough: Combine 50g active sourdough starter, 175g warm water, 180g bread flour, 70g dark rye flour, 1 Tbsp cocoa powder, and 1 Tbsp molasses. Mix until well combined. The cocoa and molasses will give it its distinct dark color and add depth of flavor.
Cover both bowls with a damp cloth or plastic wrap and let them rest for 30 minutes. This process, called **autolyse**, allows the flour to fully hydrate and gluten to begin developing, making the dough easier to work with.
Step 3: Incorporate Salt & Caraway Seeds – 15 minutes
After the autolyse, it’s time to add the salt and caraway seeds:
- For both doughs: Sprinkle 5g of fine sea salt and 1 tsp of caraway seeds (if using) over the surface of each dough.
- Wet your hands slightly and gently squeeze and fold the dough in the bowl for about 2-3 minutes until the salt and caraway seeds are evenly distributed. The dough will become a bit more cohesive.
- Cover again and let rest for 15 minutes.
Step 4: Bulk Fermentation & Stretch and Folds (3-4 hours)
This is where the magic happens! Over the next 3-4 hours (or longer, depending on your room temperature – warmer rooms ferment faster), you’ll perform a series of “stretch and folds” to develop the gluten and strengthen the dough. Aim for 3-4 sets of folds, spaced 30-45 minutes apart.
- First Set of Folds (30 minutes after salt incorporation): Lightly wet your hands. Grab a portion of the dough from one side, stretch it upwards, and fold it over itself towards the center. Rotate the bowl a quarter turn and repeat this process 3-4 more times until you’ve folded all sides. The dough should start to feel more elastic. Repeat for both doughs.
- Cover and let rest for 30-45 minutes.
- Repeat this “stretch and fold” process 2-3 more times. With each set, you’ll notice the dough becoming smoother, stronger, and more elastic. It should eventually hold its shape better.
- After the last fold, let the dough rest, covered, until it has increased in volume by about 20-30% and feels light and airy. This is the end of bulk fermentation. This might take 1-2 hours after the last fold. Beginner Tip: Look for bubbles on the surface and along the sides of the bowl.
Step 5: Pre-Shaping (Bench Rest) – 20 minutes
Lightly flour your work surface. Gently turn out both the light and dark rye doughs onto the floured surface. Gently shape each dough into a loose round. Cover them loosely with a damp cloth or inverted bowl and let them rest for 20 minutes. This allows the gluten to relax, making final shaping easier.
Step 6: Final Shaping for the Marble Effect
This is the fun part where you create the marble!
- Lightly flour your work surface again. Gently flatten each dough into a rough rectangle, about 8×10 inches. Try to make them similar in size.
- Carefully lay one rectangle of dough (e.g., the dark rye) directly on top of the other (the light rye).
- Starting from a short end, tightly roll the layered dough into a log. As you roll, gently tug the dough towards you to create tension on the surface.
- Once rolled, pinch the seam closed along the bottom and tuck in the ends to create a neat loaf shape.
- Beginner Tip: Don’t worry if it’s not perfect! The marbling will still look great. The goal is to get a relatively even spiral.
Step 7: Cold Proof (Overnight in the Fridge) – 12-18 hours
Generously flour a banneton (proofing basket) or a bowl lined with a floured kitchen towel. Carefully transfer your shaped marble rye loaf into the banneton, seam-side up. Cover the banneton with plastic wrap or a shower cap and place it in the refrigerator for 12-18 hours. Cold proofing slows down fermentation, develops deeper flavor, and makes the dough much easier to handle for scoring.
Alternative: Room Temperature Proof (1-3 hours): If you’re in a hurry, you can proof at room temperature until the dough passes the “poke test” (see Step 9). However, cold proofing is highly recommended for flavor and handling.
Step 8: Preheat Oven & Dutch Oven – 45-60 minutes
About an hour before you plan to bake, place your Dutch oven (with the lid on) into your oven and preheat to 475°F (245°C). Allowing the Dutch oven to preheat thoroughly is crucial for a great oven spring and crust.
Step 9: Score & Bake!
- Carefully remove your cold-proofed dough from the refrigerator. It should feel light and airy, and a gentle poke with a wet finger should leave a slight indentation that slowly springs back (the “poke test”). If it springs back too quickly, it’s underproofed. If it doesn’t spring back at all, it’s overproofed.
- Gently invert the dough onto a piece of parchment paper.
- Using a very sharp knife or a bread lame, score the top of the loaf. A simple long slash down the middle is classic, or you can get creative with patterns. This guides the oven spring and prevents uncontrolled tearing.
- Carefully remove the hot Dutch oven from the oven (use oven mitts!). Lift the dough by the parchment paper and gently lower it into the hot Dutch oven. Replace the lid.
- Bake with the lid on for 20 minutes at 475°F (245°C). The steam trapped inside creates an amazing crust.
- After 20 minutes, remove the lid. Reduce the oven temperature to 425°F (220°C).
- Bake with the lid off for another 25-35 minutes, or until the crust is a deep golden brown and the internal temperature reaches 200-210°F (93-99°C).
Step 10: Cool Completely
Carefully remove the loaf from the Dutch oven and transfer it to a wire cooling rack. This is arguably the hardest step: allow the bread to cool completely for at least 2-3 hours before slicing. Slicing too early will result in a gummy texture inside, as the bread is still cooking and releasing steam.
Tips & Tricks for Sourdough Success
- Active Starter is Non-Negotiable: Your sourdough starter is the heart of this recipe. Make sure it’s fed, bubbly, and active. An inactive starter will lead to a dense, sad loaf. If unsure, do a float test: drop a small spoonful into water; if it floats, it’s ready!
- Temperature Matters: Room temperature significantly impacts fermentation time. In a warmer kitchen, your dough will ferment faster. In a cooler kitchen, it will take longer. Adjust your bulk fermentation time accordingly.
- Don’t Be Afraid to Get Hands-On: Sourdough baking is a tactile experience. Don’t shy away from feeling the dough during stretch and folds. You’ll learn to recognize when it’s developing strength and elasticity.
- Use a Kitchen Scale: For consistent and accurate results, always measure your ingredients by weight, especially flour and water. Volume measurements can vary wildly.
- Patience is a Virtue: Sourdough takes time. Don’t rush the bulk fermentation or the cold proof. These stages develop flavor and texture. And please, resist the urge to slice your bread before it’s fully cooled!
- Practice Makes Perfect: Your first loaf might not be Instagram-perfect, and that’s okay! Each bake is a learning experience. Pay attention to how your dough feels and looks at each stage, and you’ll improve with every loaf.
- Storage: Once cooled, store your marble rye at room temperature in a bread bag or airtight container for 3-4 days. For longer storage, slice and freeze.
Essential Baking Tools
Having the right tools can make your sourdough journey much smoother. Here are some essentials:
- Mixing Bowl (large, for combining ingredients)
- Whisk (for initial ingredient mixing)
- Baking Pan (while a Dutch oven is ideal, a loaf pan can be used for a sandwich loaf, or a baking stone with a tray of water for steam)
- Measuring Cups & Spoons (for smaller quantities like caraway seeds, cocoa, molasses)
- Spatula (for mixing and scraping dough)
- Kitchen Scale (absolute must for accurate sourdough baking)
- Dutch Oven (for incredible crust and oven spring)
- Banneton (Proofing Basket) (optional, but helps maintain shape during proofing)
- Bread Lame or Sharp Knife (for scoring)
Nutrition Information (Estimated per 1/12th of Loaf)
Please note: These are estimated values and can vary based on specific ingredients and preparation.
| Nutrient | Amount |
|---|---|
| Calories | 200 kcal |
| Carbohydrates | 40g |
| Protein | 7g |
| Fat | 1.5g |
| Fiber | 3g |
| Sugar | 2g |
Frequently Asked Questions (FAQs)
Q1: My sourdough starter isn’t very active. Can I still use it?
A: It’s crucial for your starter to be active and bubbly. If it’s sluggish, your bread won’t rise properly. Give it another feeding (equal parts starter, flour, and water) and wait until it doubles in size and shows lots of bubbles, typically 4-8 hours after feeding, before using it in the recipe.
Q2: How do I know if my dough is properly proofed during bulk fermentation?
A: During bulk fermentation, your dough should increase in volume by about 20-30% and feel lighter and airier. Look for bubbles on the surface and along the sides of the bowl. If you gently jiggle the bowl, it should have a slight “jiggle” to it. It shouldn’t be overly gassy or have a strong sour smell at this stage.
Q3: What if I don’t have a Dutch oven for baking?
A: While a Dutch oven is highly recommended for sourdough, you can still get good results. Preheat your oven with a baking stone or heavy baking sheet inside. Place a tray of hot water on the bottom rack of your oven to create steam. Bake your loaf directly on the hot stone/sheet. The steam is essential for a good crust.
Q4: Why is my marble effect not very pronounced?
A: The key to a good marble effect is ensuring both doughs are spread evenly into rectangles and layered well. Don’t overwork the dough when rolling it up, as this can blend the colors too much. Practice makes perfect, and even a subtle marble will taste fantastic!
Q5: Can I skip the cold proofing step?
A: Yes, you can do a shorter room temperature proof (1-3 hours) until the dough passes the “poke test.” However, cold proofing significantly enhances the flavor of the sourdough, makes the dough much easier to score, and allows for more flexible baking schedules. For the best results, stick with the cold proof.
Q6: My bread is gummy inside. What went wrong?
A: The most common reason for gummy bread is slicing it before it has completely cooled. The internal cooking process continues as the bread cools, and steam needs to fully escape. Always wait at least 2-3 hours (or even longer for very large loaves) before slicing. Underbaking or underproofing can also contribute to a gummy texture.
Conclusion
Congratulations, baker! You’ve just embarked on a delightful journey to master the Sourdough Marble Rye Bread Recipe. This loaf isn’t just bread; it’s a testament to patience, practice, and the simple joy of creating something truly spectacular from scratch. Don’t be discouraged if your first attempt isn’t perfect; every baker has a learning curve. The aroma alone is a reward, and each slice of this beautiful, tangy, and flavorful bread will be a source of immense pride.
We hope these baking tips for beginners have empowered you to tackle this recipe with confidence. Share your creations, experiment with flavors, and most importantly, enjoy the process. Happy baking, and get ready to savor the best marble rye you’ve ever tasted!