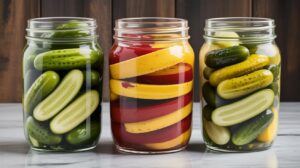
Ingredients List
Gather your fresh produce and spices! Quality ingredients are key to the best pickles.
| Ingredient | Quantity | Unit |
|---|---|---|
| Pickling Cucumbers (Kirby or Persian work well) | 4 | pounds |
| Yellow Onions | 2 | large |
| Pickling Salt (non-iodized) | 1/4 | cup |
| Cold Water | 4 | cups |
| Apple Cider Vinegar (5% acidity) | 3 | cups |
| Granulated Sugar | 2 | cups |
| Mustard Seeds | 2 | tablespoons |
| Celery Seeds | 1 | tablespoon |
| Turmeric Powder | 1 | teaspoon |
| Red Pepper Flakes | 1-2 | teaspoons (adjust to taste) |
| Garlic (sliced) | 4 | cloves |
| Fresh Dill Sprigs (optional, for flavor) | 4-6 | sprigs |
Step-by-Step Instructions: Mastering Your Pickling Process
Follow these detailed steps carefully for perfect, crunchy, and safe pickles. Precision is your best friend here!
Step 1: Prepare Your Cucumbers and Onions (The Brining Stage)
- Wash and Slice: Thoroughly wash your cucumbers. For classic bread and butter pickles, slice them into 1/4-inch thick rounds. You can use a mandoline for even slices, but a sharp knife works perfectly. Slice your yellow onions into similar 1/4-inch rounds as well.
- Brine Them: In a large, non-reactive bowl (glass or stainless steel), combine the sliced cucumbers and onions. Sprinkle the 1/4 cup of pickling salt evenly over them. Pour in 4 cups of cold water. Make sure everything is submerged.
- Let Them Rest: Cover the bowl and let it sit at room temperature for at least 2 hours, or up to 4 hours. This step is crucial! The salt draws out excess water from the vegetables, ensuring your pickles stay crisp and flavorful, preventing them from becoming soggy. Beginner Tip: Don’t skip this! It’s an essential preparatory step that impacts the final texture, much like proofing dough in baking.
Step 2: Prepare Your Jars and Lids (Sterilization is Key!)
- Sterilize Jars: While your cucumbers are brining, prepare your canning jars. You’ll need about 4-5 pint-sized jars, or 2-3 quart-sized jars. Wash them thoroughly with hot soapy water. For sterilization, you have a few options:
- Boiling Water: Place jars right-side up on a rack in a large canning pot. Fill the pot and jars with water until jars are submerged by at least an inch. Bring to a rolling boil for 10 minutes.
- Dishwasher: Run them through a hot cycle in your dishwasher without detergent, ensuring they stay hot until ready to fill.
- Oven: Place clean jars on a baking sheet in a 225°F (107°C) oven for 10 minutes.
Common Mistake: Not sterilizing jars properly can lead to spoilage. Always ensure your jars are hot when filling to prevent thermal shock and keep them sterile.
- Prepare Lids and Rings: Wash new canning lids and rings with hot soapy water. Place the flat lids in a small saucepan with simmering (not boiling) water for at least 5 minutes to soften the sealing compound. Keep them hot until ready to use. Rings do not need to be sterilized, just clean.
Step 3: Rinse and Drain
- Rinse Thoroughly: After the brining period, drain the cucumber and onion mixture in a colander. Rinse them very thoroughly under cold running water for several minutes to remove excess salt.
- Drain Well: Let them drain in the colander for about 15-20 minutes, shaking occasionally, or gently pat dry with a clean kitchen towel. You want them as dry as possible to prevent diluting your pickling brine.
Step 4: Prepare the Pickling Brine
- Combine Brine Ingredients: In a large, non-reactive pot (stainless steel is ideal), combine the apple cider vinegar, granulated sugar, mustard seeds, celery seeds, turmeric powder, and red pepper flakes. Add the sliced garlic cloves.
- Heat and Dissolve: Bring the mixture to a boil over medium-high heat, stirring occasionally, until the sugar is completely dissolved. Reduce the heat to a simmer and let it cook for 5 minutes to allow the flavors to meld. Beginner Tip: Taste the brine at this stage (carefully, it’s hot!). This is your chance to adjust the spice level. Want it hotter? Add more red pepper flakes!
Step 5: Pack the Jars
- Add Cucumbers to Brine (Optional but Recommended): Some recipes have you add the cucumbers directly to the hot brine for a few minutes. This can help them soften slightly and absorb flavor. If you prefer super crunchy pickles, you can skip this and pack directly into jars.
- Pack Jars: Carefully remove your hot, sterile jars from the canner or oven. Using a canning funnel (highly recommended for beginners!), tightly pack the drained cucumber and onion slices into the hot jars. If using, add a sprig of fresh dill to each jar.
- Pour Brine: Ladle the hot pickling brine over the packed vegetables, ensuring they are completely submerged.
- Leave Headspace: Leave 1/2 inch of headspace from the top of the jar rim. This is crucial for proper sealing! Common Mistake: Filling jars too full or not full enough. Too full and the lid won’t seal; not full enough and the food might spoil.
- Remove Air Bubbles: Use a non-metallic utensil (like a plastic chopstick or canning bubble remover) to gently push down into the jar, releasing any trapped air bubbles. Add more brine if necessary to maintain the 1/2-inch headspace.
Step 6: Seal and Process (Water Bath Canning)
- Clean Rims: Wipe the rims of the jars clean with a damp paper towel. Any food residue can prevent a proper seal.
- Place Lids and Rings: Center a hot, flat lid on each jar. Screw on the metal band (ring) until it is fingertip tight – meaning snug, but not overly tight.
- Process in Water Bath: Carefully place the filled jars onto the rack in your canning pot, ensuring they are not touching each other. Lower the rack into the pot. Add more hot water if needed, ensuring the jars are covered by at least 1-2 inches of water.
- Boil and Process: Bring the water to a rolling boil. Once boiling, start your timer. Process pint jars for 10 minutes and quart jars for 15 minutes. (Adjust for altitude if you live above 1,000 feet – add 1 minute for every 1,000 feet of elevation).
- Cool Down: After processing, turn off the heat. Let the jars sit in the hot water for 5 minutes before carefully removing them with a jar lifter.
Step 7: Cool and Check Seals
- Cool Jars: Place the hot jars on a wire rack or a clean kitchen towel on your countertop, leaving space between them. Do not disturb them for 12-24 hours. You’ll likely hear satisfying “ping!” sounds as the lids seal.
- Check Seals: After 24 hours, check the seals. The center of each lid should be concave and not flex when pressed. If any jar hasn’t sealed, refrigerate it and consume within a few weeks.
- Store: Remove the rings (they can rust if left on) and store sealed jars in a cool, dark place for at least 2-3 weeks before opening for best flavor. Enjoy your homemade **Spicy Bread Butter Pickles Recipe**!
Tips & Tricks for Perfect Pickles Every Time
Making pickles is a rewarding experience, and these tips will help ensure your success, especially as a beginner.
- Always Use Fresh, Firm Cucumbers: Overripe or soft cucumbers will result in mushy pickles. Pickling cucumbers like Kirby or Persian varieties are ideal due to their texture and smaller seeds.
- Don’t Skimp on the Salt Brine: The initial salt brine is essential for drawing out water and maintaining crispness. Make sure you rinse thoroughly afterward to prevent overly salty pickles.
- Acidity is Your Friend: Use vinegar with at least 5% acidity for safe canning. This level of acidity inhibits bacterial growth. Do not reduce the vinegar amount in the recipe.
- Adjust Spices to Your Liking: The beauty of homemade pickles is customization. Feel free to add more or less red pepper flakes, or even experiment with other spices like whole peppercorns, bay leaves, or a touch of ground ginger.
- Cleanliness is Paramount: Treat canning like a sterile surgery. Ensure all equipment – jars, lids, utensils – are impeccably clean and sterilized. This is non-negotiable for food safety.
- Patience for Flavor: While it’s tempting to try them right away, allowing your pickles to cure for at least 2-3 weeks in a cool, dark place really allows the flavors to meld and deepen. They’ll be good sooner, but great later!
- Water Quality: If you have hard water, consider using filtered water for your brine, as minerals can sometimes affect the pickling process or flavor.
Essential Kitchen Tools
While canning requires specific equipment (like a canning pot and jar lifter), these general kitchen tools are also incredibly useful for this recipe and many others. We’ve included some common kitchen essentials here:
- Mixing Bowl (for brining cucumbers)
- Whisk (for mixing brine ingredients)
- Large Pot or Canning Pot (essential for water bath canning – though “Baking Pan” is listed, a large stock pot or proper canning pot with a rack is what you’ll need for this process!)
- Measuring Cups (for precise ingredient measurements)
- Spatula (for stirring and general kitchen use, a non-metallic one is good for releasing air bubbles in jars)
- Additional Canning Specific Tools (Highly Recommended): Canning Funnel, Jar Lifter, Bubble Remover/Headspace Tool, Large Canning Pot with Rack, Canning Jars with new lids.
Nutrition Information (Estimated per 1/2 cup serving)
Please note that these values are estimates and can vary based on specific ingredients and preparation methods.
| Nutrient | Amount |
|---|---|
| Calories | 60 kcal |
| Carbohydrates | 15 g |
| Protein | 1 g |
| Fat | 0 g |
| Fiber | 1 g |
| Sugar | 12 g |
Frequently Asked Questions (FAQs)
Q1: Can I reduce the sugar in this recipe?
A: While you can slightly reduce the sugar for taste, it’s generally not recommended to significantly alter the sugar content in canning recipes, especially for bread and butter pickles where it plays a role in flavor balance and preservation. If you want a less sweet pickle, you might look for a dill pickle recipe instead.
Q2: Why did my jars not seal?
A: Common reasons for unsealed jars include: not enough headspace, food residue on the jar rim preventing a seal, using old or damaged lids, not processing for long enough, or incorrect ring tightness. Always ensure your rims are clean and lids are new and properly prepared.
Q3: What kind of cucumbers are best for pickling?
A: Small, firm pickling cucumbers like Kirby or Persian are ideal. Avoid large, waxy slicing cucumbers as they tend to be watery and produce soft, mushy pickles. Pick them fresh for the best results!
Q4: How long do these pickles last?
A: Properly canned and sealed, these **Spicy Bread Butter Pickles Recipe** can last for up to 1 year in a cool, dark pantry. Once opened, they should be refrigerated and consumed within 2-3 weeks for optimal freshness and flavor.
Q5: Can I make this recipe without canning it?
A: Yes, you can! If you skip the water bath canning step, these are considered “refrigerator pickles.” They will still be delicious but must be stored in the refrigerator and consumed within 3-4 weeks. The flavor will develop faster, but the shelf life is much shorter.
Conclusion: Savor Your Homemade Success!
Congratulations, culinary explorer! You’ve just created your very own batch of Spicy Bread Butter Pickles Recipe*. This isn’t just a recipe; it’s an accomplishment, a testament to your growing skills in the kitchen. Whether you’re a seasoned pro or just starting your journey with baking tips for beginners (or in this case, pickling tips!), the satisfaction of making something so delicious from scratch is unparalleled. Don’t be afraid to experiment with spices next time, or try another preserving adventure. Each batch gets easier, and your confidence will soar. Enjoy these tangy, spicy, and perfectly crunchy pickles as a snack, on sandwiches, or as a vibrant side dish. Happy pickling!