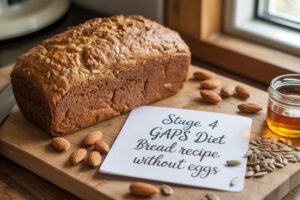
Forget complex techniques and obscure ingredients. Our goal is to empower you to create a beautiful, healthy loaf from scratch, even if you’ve never baked before. This bread is perfect for sandwiches, toast, or alongside your favorite GAPS-friendly meals. Get ready to transform your kitchen into a haven of healthy, homemade goodness!
Ingredients List
Gather your ingredients! Precision is key in baking, so make sure to measure everything accurately.
| Ingredient | Quantity | Unit |
|---|---|---|
| Blanched Almond Flour | 1 ½ | cups |
| Coconut Flour | ¼ | cup |
| Unflavored Gelatin Powder | 1 | tablespoon |
| Warm Water (for gelatin) | ¼ | cup |
| Lukewarm Water (for dough) | ½ | cup |
| Melted Coconut Oil (or Ghee) | ¼ | cup |
| Apple Cider Vinegar | 1 | tablespoon |
| Baking Soda | 1 | teaspoon |
| Sea Salt | ½ | teaspoon |
Step-by-Step Instructions: Your Beginner-Friendly Baking Journey
Follow these steps closely, and you’ll have a delightful loaf of GAPS-friendly bread in no time!
Step 1: Prepare Your Oven and Pan
- Preheat your oven: Set your oven to 350°F (175°C). It’s crucial for the oven to be fully preheated before your bread goes in, ensuring even baking and a good rise.
- Prepare your loaf pan: Lightly grease a standard 8.5 x 4.5 inch (or similar) loaf pan with coconut oil or ghee. You can also line it with parchment paper for easier removal, leaving an overhang on the sides. This prevents sticking and makes cleanup a breeze.
Step 2: Bloom the Gelatin
- In a small bowl, sprinkle the 1 tablespoon of unflavored gelatin powder over ¼ cup of warm water. Let it sit for about 5 minutes. This process, called “blooming,” allows the gelatin to absorb the water and soften. It will look like a thick gel. This gelatin acts as our essential egg replacer and binder, giving structure to our egg-free bread.
Step 3: Combine Dry Ingredients
- In a large mixing bowl, combine the blanched almond flour, coconut flour, baking soda, and sea salt.
- Beginner Tip: Use a whisk to thoroughly mix these dry ingredients. This ensures that the baking soda and salt are evenly distributed throughout the flour, which is vital for consistent texture and flavor. Clumps of baking soda can lead to an uneven rise or bitter spots.
Step 4: Mix Wet Ingredients
- In a separate medium-sized bowl, add the ½ cup of lukewarm water, ¼ cup of melted coconut oil (or ghee), and 1 tablespoon of apple cider vinegar.
- Once the gelatin has bloomed, gently heat it for about 10-15 seconds in the microwave or in a small saucepan over low heat until it melts into a liquid. Make sure it doesn’t get too hot, just warm enough to be liquid.
- Add the melted gelatin to your wet ingredient mixture. Whisk everything together until well combined.
- Common Mistake: Adding hot gelatin to the mixture. If the gelatin is too hot, it can cook the other ingredients or solidify too quickly. Ensure it’s just melted and warm, not boiling.
Step 5: Combine Wet and Dry Mixtures
- Pour the wet ingredient mixture into the bowl with the dry ingredients.
- Using a spatula or a wooden spoon, mix everything together until just combined. Do not overmix! Overmixing can develop the starches in the flours (even low-carb ones), leading to a tough, dense bread instead of a light, tender one. Mix until no dry streaks of flour remain. The dough will be thick but manageable.
Step 6: Transfer to Pan and Bake
- Spoon the dough into your prepared loaf pan.
- Use the back of your spoon or a spatula to gently spread the dough evenly and smooth out the top.
- Place the loaf pan in the preheated oven.
- Bake for 35-45 minutes. The exact time can vary slightly depending on your oven.
- How to check for doneness: The bread should be golden brown on top. Insert a wooden skewer or toothpick into the center of the loaf. If it comes out clean (without wet batter sticking to it), your bread is ready. If it comes out with wet crumbs, continue baking for another 5-10 minutes and check again.
Step 7: Cool and Slice
- Once baked, carefully remove the loaf pan from the oven.
- Let the bread cool in the pan for about 10-15 minutes. This allows the bread to set and firm up, making it easier to remove without breaking.
- After 10-15 minutes, carefully invert the pan onto a wire cooling rack and gently remove the bread.
- Allow the bread to cool completely on the wire rack before slicing. This is a crucial step! Slicing warm GAPS bread can lead to a gummy texture and it might crumble. Patience here will be rewarded with perfect slices.
- Once fully cooled, slice your bread into desired thickness. Enjoy!
Tips & Tricks for GAPS Baking Success
Baking can be an art and a science, but with these simple tips, you’ll master this recipe in no time:
- Accurate Measuring is Key: Especially with low-carb flours like almond and coconut flour, using precise measurements (preferably with a kitchen scale for flours if you have one, or by leveling off cups properly) is vital. Coconut flour is particularly absorbent, so even a slight excess can make your bread dry.
- Don’t Overmix: As mentioned in the instructions, mixing until just combined is important. Overmixing develops gluten (even in gluten-free flours, it can affect texture) and can lead to a tough or dense loaf.
- Oven Temperature Matters: Ovens can vary. Consider investing in an oven thermometer to ensure your oven is truly at the temperature you set. An inaccurate oven can significantly impact baking time and results.
- Cool Completely: Resist the urge to slice warm bread! GAPS breads, especially those without traditional gluten, need time to set and firm up as they cool. Slicing too early often results in a crumbly or gummy texture.
- Storage: Once completely cooled, store your bread in an airtight container at room temperature for up to 3 days, or in the refrigerator for up to 5-7 days. For longer storage, slice the bread and freeze individual slices, separating them with parchment paper. This allows you to grab a slice whenever you need it!
- Substitutions: While this recipe is optimized for GAPS Stage 4, you can experiment. Ghee can be used interchangeably with coconut oil. For a different flavor profile, you could try another GAPS-friendly nut flour (like pecan flour) in place of some almond flour, though the ratio might need slight adjustment due to varying absorption rates.
Essential Baking Tools
Having the right tools makes baking a joy. Here are a few essentials you’ll need, with convenient links to find them:
Nutrition Info (Estimated per slice, assuming 12 slices per loaf)
Please note that these are approximate values and can vary based on specific brands and exact measurements. This information is for general guidance only.
| Nutrient | Amount |
|---|---|
| Calories | 160 kcal |
| Carbohydrates | 6g |
| Protein | 6g |
| Fat | 14g |
| Fiber | 3g |
| Sugar | 1g |
Frequently Asked Questions
Q1: Can I use a different flour instead of almond or coconut flour?
A: For GAPS Stage 4, almond and coconut flour are excellent choices. Other nut flours like pecan or hazelnut flour might work, but they absorb liquid differently, so you might need to adjust the liquid content slightly. Avoid grain flours as they are not GAPS compliant at this stage.
Q2: My bread didn’t rise much. What went wrong?
A: A few common culprits: 1) Expired baking soda (always check the date!). 2) Overmixing the batter, which can deflate the air pockets. 3) Your oven might not have been fully preheated. 4) Ensure your gelatin bloomed properly and was fully melted and incorporated.
Q3: Why is this recipe egg-free? Can I add eggs if I tolerate them?
A: This recipe is specifically designed for those following the GAPS diet who may not tolerate eggs, or are not yet ready to introduce them at Stage 4. If you tolerate eggs and want to include them, you could try replacing the gelatin and some of the liquid with 2-3 eggs, but this would be a significant modification to the recipe and would change the texture. It’s best to find a separate GAPS bread recipe that *includes* eggs if that’s your preference.
Q4: Can I make this bread sweeter or add other ingredients?
A: At GAPS Stage 4, it’s generally recommended to keep added sweeteners to a minimum or avoid them. However, if you’re further along in your healing journey and tolerate it, a very small amount of honey (e.g., 1-2 teaspoons) could be added to the wet ingredients. For savory variations, you could add dried herbs (like rosemary or thyme) or garlic powder to the dry ingredients.
Q5: How do I know if my gelatin has bloomed properly?
A: When gelatin blooms, it will absorb the warm water and turn into a thick, translucent gel-like substance. It should not be watery. If it’s still powdery or hasn’t thickened, it might need a few more minutes or slightly warmer water (but not hot/boiling!).
Conclusion
Congratulations, you’ve just unlocked the secret to baking delicious, GAPS-compliant bread without eggs! We hope this detailed, beginner-friendly guide has made the process enjoyable and stress-free. Remember, every time you bake, you’re not just making food; you’re nurturing yourself and your loved ones with wholesome ingredients.
Don’t be afraid to experiment a little once you’ve mastered the basic recipe, but always stick to your GAPS guidelines. Enjoy your homemade Stage 4 Gaps Diet Bread Recipe Without Eggs and celebrate your baking success. Happy baking, and here’s to feeling great!