
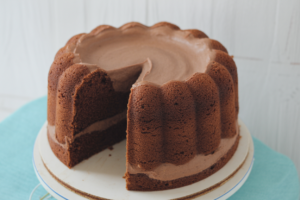
Welcome, fellow dessert lovers and aspiring bakers! Are you ready to dive into the delightful world of homemade treats? Today, we’re tackling a classic that brings back sweet memories for many: the Suzy Q Cake Recipe. Forget those store-bought snack cakes – this homemade version is not only incredibly delicious but also surprisingly simple to make. If you’ve been searching for easy baking recipes that deliver big on flavor without requiring advanced skills, you’ve found your match. We’ve packed this guide with detailed instructions and essential baking tips for beginners to ensure your first attempt is a huge success. Get ready to impress your friends and family with this moist chocolate cake topped with a dreamy, fluffy marshmallow-like frosting. Let’s get baking!
This recipe is designed to be as straightforward as possible, guiding you through each step with clear explanations. We understand that baking can sometimes feel intimidating, but with our friendly advice, you’ll gain confidence in the kitchen and create a show-stopping dessert. So, put on your apron, gather your ingredients, and let’s create some magic together!
Ingredients You’ll Need
For the Chocolate Cake:
| Quantity | Unit | Ingredient |
|---|---|---|
| 1 ¾ | cups | All-purpose flour |
| ¾ | cup | Unsweetened cocoa powder (natural, not Dutch-processed) |
| 1 ½ | teaspoons | Baking soda |
| ½ | teaspoon | Salt |
| 1 ½ | cups | Granulated sugar |
| ½ | cup | Unsalted butter, softened (1 stick) |
| 2 | large | Eggs, at room temperature |
| 1 | teaspoon | Vanilla extract |
| 1 | cup | Buttermilk, at room temperature |
| ½ | cup | Hot water (or hot strong coffee for deeper flavor) |
For the Fluffy Marshmallow Frosting:
| Quantity | Unit | Ingredient |
|---|---|---|
| 1 | cup | Granulated sugar |
| ¼ | cup | Water |
| 2 | large | Egg whites, at room temperature |
| ½ | teaspoon | Cream of tartar |
| 1 | teaspoon | Vanilla extract |
Step-by-Step Instructions: Baking Your Suzy Q Cake
Follow these detailed steps carefully, and you’ll be enjoying a delicious homemade Suzy Q Cake in no time!
Part 1: Preparing the Chocolate Cake
- Preheat Your Oven & Prep Your Pan: Start by preheating your oven to 350°F (175°C). This is crucial for even baking. Next, take a 9×13 inch baking pan. Lightly grease it with butter or non-stick spray, then dust it with a little flour. Tap out any excess flour. This prevents your cake from sticking – a common beginner frustration! You can also line the bottom with parchment paper for extra insurance.
- Combine Dry Ingredients: In a large bowl, whisk together the flour, cocoa powder, baking soda, and salt. Whisking ensures everything is evenly distributed and helps to aerate the flour, leading to a lighter cake. Set this bowl aside.
- Cream Butter and Sugar: In a separate, larger bowl (or the bowl of a stand mixer), cream together the softened butter and granulated sugar on medium speed until the mixture is light and fluffy. This usually takes about 3-5 minutes. Softened butter (not melted!) is key here – it incorporates air, which contributes to the cake’s texture. If your butter isn’t soft enough, microwave it for 10-15 seconds, but be careful not to melt it.
- Add Eggs and Vanilla: Beat in the eggs one at a time, mixing well after each addition. Scrape down the sides of the bowl with a spatula to ensure everything is fully incorporated. Then, stir in the vanilla extract. Adding eggs one by one helps to create a stable emulsion, preventing the batter from curdling.
- Alternate Wet and Dry Ingredients: Now, it’s time to combine everything. Slowly add the dry ingredient mixture to the wet mixture, alternating with the buttermilk. Start and end with the dry ingredients. For example, add about a third of the dry mix, mix until just combined, then add half the buttermilk, mix, then another third of dry, the rest of the buttermilk, and finally the last third of dry.
- Beginner Tip: Do NOT overmix the batter once the flour is added! Overmixing develops the gluten in the flour too much, resulting in a tough, dense cake. Mix until just combined, with no visible streaks of flour. A few small lumps are okay.
- Incorporate Hot Water/Coffee: Gently stir in the hot water (or coffee). The hot liquid helps to bloom the cocoa powder, intensifying its chocolate flavor and creating a moist crumb. The batter will be quite thin, which is perfectly normal for this recipe.
- Pour and Bake: Pour the batter evenly into your prepared 9×13 inch pan. Bake for 30-35 minutes, or until a wooden skewer or toothpick inserted into the center comes out clean or with a few moist crumbs attached.
- Common Mistake & Fix: Don’t open the oven door too early! This can cause the cake to sink in the middle. Wait until at least 25 minutes have passed. If your cake sinks, it might be underbaked or the oven temperature might be inconsistent.
- Cooling Time: Once baked, remove the cake from the oven and let it cool in the pan on a wire rack for about 15-20 minutes. Then, carefully invert the cake onto the wire rack to cool completely. This is very important! Frosting a warm cake will result in melted, messy frosting. This can take 1-2 hours.
Part 2: Making the Fluffy Marshmallow Frosting
- Prepare a Double Boiler: Fill a saucepan with about an inch or two of water and bring it to a simmer over medium heat. You’ll need a heatproof bowl that fits snugly over the saucepan without touching the water (this creates a double boiler).
- Combine Sugar, Water, Egg Whites, and Cream of Tartar: In your heatproof bowl, combine the granulated sugar, water, egg whites, and cream of tartar. Whisk them together briefly.
- Beginner Tip: Ensure your egg whites are at room temperature. They whip up much better and achieve greater volume. Also, make sure there is absolutely no egg yolk in your whites, or they won’t whip properly.
- Heat and Whisk: Place the bowl over the simmering water. Continuously whisk the mixture by hand for about 5-7 minutes, or until the sugar has dissolved and the mixture is warm to the touch (around 160°F or 71°C if you have a thermometer). The mixture will become frothy. This step is crucial for dissolving the sugar and pasteurizing the egg whites.
- Whip to Stiff Peaks: Carefully remove the bowl from the heat. Using an electric hand mixer or a stand mixer with the whisk attachment, beat the mixture on high speed. Continue beating for about 7-10 minutes, until the frosting is very thick, glossy, and holds stiff peaks.
- Add Vanilla: Beat in the vanilla extract during the last minute of whipping.
Part 3: Assembling Your Suzy Q Cake
- Frost the Cooled Cake: Once your chocolate cake is completely cool, dollop the fluffy marshmallow frosting on top. Use an offset spatula or the back of a spoon to spread the frosting evenly over the entire cake. Create swirls or peaks for a lovely presentation.
- Chill (Optional, but Recommended): For cleaner slices and a firmer frosting, you can chill the cake in the refrigerator for about 30 minutes before serving.
- Serve and Enjoy: Slice into generous portions and savor your homemade Suzy Q Cake!
Tips & Tricks for Baking Success
Baking is a science, but with a few simple tricks, you can master any recipe. Here are some extra pointers to help you along your baking journey, especially with this **Suzy Q Cake Recipe**:
- Measure Accurately: Baking requires precision. Use proper measuring cups for dry ingredients (levelled off with a straight edge) and liquid measuring cups for liquids. For best results, consider investing in a kitchen scale – it’s the most accurate way to measure flour and sugar.
- Room Temperature Ingredients: Ensure your butter, eggs, and buttermilk are at room temperature. This allows them to emulsify better, creating a smoother, more uniform batter and a lighter cake texture. For eggs, place them in a bowl of warm water for 5-10 minutes. For butter, leave it on the counter for 30-60 minutes.
- Don’t Overbake: Overbaking is the enemy of a moist cake. Start checking for doneness at the minimum recommended baking time. A toothpick inserted into the center should come out clean or with a few moist crumbs, but not wet batter.
- Quality Ingredients: While not always necessary, using good quality cocoa powder and vanilla extract can significantly enhance the flavor of your cake.
- Patience with Cooling: Resist the urge to frost a warm cake. The frosting will melt and slide off. Allow the cake to cool completely on a wire rack before applying any frosting.
- Cleanliness is Key for Frosting: When making the marshmallow frosting, ensure your bowl and whisk attachment are perfectly clean and grease-free. Any trace of fat can prevent egg whites from whipping up properly.
Essential Baking Tools
Having the right tools makes all the difference! Here are some basics you’ll want for this recipe:
- Mixing Bowl (various sizes)
- Whisk (for dry ingredients and hand-whisking frosting)
- 9×13 Inch Baking Pan
- Measuring Cups (dry and liquid)
- Measuring Spoons
- Rubber Spatula (for scraping bowls)
- Electric Hand Mixer or Stand Mixer (highly recommended for creaming butter and whipping frosting)
- Wire Rack (for cooling the cake)
- Offset Spatula (for spreading frosting evenly)
Nutrition Information (Estimated per serving, 1 of 12 servings)
| Nutrient | Amount |
|---|---|
| Calories | 380 kcal |
| Carbohydrates | 70g |
| Protein | 6g |
| Fat | 10g |
| Fiber | 2g |
| Sugar | 50g |
Disclaimer: Nutritional information is an estimate based on average ingredient values and may vary depending on specific brands and preparation methods.
Frequently Asked Questions (FAQs)
Q1: Can I make this cake ahead of time?
Absolutely! The chocolate cake can be baked a day in advance. Once completely cooled, wrap it tightly in plastic wrap and store it at room temperature. You can make the frosting just before assembling, as it’s best when freshly made, or frost the cake and store it in an airtight container at room temperature for up to 2 days, or in the refrigerator for up to 4 days.
Q2: My cake sunk in the middle. What went wrong?
Several factors can cause a cake to sink. Common culprits include opening the oven door too early (which causes a sudden temperature drop), underbaking the cake, or overmixing the batter (which creates too much air that collapses during baking). Ensure your oven temperature is accurate (an oven thermometer can help!) and resist the urge to peek during the first 25 minutes of baking.
Q3: My marshmallow frosting isn’t getting stiff. What should I do?
This is a common issue! The most likely reasons are that the bowl or whisk had traces of grease, the egg whites weren’t at room temperature, or the mixture wasn’t heated enough over the double boiler. Ensure all equipment is spotless and grease-free. You might also need to beat it for longer – sometimes it takes more than 10 minutes to reach stiff peaks, especially in humid conditions.
Q4: Can I use regular milk instead of buttermilk?
Yes, you can make a buttermilk substitute! For 1 cup of buttermilk, simply measure 1 cup of regular milk (whole or 2%) and stir in 1 tablespoon of lemon juice or white vinegar. Let it sit for 5-10 minutes until it curdles slightly. This acidity is important for reacting with the baking soda and giving the cake its tender texture.
Q5: How should I store leftover Suzy Q Cake?
Store leftover cake in an airtight container at room temperature for up to 2-3 days, or in the refrigerator for up to 4-5 days. If refrigerating, let it come to room temperature for about 30 minutes before serving for the best texture and flavor.
Time to Enjoy Your Homemade Suzy Q!
Congratulations, you’ve just baked a fantastic Suzy Q Cake! We hope you found this recipe guide clear, helpful, and most importantly, fun to follow. Baking, especially for beginners, is all about practice and enjoying the process. Don’t be afraid to experiment and make it your own. This homemade version is so much more satisfying than anything you’ll find in a package, and the pride of creating it yourself is truly the sweetest ingredient.

Share your creations with us, and don’t hesitate to reach out if you have more questions. Happy baking, and enjoy every single delicious bite of your amazing Suzy Q Cake!