
Forget intimidating techniques; we’ve crafted this guide to be incredibly beginner-friendly, focusing on easy baking recipes that yield spectacular results. We’ll walk you through every step, providing essential baking tips for beginners to ensure your success. This recipe blends the delightful tang of sourdough with a hint of sweetness, creating a loaf that’s perfect for breakfast toast, sandwiches, or simply enjoyed on its own. Get ready to impress yourself and your loved ones with a loaf that’s both rustic and wonderfully delicious!
What You’ll Need: Simple Ingredients for Delicious Sweet Sourdough
Gather your ingredients! Using a kitchen scale for accuracy is highly recommended, especially when working with sourdough.
| Ingredient | Quantity | Unit |
|---|---|---|
| Active Sourdough Starter | 100 | grams |
| Warm Water (around 90-95°F / 32-35°C) | 350 | grams |
| Bread Flour (high protein content is best) | 500 | grams |
| Granulated Sugar (or honey/maple syrup) | 50 | grams |
| Fine Sea Salt | 10 | grams |
| Unsalted Butter (softened, optional for richer crumb) | 20 | grams |
Baking Your Sweet Sourdough: A Step-by-Step Journey for Beginners
Patience is key with sourdough, but don’t worry, we’ll guide you through each stage. Read through all steps before you begin!
Step 1: Prepare Your Sourdough Starter (The Night Before)
Ensure your sourdough starter is active and bubbly before you begin. The best time to use it is 4-8 hours after its last feeding, when it has doubled or tripled in size and passes the “float test” (a small dollop floats in water). If your starter isn’t quite ready, feed it and wait. This step is crucial for good rise!
Step 2: Autolyse (Hydration & Flavor Development) – Morning
This is an optional but highly recommended step for beginners as it makes the dough easier to work with and improves gluten development.
- In a large mixing bowl, combine the **bread flour** and **warm water**. Mix them just enough until no dry flour remains. It will look shaggy and unappealing, but that’s okay!
- Cover the bowl with a damp cloth or plastic wrap and let it rest for 30 minutes to 1 hour at room temperature. During this time, the flour will fully hydrate, and gluten development will begin naturally.
Step 3: Mix in the Starter, Sugar, and Salt
Now it’s time to bring everything together!
- Add your **active sourdough starter**, **granulated sugar**, and **fine sea salt** to the autolysed dough.
- Using your hands (wet them slightly to prevent sticking) or a stand mixer with a dough hook, mix the ingredients until they are fully incorporated. This might take 5-10 minutes by hand or 3-5 minutes on low speed with a mixer.
- If using butter, add the **softened unsalted butter** now and continue mixing until it’s fully absorbed and the dough starts to become smooth and elastic. Beginner Tip: Don’t be afraid to get your hands messy! The dough will be sticky at first but will come together with mixing.
- Once mixed, cover the bowl again and let it rest for 30 minutes. This is called a “bench rest” and allows the gluten to relax.
Step 4: Bulk Fermentation & Stretch and Folds (Building Strength)
This is where the dough develops flavor and strength. It typically takes 4-6 hours, depending on your room temperature and starter activity.
- Over the next 2-3 hours, you will perform a series of “stretch and folds.” This technique gently strengthens the dough.
- First set of folds (after 30 min bench rest): Lightly dampen your hands. Grab a portion of the dough from one side, gently stretch it upwards, and fold it over itself towards the center. Rotate the bowl a quarter turn and repeat this process 3-4 more times until you’ve gone around the entire dough. The goal is to build tension.
- Cover the bowl and let it rest for 30-45 minutes.
- Repeat this “stretch and fold” process 3-4 more times, with 30-45 minute rests in between each set. You should notice the dough becoming smoother, stronger, and more elastic with each set. It will also start to show visible bubbles.
- After the last set of folds, allow the dough to continue fermenting undisturbed for the remainder of the bulk fermentation time (until it has increased in volume by about 30-50% and looks bubbly). Common Mistake: Rushing this stage will result in a dense loaf. Look for visual cues – lots of small bubbles on the surface and along the sides of the bowl.
Step 5: Pre-Shaping (Creating Surface Tension)
This step prepares the dough for its final shape.
- Lightly flour your work surface.
- Gently tip the dough out of the bowl onto the floured surface. Avoid deflating it too much.
- Gently shape the dough into a loose round or rectangle (depending on your final desired shape) by pulling the edges towards the center and creating surface tension.
- Cover the dough with a damp cloth or inverted bowl and let it rest for 20-30 minutes. This is another “bench rest” to allow the gluten to relax before final shaping.
Step 6: Final Shaping (The Loaf’s Form)
Now, give your bread its final structure.
- Lightly flour your hands and the dough.
- Gently flatten the dough into a rough rectangle.
- For a round loaf (boule): Fold the top third of the dough down towards the center, then fold the bottom third up over that. Rotate 90 degrees, then gently roll the dough into a tight log, stitching the seam as you go. Pinch the ends to seal.
- For an oblong loaf (batard): Similar to the boule, but aim for a more elongated shape.
- Once shaped, place the dough seam-side up into a floured banneton (proofing basket) or a bowl lined with a floured tea towel. Beginner Tip: Generously flour your banneton/towel with rice flour or a mix of rice and bread flour to prevent sticking.
Step 7: Cold Proofing (Developing Flavor & Structure) – Overnight
Cold proofing slows down fermentation, enhancing flavor and making the dough easier to handle.
- Cover your banneton/bowl with plastic wrap or a shower cap.
- Place it in the refrigerator for 12-18 hours. This slow, cold proof develops complex flavors and makes the dough much easier to score and bake. You can even extend this up to 24 hours. Alternative: If you’re in a rush, you can do a shorter room temperature proof (1-3 hours), but the flavor won’t be as deep.
Step 8: Preheat Oven & Dutch Oven
Getting your oven and baking vessel screaming hot is crucial for a great crust and oven spring.
- At least 1 hour before you plan to bake, place your Dutch oven (with its lid) into your oven.
- Preheat your oven to 475°F (245°C) with the Dutch oven inside. Ensure it’s fully preheated before proceeding.
Step 9: Score & Bake!
The moment of truth!
- Carefully remove the hot Dutch oven from the oven. Be extremely cautious – it’s very hot!
- Gently invert your proofed dough directly into the hot Dutch oven. You can place a piece of parchment paper underneath for easier transfer if you prefer.
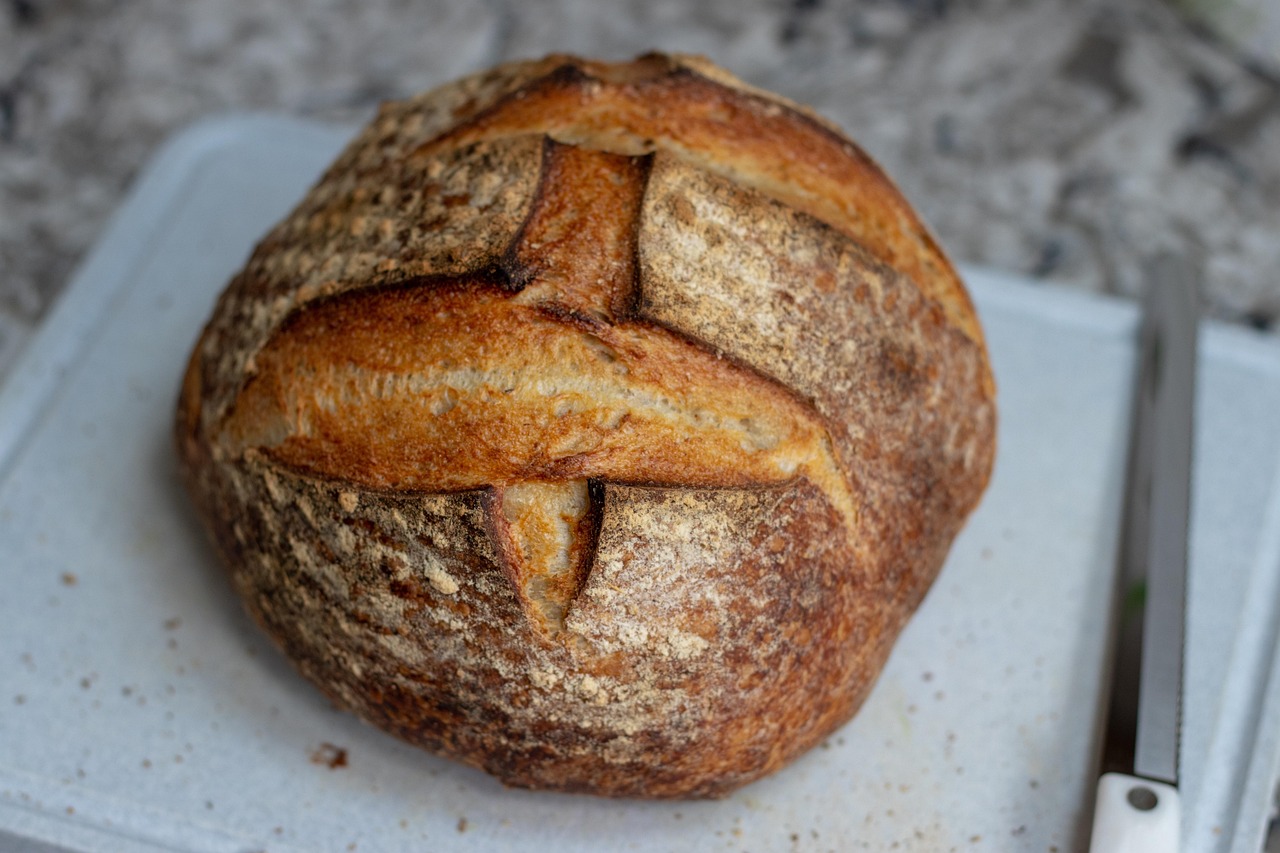
- Using a sharp razor blade (lame) or a very sharp knife, score the top of your dough. A simple slash down the middle or a crosshatch pattern works well. Scoring allows the dough to expand predictably.
- Cover the Dutch oven with its lid.
- Bake for 20 minutes with the lid on. This steams the bread, allowing for maximum oven spring and a beautiful crust.
- After 20 minutes, carefully remove the lid. Reduce the oven temperature to 450°F (230°C).
- Continue baking for another 25-30 minutes, or until the crust is a deep golden brown and the internal temperature reaches 200-210°F (93-99°C).
- Carefully remove the bread from the Dutch oven and place it on a wire rack to cool completely.
Step 10: Cool Completely (The Hardest Part!)
Resist the urge to cut into your beautiful loaf immediately! Cooling allows the internal structure to set and steam to dissipate, preventing a gummy interior.
- Let the bread cool on a wire rack for at least 2-3 hours before slicing. Enjoy your delicious, homemade Sweet Sourdough Bread!
Pro Tips for Perfect Sweet Sourdough Every Time
Even though this is a beginner-friendly recipe, a few extra pointers can make a big difference in your baking journey:
- Know Your Starter: An active, bubbly starter is paramount. If it’s sluggish, feed it a couple of times before baking. It should double in size within 4-8 hours after feeding.
- Temperature Matters: Sourdough is sensitive to temperature. Warmer temperatures speed up fermentation, while cooler temperatures slow it down. Adjust bulk fermentation and proofing times accordingly. Your kitchen temperature will directly impact your dough.
- Invest in a Kitchen Scale: Measuring by weight (grams) is far more accurate than cups, especially for baking. It removes guesswork and ensures consistent results.
- Don’t Be Afraid to Get Sticky: Dough can be sticky, especially during mixing. Wet hands can help prevent sticking when doing stretch and folds. Embrace the tactile experience!
- Listen to Your Dough: Don’t rely solely on timings. Look for visual cues: bubbles, increased volume, jiggle, and how it feels. These are better indicators of readiness than a clock.
- Patience is a Virtue: Sourdough takes time. Don’t rush any of the fermentation or proofing stages. Good things come to those who wait!
- Cool Completely: This cannot be stressed enough. Slicing into hot bread traps steam, leading to a gummy texture. Wait for that beautiful crumb to set.
Your Baking Arsenal: Essential Tools for Sweet Sourdough Success
Having the right tools makes the process smoother and more enjoyable:
- Large Mixing Bowl
- Whisk (for combining dry ingredients, though hands are often preferred for sourdough)
- Dutch Oven (or a heavy-bottomed pot with a lid that can go in the oven)
- Kitchen Scale (essential for accurate ingredient measurements)
- Dough Scraper or Spatula (for handling sticky dough)
- Banneton (proofing basket) or a bowl lined with a floured tea towel
- Sharp razor blade (lame) or a very sharp knife for scoring
- Wire cooling rack
Nutrition Snapshot (per serving, estimated)
This is an estimated nutritional breakdown for one slice of sweet sourdough bread (assuming 12 slices per loaf). Actual values may vary based on ingredients and exact preparation.
| Nutrient | Amount |
|---|---|
| Calories | 200-250 kcal |
| Carbohydrates | 40-50 g |
| Protein | 8-10 g |
| Fat | 2-4 g |
| Fiber | 2-3 g |
| Sugar | 5-8 g |
Sweet Sourdough FAQs: Your Questions Answered
Q1: My sourdough starter isn’t very active. What should I do?
A1: An active starter is key! If your starter seems sluggish, try feeding it 1:1:1 (starter:water:flour by weight) a couple of times, about 8-12 hours apart, before you plan to bake. Keep it in a warm spot (75-80°F / 24-27°C) to encourage activity. Look for it to double or triple in size and be very bubbly before using.
Q2: Can I use all-purpose flour instead of bread flour?
A2: While you can, bread flour is highly recommended for sourdough. It has a higher protein content, which translates to better gluten development, strength, and ultimately, a better rise and crumb structure in your bread. All-purpose flour might result in a denser loaf.
Q3: What if my dough isn’t rising much during bulk fermentation?
A3: Several factors can cause this. Check your starter’s activity first. Also, ensure your kitchen isn’t too cold; sourdough ferments best in a warmer environment. If it’s cold, try placing your dough in a slightly warmer spot (like an oven with just the light on) or extend the bulk fermentation time. Remember, sourdough rise is often more subtle than commercial yeast breads.
Q4: How do I know when the bread is fully baked?
A4: Besides the visual cues of a deep golden-brown crust, the most reliable way is to check the internal temperature with a thermometer. It should register between 200-210°F (93-99°C). If you tap the bottom of the loaf, it should also sound hollow.
Q5: How should I store my Sweet Sourdough Bread?
A5: Once completely cooled, store your bread at room temperature. A cut loaf is best stored cut-side down on a cutting board, covered with a tea towel, or in a bread bag. It stays fresh for 2-3 days. For longer storage, slice the loaf and freeze the slices in an airtight bag. Toast directly from frozen!
Your Sweet Sourdough Masterpiece Awaits!
Congratulations, baker! You’ve successfully navigated the wonderful world of Sweet Sourdough Bread. From the first mix to the final golden crust, you’ve nurtured a beautiful loaf that’s bursting with flavor and made with your own hands. Don’t be discouraged if your first loaf isn’t “perfect” – every bake is a learning experience, and the taste will always be incredible. Keep experimenting, keep baking, and most importantly, keep enjoying the process!
We’d love to see your creations! Share your sweet sourdough journey with us in the comments below or on social media. Happy baking!