Welcome, aspiring bakers! Are you ready to dive into the wonderful world of homemade bread? There’s nothing quite like the aroma of freshly baked bread wafting through your kitchen, and with this Sweetened Condensed Milk Bread Recipe, you’re in for a treat.
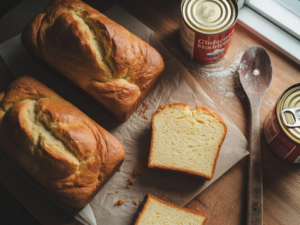
This recipe is designed to be one of the most easy baking recipes you’ll ever try, perfect for anyone looking for baking tips for beginners. Forget complicated techniques; we’re focusing on simplicity, deliciousness, and a truly rewarding baking experience. Get ready to bake a loaf that’s incredibly soft, subtly sweet, and wonderfully moist – a true crowd-pleaser!
Ingredients You’ll Need
Gathering your ingredients beforehand, also known as “mise en place,” is a great habit for **baking tips for beginners**. It makes the entire process smoother and less stressful. Make sure all your ingredients are fresh for the best results!
| Ingredient | Quantity |
|---|---|
| Warm Water (105-115°F / 40-46°C) | 1/2 cup (120ml) |
| Active Dry Yeast | 2 1/4 teaspoons (1 standard packet) |
| Granulated Sugar | 1 tablespoon |
| All-Purpose Flour | 3 cups (360g), plus more for dusting |
| Salt | 1 teaspoon |
| Sweetened Condensed Milk | 1/2 cup (120ml) |
| Unsalted Butter, melted | 1/4 cup (60g) |
| Egg, large | 1, lightly beaten (for egg wash, optional) |
Step-by-Step Instructions: Bake Your Best Bread Yet!
Follow these detailed steps carefully, and you’ll be pulling a beautiful loaf out of the oven in no time. Don’t rush, enjoy the process, and remember that practice makes perfect!
-
Activate the Yeast (The First Step to Success!)
In a large **mixing bowl**, combine the **warm water** (it’s crucial to get the temperature right: not too hot, or it will kill the yeast; not too cold, or it won’t activate), **active dry yeast**, and **granulated sugar**. Give it a gentle stir with a **whisk** or spoon. Let this mixture sit undisturbed for 5-10 minutes. What you’re looking for is a visibly foamy, bubbly top – this tells you your yeast is alive and ready to work its magic! If it doesn’t foam, your yeast might be old or the water temperature was off; you’ll need to discard it and start this step over with fresh yeast and properly warmed water.
Beginner Tip: Use a kitchen thermometer to check your water temperature accurately. It makes a huge difference! -
Combine Dry Ingredients
While the yeast is activating, in a separate medium bowl, **whisk** together the **all-purpose flour** and **salt**. This step, often overlooked by beginners, is important because it ensures the salt is evenly distributed throughout the flour, preventing pockets of overly salty bread and ensuring consistent flavor in every bite.
-
Mix Wet Ingredients
Once your yeast mixture is beautifully foamy, add the **sweetened condensed milk** and **melted butter** to it. Stir gently with your **spatula** or whisk until all the ingredients are well combined. The sweetness from the condensed milk will not only flavor the bread but also provide additional food for the yeast, helping it to rise even better.
-
Form the Dough
Now, it’s time to bring it all together! Gradually add the dry flour mixture to the wet ingredients, about a cup at a time, mixing with a sturdy wooden spoon or a robust **spatula**. Continue mixing until the dough becomes too stiff to stir. At this point, turn the shaggy dough out onto a lightly floured surface. For beginners, a **lightly floured surface** means just enough flour so the dough doesn’t stick to your hands or the counter, but not so much that it dries out the dough.
-
Knead the Dough (Don’t Be Afraid!)
This is where the magic of gluten development happens! Gently knead the dough for about 5-7 minutes. The goal is to develop the gluten strands, which give bread its characteristic structure, elasticity, and chewiness. Your dough will start out sticky and rough, but as you knead, it will gradually become smoother, more elastic, and less sticky. If it feels too sticky to handle, add a tiny bit more flour (a tablespoon at a time). If it’s too dry and stiff, add a tiny bit of water. You’re looking for a dough that is soft, pliable, and springs back slightly when poked with a finger.
Beginner Tip for Kneading: To knead, push the dough away from you with the heels of your hands, fold it back over itself, turn it a quarter turn, and repeat. It’s a rhythmic motion that you’ll quickly get the hang of! Don’t be shy; bread dough can take a good workout. -
First Rise (The Bulk Fermentation)
Lightly grease your large **mixing bowl** with a little neutral oil (vegetable, canola, or olive oil works well). Place the kneaded dough in the bowl, turning it once to coat the top with oil. This prevents it from drying out. Cover the bowl snugly with plastic wrap or a clean, damp kitchen towel. Let the dough rise in a warm, draft-free place for 1 to 1.5 hours, or until it has visibly doubled in size. A slightly warm oven (turned on for a minute or two then immediately turned off), a sunny windowsill, or even inside your microwave (turned off!) with a cup of hot water can create an ideal environment.
-
Shape the Loaf
Once the dough has doubled, gently punch it down to release the trapped air. Turn the dough out onto a lightly floured surface. Gently flatten it into a rough rectangle. Fold the short ends towards the middle, then roll the dough tightly from one long end to the other, sealing the seam at the bottom. This rolling technique creates tension that helps the bread rise nicely and evenly in the oven, giving you that beautiful loaf shape.
-
Second Rise (Proofing)
Generously grease a standard 9×5 inch **baking pan** (loaf pan) to prevent sticking. Carefully place the shaped dough seam-side down into the prepared pan. Cover the pan loosely with plastic wrap or a clean kitchen towel. Let it rise again in a warm, draft-free place for another 30-45 minutes, or until it has nearly doubled in size and looks delightfully puffy and airy.
-
Preheat Oven & Egg Wash (Optional but Recommended!)
About 15 minutes before the end of the second rise, preheat your oven to 375°F (190°C). If you want a beautiful golden, shiny crust, prepare an egg wash: lightly beat one large egg with a tablespoon of water or milk in a small bowl. Gently brush the top of the risen dough with this egg wash. Be careful not to deflate the dough! This step is optional but highly recommended for a professional-looking finish.
-
Bake Your Beautiful Bread!
Place the loaf pan in the preheated oven. Bake for 30-35 minutes, or until the top is a deep golden brown and the internal temperature reaches 200-210°F (93-99°C) when measured with an instant-read thermometer. If the top starts to brown too quickly before the inside is fully cooked, you can loosely tent it with aluminum foil for the remaining baking time.
-
Cool & Enjoy!
Once baked, immediately remove the bread from the oven and carefully turn it out onto a wire rack to cool completely. Cooling on a wire rack allows air to circulate all around the loaf, preventing the bottom from becoming soggy. Resist the urge to slice into it too soon! Cooling helps the bread’s internal structure set, resulting in a much better texture and preventing a gummy interior. Once cooled, slice and enjoy your homemade **Sweetened Condensed Milk Bread**!
Tips & Tricks for Baking Success
Even the simplest recipes benefit from a few expert insights. These **baking tips for beginners** will help you achieve perfect results every time and build your confidence in the kitchen.
- Measure Accurately: This is perhaps the most crucial tip! Especially for flour. Use the “spoon and level” method: spoon flour into your **measuring cups** until overflowing, then level off with a straight edge (like the back of a knife). Never scoop directly from the bag, as this compacts the flour, and you’ll end up with too much, leading to dry, dense bread.
- Yeast Temperature is Key: As mentioned, ensure your water is precisely between 105-115°F (40-46°C). Too cold, and the yeast won’t activate; too hot, and it will die. A reliable kitchen thermometer is a small but mighty investment for accurate results.
- Warm, Draft-Free Rising Environment: Yeast thrives in warmth! A slightly warm (but off!) oven, a sunny spot, or even a microwave with a cup of hot water (for steam) can create the perfect draft-free environment for your dough to rise beautifully.
- Don’t Rush the Rise: The rising times provided are estimates. Always go by how the dough looks (doubled in size, visibly puffy) rather than strictly by the clock. An under-risen dough leads to dense, heavy bread, while an over-risen dough can collapse in the oven or have an alcoholic smell.
- Room Temperature Ingredients: While butter is melted in this recipe, for many other baking recipes, having ingredients like butter and eggs at room temperature is essential as they incorporate more easily and create a smoother, more emulsified batter or dough.
- Cool Completely: It’s incredibly tempting to slice into warm bread, but waiting until it’s fully cooled (or at least just warm, not hot) allows the starches to set, giving you the best possible texture and preventing a gummy interior. Patience is a virtue in baking!
- Storage: Store your cooled **Sweetened Condensed Milk Bread** in an airtight container or a bread bag at room temperature for up to 3-4 days. For longer storage, slice the cooled bread and freeze the slices in a freezer-safe bag for up to 2-3 months. You can then toast individual slices directly from frozen!
Essential Baking Tools for Your Kitchen
Having the right tools makes baking much easier, more efficient, and ultimately more enjoyable. Here are some basics we recommend for this recipe and beyond:
- Mixing Bowl (large and medium)
- Whisk
- Baking Pan (9×5 inch Loaf Pan)
- Measuring Cups
- Measuring Spoons
- Spatula (or a sturdy wooden spoon)
- Kitchen Thermometer (for water temperature and internal bread temperature)
- Wire Cooling Rack
Nutrition Information (Estimated Per Serving)
Here’s an estimated nutritional breakdown for one slice of this delicious bread (assuming 12 slices per loaf). Please note these are approximations and can vary based on exact ingredient brands, portion sizes, and specific preparation methods.
| Nutrient | Amount (per slice) |
|---|---|
| Calories | 220 kcal |
| Carbohydrates | 40g |
| Protein | 6g |
| Fat | 4g |
| Fiber | 1g |
| Sugar | 12g |
Frequently Asked Questions (FAQs) for Beginner Bakers
Q1: My dough isn’t rising. What went wrong?
A: This is a common concern! The most frequent culprits are inactive yeast or incorrect water temperature. Ensure your water is warm (105-115°F/40-46°C), not hot enough to kill the yeast, nor cold enough to keep it dormant. Always check the expiry date on your yeast packet. A drafty or cold environment can also hinder rising, so ensure your dough is in a warm, still spot.
Q2: Can I use whole wheat flour instead of all-purpose flour?
A: You can, but it will significantly change the texture and may require adjustments. Whole wheat flour absorbs more liquid than all-purpose, so you might need to add a tablespoon or two of extra water or milk to achieve the right dough consistency. The resulting bread will also be denser, have a heartier texture, and a nuttier flavor. For your very first attempt at this specific recipe, sticking to all-purpose flour is highly recommended for the intended soft, fluffy loaf.
Q3: How do I store the Sweetened Condensed Milk Bread?
A: Once your bread is completely cooled, store it in an airtight container, a reusable bread bag, or wrapped tightly in plastic wrap at room temperature. It will stay fresh for about 3-4 days. For longer storage, you can slice the cooled bread and freeze the slices in a freezer-safe bag for up to 2-3 months. You can then toast individual slices directly from frozen for a quick treat!
Q4: My bread turned out dense and heavy. What could be the reason?
A: A dense loaf usually indicates that the dough didn’t rise enough during its first or second proofing. Double-check your yeast activity and ensure your rising environment is consistently warm and free of drafts. Other potential causes include overworking the dough (kneading too long or too aggressively, which can tighten the gluten too much) or using too much flour during the initial mixing and kneading stages, which dries out the dough.
Q5: Can I make this recipe dairy-free?
A: Yes, with a few mindful substitutions! You can use plant-based milk (like unsweetened almond, soy, or oat milk) for the warm water, vegan butter (stick form works best for melting) for regular butter, and most importantly, a dairy-free sweetened condensed milk alternative. These are often made with coconut milk and are becoming widely available in many grocery stores.
Q6: Why is my bread crust tough or too hard?
A: A tough crust can be caused by overbaking (baking for too long or at too high a temperature), which dries out the exterior. It can also happen if the dough was too dry to begin with, or if it was exposed to too much air during rising. Ensure your oven temperature is accurate (an oven thermometer helps!), and consider tenting the bread with foil if it’s browning too quickly.
Ready to Bake Your Own Sweetened Condensed Milk Bread?
Congratulations, you’ve got all the tools and knowledge you need to bake your very first (or next!) amazing loaf of Sweetened Condensed Milk Bread Don’t worry if it’s not absolutely perfect on your first try; baking is a journey, and every loaf is a valuable learning experience. The most important thing is to have fun, be patient, and enjoy the process. Imagine the proud moment when you pull that golden-brown loaf from the oven, slice into its soft, sweet interior, and share it with loved ones. Happy baking, and we can’t wait to hear about your delicious creations!