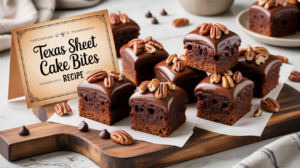
Welcome, aspiring bakers and dessert enthusiasts! Are you ready to dive into the wonderful world of baking with a recipe that’s as comforting as it is incredibly easy. Look no further than our Texas Sheet Cake Bites Recipe. This isn’t just any cake; it’s a beloved Southern classic known for its rich chocolate flavor, moist texture, and irresistible fudgy frosting. But we’re making it even better bite-sized! Perfect for parties,
lunchboxes, or simply satisfying a sweet craving without committing to a whole slice. If you’re searching for easy baking recipes that deliver maximum flavor with minimal fuss, you’ve hit the jackpot. We’ve packed this guide with comprehensive baking tips for beginners to ensure your first or hundredth batch turns out perfectly every time. Get ready to bake something truly special!
Ingredients List
Gather your ingredients! Having everything measured and ready before you start (this is called “mise en place”) makes the baking process so much smoother, especially for beginners.
For the Cake:
| Quantity | Unit | Ingredient |
|---|---|---|
| 2 | cups | All-Purpose Flour |
| 2 | cups | Granulated Sugar |
| 1 | teaspoon | Baking Soda |
| ½ | teaspoon | Salt |
| ½ | cup (1 stick) | Unsalted Butter |
| ¼ | cup | Unsweetened Cocoa Powder (natural, not Dutch-processed) |
| 1 | cup | Water |
| ½ | cup | Buttermilk (room temperature) |
| 2 | large | Eggs (room temperature) |
| 1 | teaspoon | Vanilla Extract |
For the Frosting:
| Quantity | Unit | Ingredient |
|---|---|---|
| ½ | cup (1 stick) | Unsalted Butter |
| ¼ | cup | Unsweetened Cocoa Powder |
| ¼ | cup | Milk |
| 4 | cups | Powdered Sugar (confectioners’ sugar), sifted |
| 1 | teaspoon | Vanilla Extract |
| Pinch | Salt | |
| ½ | cup | Chopped Pecans (optional, for topping) |
Step-by-Step Instructions: Baking Your Texas Sheet Cake Bites
Let’s get baking! Follow these detailed steps carefully, and you’ll have perfect Texas Sheet Cake Bites in no time. Remember, baking is a science, so precision helps, but don’t be afraid to enjoy the process!
Step 1: Preheat and Prepare Your Pan
First things first! Preheat your oven to 350°F (175°C). This ensures the oven is at the correct temperature when your cake goes in, which is crucial for even baking. Next, prepare a 9×13 inch baking pan. You can either grease and flour it thoroughly, or for an easier cleanup, line it with parchment paper, leaving an overhang on the sides. This overhang will act as “handles” later, making it super easy to lift the cooled cake out of the pan for cutting into bites.
Step 2: Combine Dry Ingredients
In a large mixing bowl, combine the flour, granulated sugar, baking soda, and salt. Give them a good whisk to ensure they are well combined and there are no lumps. This is important for even distribution throughout your cake batter. Beginner Tip: When measuring flour, spoon it into your measuring cup and then level it off with a straight edge (like the back of a knife). Don’t scoop directly from the bag, as this can compact the flour and lead to a dry cake.
Step 3: Prepare the Wet Ingredients (Part 1 – The Hot Mixture)
In a medium saucepan, combine the ½ cup unsalted butter, ¼ cup unsweetened cocoa powder, and 1 cup water. Place the saucepan over medium heat and bring the mixture to a rolling boil, stirring occasionally. Once it boils, remove it immediately from the heat. This step “blooms” the cocoa, intensifying its chocolate flavor, and melts the butter perfectly.
Step 4: Combine Wet and Dry Ingredients
Carefully pour the hot cocoa mixture from the saucepan directly into your bowl with the dry ingredients. Using a whisk or a spatula, mix them together until just combined. The mixture will be quite thin at this stage, and that’s exactly what you want! Common Mistake: Don’t overmix! Overmixing develops gluten in the flour, which can lead to a tough, dry cake.
Step 5: Incorporate Remaining Wet Ingredients
To the cake batter, add the ½ cup room temperature buttermilk, 2 large room temperature eggs, and 1 teaspoon vanilla extract. Whisk or stir until everything is fully incorporated and the batter is smooth. Beginner Tip: Using room temperature eggs and buttermilk helps them emulsify better with the other ingredients, creating a smoother batter and a more tender cake. If you don’t have buttermilk, you can make a substitute: add 1 tablespoon of lemon juice or white vinegar to a liquid measuring cup, then fill the rest of the cup with regular milk until it reaches the ½ cup line. Let it sit for 5-10 minutes until it curdles slightly before using.
Step 6: Bake the Cake
Pour the prepared cake batter into your greased and floured (or parchment-lined) 9×13 inch baking pan. Carefully transfer the pan to your preheated oven. Bake for approximately 20-25 minutes. The cake is done when a wooden toothpick inserted into the center comes out clean or with a few moist crumbs attached. Beginner Tip: Avoid opening the oven door frequently, especially in the first 15 minutes, as this can cause the cake to sink.
Step 7: Prepare the Frosting While the Cake Bakes
While the cake is baking, it’s time to make that luscious, fudgy frosting! In a medium saucepan, combine the ½ cup unsalted butter, ¼ cup unsweetened cocoa powder, and ¼ cup milk. Place over medium heat and bring to a gentle boil, stirring constantly. Once it boils, remove from heat immediately.
Step 8: Finish the Frosting
To the hot cocoa mixture in the saucepan, add the 4 cups sifted powdered sugar, 1 teaspoon vanilla extract, and a pinch of salt. Whisk vigorously until the frosting is completely smooth and free of lumps. It should be thin enough to pour but thick enough to coat a spoon. If it’s too thick, add a tiny bit more milk (1 teaspoon at a time) until it reaches the desired consistency. If it’s too thin, whisk in a little more sifted powdered sugar. Beginner Tip: Sifting your powdered sugar is crucial for a smooth, lump-free frosting. Don’t skip this step!
Step 9: Frost the Warm Cake
As soon as the cake comes out of the oven, while it’s still warm, carefully pour the hot frosting evenly over the entire surface of the cake. Use an offset spatula or the back of a spoon to gently spread it to the edges if needed. The warmth of the cake will help the frosting slightly melt and seep into the cake, creating that signature moist, fudgy texture. If using, sprinkle the chopped pecans evenly over the warm frosting immediately before it sets.
Step 10: Cool and Cut into Bites
Allow the cake to cool completely in the pan on a wire rack. This is important for the frosting to set properly and for the cake to firm up, making it easier to cut. This usually takes about 1-2 hours, or longer if your kitchen is warm. Once fully cooled, if you used parchment paper, lift the cake out of the pan using the overhang. Place it on a cutting board. Use a sharp knife to cut the cake into small, uniform squares, approximately 1.5 to 2 inches each. For cleaner cuts, wipe your knife with a damp cloth between cuts. You should get about 24-36 bites from a 9×13 inch pan, depending on your desired size.
Tips & Tricks for Baking Success
Baking is a delightful journey, and these tips will help you achieve perfect results with your Texas Sheet Cake Bites every single time:
- Room Temperature Matters: Ensure your buttermilk and eggs are at room temperature. This helps them incorporate more evenly into the batter, leading to a smoother texture and better-emulsified cake.
- Accurate Measuring: Baking is a science! Use proper measuring cups and spoons, and level off dry ingredients like flour and sugar. For liquids, measure at eye level.
- Don’t Overmix: After combining wet and dry ingredients, mix just until no dry streaks remain. Overmixing develops gluten, which can make your cake tough and chewy.
- Sift Powdered Sugar: For a silky-smooth frosting, sifting your powdered sugar is a non-negotiable step. It removes any lumps and ensures a perfect consistency.
- Warm Cake, Warm Frosting: The magic of Texas Sheet Cake lies in frosting it while the cake is still warm. This allows the frosting to slightly melt and soak into the cake, creating an incredibly moist and fudgy result.
- Clean Cuts: For neat and tidy bites, use a sharp knife and wipe it clean with a damp cloth between each cut. This prevents frosting from dragging and smearing.
- Storage: Store your Texas Sheet Cake Bites in an airtight container at room temperature for up to 3 days, or in the refrigerator for up to a week. They are often even better the next day as the flavors meld!
- Freezing: These bites freeze beautifully! Place them in a single layer on a baking sheet to freeze individually, then transfer them to an airtight freezer-safe container or bag for up to 2-3 months. Thaw at room temperature.
Essential Baking Tools
Having the right tools makes all the difference in your baking experience. Here are some essentials you’ll need for this recipe, with convenient links to find them:
- Mixing Bowl
- Whisk
- Baking Pan (9×13 inch)
- Measuring Cups
- Spatula
- Saucepan (for melting butter/cocoa)
- Parchment Paper (optional, but recommended for easy removal)
- Wire Cooling Rack
- Sharp Knife
Nutrition Info (Estimated per serving)
Please note that these values are approximate and can vary based on specific ingredients and portion size (assuming 30 bites from a 9×13 inch cake).
| Nutrient | Amount (per bite) |
|---|---|
| Calories | ~180-200 kcal |
| Carbohydrates | ~30-35 g |
| Protein | ~2-3 g |
| Fat | ~7-9 g |
| Fiber | ~1 g |
| Sugar | ~25-30 g |
Frequently Asked Questions (FAQs)
Q1: Can I make Texas Sheet Cake Bites ahead of time?
Absolutely! Texas Sheet Cake is one of those magical desserts that often tastes even better the next day as the flavors have more time to meld and the cake becomes even moister. You can bake and frost them up to 2-3 days in advance. Store them in an airtight container at room temperature or in the refrigerator.
Q2: What if I don’t have buttermilk?
No problem! You can easily make a homemade buttermilk substitute. Pour 1 tablespoon of white vinegar or lemon juice into a liquid measuring cup. Then, fill the rest of the cup with regular milk (any fat percentage) until it reaches the ½-cup line. Stir it gently and let it sit for 5-10 minutes until it slightly curdles. It will work perfectly in this recipe!
Q3: How do I store leftover Texas Sheet Cake Bites?
Store your bites in an airtight container to prevent them from drying out. They will stay fresh at room temperature for up to 3 days. If you prefer them chilled or live in a very warm climate, you can store them in the refrigerator for up to a week. Just let them come to room temperature for about 15-20 minutes before serving for the best texture.
Q4: Why is my cake dry?
A dry cake is usually due to one of a few common issues: over-measuring flour (too much dry ingredient), over-baking (leaving it in the oven too long), or over-mixing the batter (which develops too much gluten). Make sure to spoon and level your flour, test for doneness with a toothpick at the minimum baking time, and mix the batter just until combined.
Q5: Can I add nuts to the cake batter instead of just the topping?
Yes, you certainly can! If you love nuts, feel free to fold in about ½ cup of chopped pecans or walnuts into the batter just before pouring it into the pan. This will add extra texture and nutty flavor throughout the cake.
Q6: How do I know when the cake is done baking?
The best way to check for doneness is to insert a wooden toothpick into the center of the cake. If it comes out clean or with just a few moist crumbs attached, your cake is ready! If it comes out wet with raw batter, bake for a few more minutes and test again. Be careful not to overbake, as this can lead to a dry cake.
Conclusion: Enjoy Your Delicious Texas Sheet Cake Bites!
Congratulations, you’ve just created a batch of utterly delicious Texas Sheet Cake Bites! Whether you’re a seasoned baker or just starting your culinary adventures, this recipe proves that incredible flavor doesn’t have to be complicated. These moist, chocolatey, and perfectly frosted bites are sure to be a hit with everyone who tries them. Don’t be shy – share your creations with friends and family, or simply savor them yourself with a cup of coffee or a glass of milk. We hope these detailed instructions and helpful tips have empowered you in the kitchen. Keep exploring, keep baking, and most importantly, keep enjoying the sweet rewards of your efforts. Happy baking!