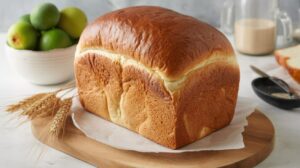
Making your own vegan bread in a breadmaker is not only incredibly satisfying but also allows you to control the ingredients, avoiding preservatives and artificial additives often found in store-bought options. This recipe is designed to be foolproof, yielding a beautifully crusted exterior and a soft, airy interior, perfect for sandwiches, toast, or just enjoying with a smear of vegan butter. Let’s get baking!
Ingredients List
Gathering your ingredients before you start is one of the best baking tips for beginners. This ensures you have everything on hand and won’t have to scramble mid-recipe!
| Quantity | Unit | Ingredient |
|---|---|---|
| 1 ½ | cups | Warm Water (105-115°F / 40-46°C) |
| 2 | tablespoons | Olive Oil (or other neutral vegetable oil) |
| 1 | tablespoon | Apple Cider Vinegar (optional, for extra rise and texture) |
| 3 ½ | cups | All-Purpose Flour (or Bread Flour for a chewier crust) |
| 2 | tablespoons | Granulated Sugar (or maple syrup, agave, or brown sugar) |
| 1 ½ | teaspoons | Salt |
| 2 ¼ | teaspoons | Active Dry Yeast (one standard packet) |
Step-by-Step Instructions: Your Path to Perfect Vegan Bread
Follow these steps carefully, and you’ll be enjoying warm, homemade bread in no time! Remember, the breadmaker does most of the hard work.
-
Prepare Your Breadmaker Pan:
Start by removing the bread pan from your breadmaker. Ensure it’s clean and dry. Some breadmakers recommend lightly greasing the pan, especially the paddle, but often it’s not strictly necessary with non-stick pans. Check your breadmaker’s manual for specific recommendations.
-
Add the Liquids First:
Pour the warm water into the bread pan. It’s crucial that your water is warm (105-115°F / 40-46°C) – think bathwater warm, not hot. Water that’s too cold won’t activate the yeast, and water that’s too hot will kill it. Next, add the olive oil and the optional apple cider vinegar. The vinegar isn’t just for flavor; it helps activate the yeast and can give your vegan bread a slightly better rise and texture, mimicking some properties of eggs often found in non-vegan recipes.
Beginner Tip: Use a kitchen thermometer to accurately check your water temperature. This small step can make a huge difference in your bread’s rise!
-
Layer the Dry Ingredients (Carefully!):
Now, gently add the flour on top of the liquids. Don’t mix it yet. Use a spatula or spoon to spread the flour evenly across the liquid. Next, add the granulated sugar and salt. It’s important to keep the salt and yeast separate at this stage. Salt can inhibit yeast activity if they come into direct contact for too long, especially before the kneading process begins.
Common Mistake & Fix: If your bread consistently doesn’t rise, double-check that your salt and yeast aren’t touching directly when you layer them. Create small “hills” of flour to keep them separated.
-
Create a Well for the Yeast:
Using your finger, gently create a small indentation or “well” in the center of the flour mound. Pour the active dry yeast into this well. This method ensures the yeast is protected from the salt and comes into contact with the water only when the breadmaker cycle begins.
-
Place Pan in Breadmaker and Select Cycle:
Carefully place the bread pan back into your breadmaker, ensuring it’s securely locked in place. Close the lid. For this recipe, you’ll typically want to select the “Basic,” “White Bread,” or “Vegan” (if your machine has one) cycle. Choose the “Light” or “Medium” crust setting, depending on your preference. Most standard loaf sizes are 1.5 lb or 2 lb; this recipe is suitable for a 2 lb loaf.
Beginner Tip: Consult your breadmaker’s manual if you’re unsure which setting to use. They often have specific recommendations for different types of bread.
-
Monitor the Dough (Optional but Recommended):
About 5-10 minutes into the kneading cycle, lift the lid (briefly!) and check the consistency of your dough. It should form a smooth, elastic ball that cleans the sides of the pan. If it’s too sticky and clinging to the sides, add flour one tablespoon at a time until it reaches the right consistency. If it’s too dry and crumbly, add water one teaspoon at a time. Close the lid promptly after checking.
Alternative: If you prefer a hands-off approach, you can skip this step, but monitoring allows for minor adjustments that can significantly improve your final loaf.
-
Let the Breadmaker Do Its Magic:
Once you’ve started the cycle, resist the urge to open the lid frequently! The breadmaker will now take over, performing all the kneading, rising, and baking cycles. Opening the lid during the rise or bake cycles can cause the bread to collapse or affect the internal temperature, leading to a less-than-perfect loaf.
-
Cooling is Crucial:
When the breadmaker beeps to signal the end of the cycle, carefully remove the bread pan (it will be hot!). Immediately invert the pan onto a wire cooling rack and shake the loaf out. If the paddle is stuck in the bread, carefully remove it with a utensil once the bread has cooled slightly. Allowing the bread to cool completely on a wire rack for at least 1-2 hours (or even longer) is absolutely essential. Slicing warm bread can lead to a gummy texture inside, as the steam needs time to dissipate and the internal structure to set.
-
Slice and Enjoy:
Once fully cooled, use a serrated bread knife to slice your delicious homemade vegan bread. Enjoy it fresh, toasted, or however you love your bread!
Tips & Tricks for Breadmaker Success
Even with a breadmaker, a few extra pointers can elevate your baking game and ensure consistent, delicious results every time.
- Always Check Yeast Freshness: Yeast is a living organism. If it’s old or expired, your bread won’t rise. You can “proof” active dry yeast by mixing it with a little warm water and a pinch of sugar. If it foams within 5-10 minutes, it’s good to go!
- Accurate Measuring: Baking is a science, and precise measurements are key. Use proper measuring cups and spoons, and for flour, gently spoon it into the measuring cup and level off with a straight edge (the “spoon and level” method) rather than scooping directly from the bag, which can compact it and lead to too much flour.
- Don’t Forget the Salt: While we want to keep it separate from the yeast initially, salt is vital for flavor and also controls the yeast’s activity, preventing it from rising too quickly and collapsing.
- Adjust for Humidity: On very humid days, you might need a tiny bit less water or a touch more flour. Conversely, on dry days, you might need a bit more water. Your dough’s consistency is your best guide during the initial kneading stage.
- Proper Cooling is Non-Negotiable: We mentioned it in the steps, but it bears repeating. Patience during the cooling phase is the secret to a perfectly textured loaf. Resist the urge to cut into it too soon!
- Store it Right: Once cooled, store your bread in an airtight container or bread bag at room temperature for 3-4 days. For longer storage, slice and freeze the bread. You can then toast slices directly from frozen.
Essential Baking Tools
While your breadmaker does most of the heavy lifting, having these basic tools will make your vegan bread baking experience even smoother:
- Mixing Bowl (for preparing water/yeast if proofing, or for mixing flour if making adjustments)
- Whisk (useful for blending dry ingredients if you pre-mix them)
- Baking Pan (not strictly needed for the breadmaker, but good if you want to reshape/bake in oven, or for cooling)
- Measuring Cups
- Spatula (for scraping ingredients, checking dough, or removing paddle)
- Kitchen Scale (highly recommended for accuracy, especially with flour)
- Instant-Read Thermometer (for checking water temperature)
- Wire Cooling Rack (crucial for proper cooling!)
- Serrated Bread Knife (for clean slices)
Nutrition Information (Estimated per slice, approx. 50g)
Please note: These values are estimates and can vary based on specific ingredients and loaf size.
| Nutrient | Amount |
|---|---|
| Calories | 160-180 kcal |
| Carbohydrates | 30-35 g |
| Protein | 5-6 g |
| Fat | 2-3 g |
| Fiber | 1-2 g |
| Sugar | 2-3 g |
Frequently Asked Questions (FAQs)
Can I use whole wheat flour instead of all-purpose flour?
Yes, you can! However, whole wheat flour absorbs more liquid. You might need to adjust the water content slightly, potentially adding an extra 1/4 cup of water, or monitoring the dough during the first knead to see if it needs more moisture. Whole wheat bread also tends to be denser.
My bread didn’t rise, what went wrong?
The most common culprits for poor rise are inactive yeast (check the expiration date!), water that was too hot or too cold, or the salt coming into direct contact with the yeast before kneading. Ensure your yeast is fresh, your water temperature is correct, and you layer your ingredients carefully as instructed.
How do I store homemade bread?
Once completely cooled, store your bread in an airtight container, a bread box, or a sealed plastic bag at room temperature for up to 3-4 days. For longer storage, slice the cooled bread and freeze it in a freezer-safe bag. You can then take out slices as needed and toast them directly from frozen.
What if my dough is too sticky or too dry during the kneading cycle?
This is a common observation and easy to fix! If the dough is too sticky and clinging to the sides of the pan, add flour one tablespoon at a time until it forms a smooth, elastic ball. If it’s too dry and crumbly, add water one teaspoon at a time. Make these adjustments during the first 5-10 minutes of the kneading cycle.
Can I add seeds or nuts to this recipe?
Absolutely! Most breadmakers have a “mix-in” or “fruit/nut” dispenser that will automatically add ingredients at the appropriate time during the kneading cycle. If yours doesn’t, you can manually add up to 1/2 cup of seeds (like sunflower, pumpkin, or flax) or chopped nuts (like walnuts) after the first kneading cycle has finished, usually when the machine beeps to signal the addition of extra ingredients.
Conclusion: Enjoy Your Homemade Vegan Bread!
Congratulations! You’ve just created a delicious, wholesome loaf of Vegan Bread right in your own kitchen with minimal effort, thanks to your bread maker. The journey of baking, especially for beginners, is incredibly rewarding, and there’s nothing quite like the taste and smell of fresh, homemade bread. Don’t be afraid to experiment with different flours or add-ins once you’ve mastered this basic recipe.
We hope this detailed, beginner-friendly guide has given you the confidence to make bread a regular part of your routine. Share your creations, enjoy the process, and savor every slice. Happy baking!