There’s nothing quite like the comforting aroma of freshly baked banana bread wafting through your home. It’s a timeless classic, and today, we’re going to bake the most delicious Walnut Banana Bread Recipes you’ve ever tried! If you’re searching for easy baking recipes that deliver incredible results every time, you’ve come to the right place.
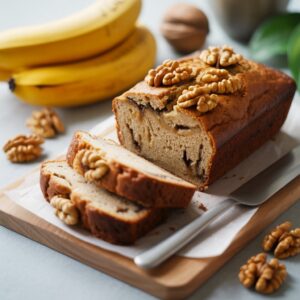
This recipe is specifically designed with baking tips for beginners in mind, breaking down every step so you can bake with confidence. Forget store-bought versions; this homemade loaf is moist, packed with flavor, and surprisingly simple to master. Get ready to transform those overripe bananas into a golden-brown masterpiece that will impress everyone (including yourself!).
Gather Your Ingredients: What You’ll Need
Before we begin our baking adventure, let’s make sure you have all the necessary ingredients. Using quality ingredients at the right temperatures can make a big difference in your final loaf!
| Ingredient | Quantity | Unit |
|---|---|---|
| Very Ripe Bananas (mashed) | 3 | medium |
| All-Purpose Flour | 1 ½ | cups |
| Granulated Sugar | ¾ | cup |
| Large Egg | 1 | |
| Unsalted Butter (melted) | ½ | cup |
| Baking Soda | 1 | teaspoon |
| Salt | ½ | teaspoon |
| Vanilla Extract | 1 | teaspoon |
| Chopped Walnuts | ½ | cup |
| Ground Cinnamon (optional) | ½ | teaspoon |
Step-by-Step Instructions: Your Guide to Perfect Banana Bread
Follow these detailed steps carefully, and you’ll be enjoying warm, delicious walnut banana bread in no time!
Step 1: Prepare Your Oven and Pan
- Preheat your oven to 350°F (175°C). This ensures the oven is at the correct temperature when your batter is ready to go in, leading to even baking.
- Lightly grease a 9×5 inch loaf pan with butter or non-stick baking spray. For extra insurance against sticking, you can also flour the pan or line it with parchment paper, leaving an overhang on the long sides to easily lift the bread out later. This is a great **baking tip for beginners** to prevent your beautiful loaf from getting stuck!
Step 2: Mash Those Bananas!
- In a large mixing bowl, thoroughly mash your three very ripe bananas with a fork. Why very ripe? The riper the banana (think brown spots and almost black skin), the sweeter and more flavorful your bread will be, and the easier it is to mash. Don’t worry if there are a few small lumps; they add a lovely texture!
Step 3: Combine Wet Ingredients
- To the mashed bananas, add the ½ cup of melted unsalted butter. Stir until well combined.
- Next, add the ¾ cup of granulated sugar, 1 large egg, and 1 teaspoon of vanilla extract. Whisk everything together until the mixture is smooth and evenly incorporated.
- Beginner Tip: Ensure your egg is at room temperature if possible! Room temperature eggs incorporate more easily into batters, leading to a smoother, more uniform mixture. If you forgot, place it in a bowl of warm water for 5-10 minutes.
Step 4: Whisk Dry Ingredients
- In a separate medium-sized bowl, whisk together the 1 ½ cups of all-purpose flour, 1 teaspoon of baking soda, and ½ teaspoon of salt. If you’re using it, add ½ teaspoon of ground cinnamon here too.
- Measuring Flour Correctly: For **baking tips for beginners**, this is crucial! Don’t scoop the flour directly with your measuring cup, as this can compact it and lead to too much flour, resulting in dry bread. Instead, use a spoon to lightly scoop the flour into your measuring cup, then level it off with the back of a knife. This “spoon and level” method ensures accuracy.
Step 5: Combine Wet and Dry Mixtures
- Pour the dry ingredients into the wet ingredients bowl.
- Using a spatula or wooden spoon, gently mix until just combined. Do NOT overmix! This is one of the most common mistakes in baking. Overmixing develops the gluten in the flour too much, which can make your banana bread tough and dense instead of light and moist. Stop mixing as soon as you no longer see streaks of dry flour. A few small lumps are perfectly fine!
Step 6: Fold in the Walnuts
- Gently fold in the ½ cup of chopped walnuts. Distribute them evenly throughout the batter. If you prefer a plain banana bread, you can skip this step, but walnuts add a fantastic crunch and nutty flavor!
Step 7: Bake Your Loaf
- Pour the batter into your prepared loaf pan, spreading it evenly.
- Place the pan in the preheated oven and bake for 55-65 minutes.
- How to tell if it’s done? This is a key **baking tip for beginners**! Insert a wooden skewer or toothpick into the center of the loaf. If it comes out clean or with a few moist crumbs attached (but no wet batter), your banana bread is ready. If it comes out with wet batter, continue baking for another 5-10 minutes, then test again.
- If the top starts to brown too quickly, you can loosely tent it with aluminum foil for the remaining baking time.
Step 8: Cool and Enjoy!
- Once baked, remove the loaf pan from the oven and let the banana bread cool in the pan for about 10-15 minutes. This allows the bread to set and prevents it from crumbling when you remove it.
- After 10-15 minutes, carefully invert the loaf onto a wire cooling rack. Let it cool completely on the rack before slicing.
- Why cool completely? Slicing warm banana bread can be tempting, but it can be crumbly and difficult to cut neatly. Cooling allows the internal structure to firm up, making for perfect slices. Plus, the flavors develop even more as it cools!
- Slice, serve, and savor your homemade **Walnut Banana Bread Recipes**!
Tips & Tricks for Banana Bread Success
Becoming a great baker means learning a few insider secrets. Here are some actionable **baking tips for beginners** to ensure your banana bread is always a triumph:
- The Bananas are Key: Seriously, use very ripe bananas. The riper they are, the more natural sweetness and moisture they contribute. If your bananas aren’t ripe enough, you can speed up the process by baking them (unpeeled) on a baking sheet at 300°F (150°C) for 15-30 minutes until their skins are black and shiny. Let them cool before mashing.
- Don’t Overmix! We can’t stress this enough. Mix only until the dry ingredients are just incorporated into the wet. Overmixing develops gluten, leading to a tough, dense loaf. Lumps are okay!
- Room Temperature Ingredients: Butter and eggs should ideally be at room temperature. They combine more smoothly and evenly, creating a better emulsion and a more uniform texture in your batter.
- Proper Pan Prep: Always grease and flour your loaf pan, or use parchment paper, especially for new pans. Nothing is more frustrating than a beautiful loaf stuck to the pan!
- Storage for Freshness: Store your banana bread at room temperature in an airtight container for up to 3-4 days. For longer storage, wrap it tightly in plastic wrap and then foil, and freeze for up to 3 months. Thaw at room temperature.
- Experiment with Add-ins: While this is a **Walnut Banana Bread Recipes**, feel free to get creative! Chocolate chips, pecans, dried cranberries, or a sprinkle of cinnamon sugar on top before baking are all delicious additions.
Essential Baking Tools You’ll Need
Having the right tools makes all the difference, especially when you’re just starting out. Here are some basics that will make your banana bread baking (and future baking adventures) much easier:
- Mixing Bowl
- Whisk
- Baking Pan (9×5 inch loaf pan)
- Measuring Cups
- Spatula (or wooden spoon)
- Measuring Spoons
- Wire Cooling Rack
Nutrition Information (Estimated Per Slice)
Here’s an estimated nutritional breakdown for one slice of our Walnut Banana Bread, assuming 12 slices per loaf. Please note that these are estimates and can vary based on specific ingredient brands and preparation.
| Nutrient | Amount |
|---|---|
| Calories | 240 kcal |
| Carbohydrates | 35 g |
| Protein | 3 g |
| Fat | 10 g |
| Fiber | 2 g |
| Sugar | 20 g |
Frequently Asked Questions (FAQs) for Beginners
Q1: Why do my bananas need to be so ripe?
A: Very ripe bananas (with brown or black spots) are much sweeter, softer, and more aromatic than yellow or green bananas. They contribute significant moisture and a concentrated banana flavor to your bread, making it incredibly delicious and naturally sweet. Using under-ripe bananas will result in a less flavorful and potentially drier loaf.
Q2: How do I know when my banana bread is fully baked?
A: The best way is the “toothpick test.” Insert a wooden skewer or toothpick into the very center of the loaf. If it comes out clean or with a few moist crumbs attached (but no wet batter), it’s done. If it comes out with wet batter, continue baking in 5-10 minute increments until it passes the test.
Q3: My banana bread came out dense/tough. What did I do wrong?
A: The most common culprit for dense or tough banana bread is overmixing the batter after adding the dry ingredients. Overmixing develops the gluten in the flour too much, which leads to a chewy, less tender texture. Always mix just until the dry ingredients are barely incorporated, stopping as soon as you no longer see streaks of dry flour.
Q4: Can I freeze banana bread?
A: Absolutely! Banana bread freezes beautifully. Once completely cooled, wrap the entire loaf or individual slices tightly in plastic wrap, then an additional layer of aluminum foil. It can be stored in the freezer for up to 3 months. Thaw at room temperature when you’re ready to enjoy.
Q5: What if I don’t have ripe bananas?
A: If you’re craving banana bread but your bananas aren’t ripe enough, you can quick-ripen them! Place unpeeled bananas on a baking sheet and bake at 300°F (150°C) for 15-30 minutes, or until the skins are shiny black. Let them cool completely before mashing. Alternatively, you can place them in a paper bag with an apple overnight to speed up ripening.
Q6: Can I add chocolate chips instead of walnuts?
A: Yes, absolutely! Chocolate chips are a fantastic addition to banana bread. You can substitute the ½ cup of chopped walnuts with ½ cup of chocolate chips (milk, semi-sweet, or dark) or use a combination of both. Fold them in at the same stage as you would the walnuts.
Time to Bake Your Masterpiece!
Congratulations, future baker! You now have all the knowledge and baking tips for beginners to create the most incredible Walnut Banana Bread Recipes. This recipe is more than just a list of instructions; it’s an invitation to experience the joy and satisfaction of baking something truly delicious from scratch. Don’t be afraid to get a little messy, follow the steps, and trust the process. You’ll be amazed at what you can achieve!
So, grab those overripe bananas, preheat your oven, and get ready to fill your home with the irresistible scent of homemade goodness. We can’t wait to hear about your baking success. Happy baking!