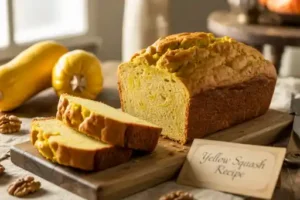
Are you looking for a delicious way to use up that abundant summer squash from your garden or farmer’s market? Look no further! Our Yellow Squash Bread Recipes are the perfect solution. This delightful quick bread is incredibly moist, subtly sweet, and packed with a tender crumb that will have everyone asking for more.
Forget complicated techniques; this is one of those truly easy baking recipes that even absolute novices can master. We’ll walk you through every step, providing valuable baking tips for beginners to ensure your success. Get ready to transform simple yellow squash into a family favorite!
Why Yellow Squash Bread?
Yellow squash, often overlooked in sweet baking, brings incredible moisture and a delicate, almost buttery flavor to quick breads. It’s a fantastic alternative to zucchini and helps create a wonderfully tender texture without being overly dense. Plus, it’s a clever way to sneak a little extra veggie into your diet! This recipe is designed to be straightforward, making it an ideal entry point for anyone eager to explore the world of baking.
Ingredients You’ll Need
Gathering your ingredients before you start is one of the best **baking tips for beginners**. It helps ensure you don’t miss anything and makes the baking process much smoother! Always try to use fresh ingredients for the best flavor and texture.
| Ingredient | Quantity | Unit |
|---|---|---|
| All-Purpose Flour | 2 | cups |
| Granulated Sugar | 1 | cup |
| Brown Sugar (packed) | 1/2 | cup |
| Baking Soda | 1 | teaspoon |
| Baking Powder | 1/2 | teaspoon |
| Ground Cinnamon | 1 | teaspoon |
| Ground Nutmeg | 1/2 | teaspoon |
| Salt | 1/2 | teaspoon |
| Large Eggs | 2 | large |
| Vegetable Oil (or melted coconut oil) | 1/2 | cup |
| Vanilla Extract | 1 | teaspoon |
| Shredded Yellow Squash | 2 | cups |
| Optional: Chopped Walnuts or Chocolate Chips | 1/2 | cup |
Step-by-Step Instructions: Your Guide to Perfect Yellow Squash Bread
Follow these detailed steps, and you’ll be enjoying your homemade Yellow Squash Bread in no time! Remember, precision is key in baking, so take your time and enjoy the process. We’ve included extra explanations for common pitfalls, so you can bake with confidence!
Step 1: Prepare Your Oven and Pan
Preheat your oven: Set your oven to 350°F (175°C). It’s crucial to preheat your oven fully before putting in your bread. This ensures a consistent temperature from the moment your bread goes in, allowing it to rise properly and bake evenly. For beginners, inconsistent oven temperatures are a common pitfall that can lead to unevenly baked goods!
Prepare your loaf pan: Lightly grease a 9×5 inch loaf pan with butter or non-stick cooking spray. You can also line it with parchment paper, leaving an overhang on the long sides; this creates “handles” that make it super easy to lift the baked bread out later, preventing sticking. Don’t skip this step, or your delicious bread might stick and be difficult to remove!
Step 2: Combine Dry Ingredients
In a large mixing bowl, whisk together the all-purpose flour, granulated sugar, brown sugar, baking soda, baking powder, ground cinnamon, ground nutmeg, and salt. Whisking ensures that all the leavening agents (baking soda and powder) and spices are evenly distributed throughout the flour. This is crucial for a uniform rise, consistent texture, and balanced flavor in every slice. This is a simple but important step for any quick bread – don’t just dump and stir!
Beginner Tip: How to measure flour correctly: For accurate baking, spoon the flour into your measuring cup until it’s overflowing, then level it off with the back of a knife or a straight edge. Don’t scoop directly from the flour bag, as this can compact the flour and lead to using too much (sometimes up to 25% more!), resulting in a dry, dense bread.
Step 3: Mix Wet Ingredients
In a separate medium bowl, whisk together the large eggs, vegetable oil, and vanilla extract until well combined and smooth. The oil adds a wonderful moistness to the bread and contributes to its tender crumb, while vanilla extract enhances all the sweet flavors and adds depth. Ensure the eggs are thoroughly beaten into the oil for a uniform mixture.
Alternative: While vegetable oil is standard, you can also use melted coconut oil (ensure it’s cooled slightly) or even unsalted melted butter for a richer flavor, though butter can sometimes make the bread a bit denser.
Step 4: Grate the Yellow Squash
Using a box grater (the side with the larger holes works best) or a food processor with a grating attachment, grate your yellow squash. You’ll need about 2 cups of grated squash. Important for beginners: Do NOT squeeze out the excess moisture from the squash! Unlike zucchini in some recipes where squeezing is recommended, the natural moisture from the yellow squash is absolutely essential for this bread’s incredibly tender and moist texture. If you squeeze it out, your bread will likely turn out dry and crumbly.
Step 5: Combine Wet and Dry Mixtures
Pour the wet ingredient mixture (from Step 3) into the large bowl with the dry ingredients (from Step 2). Using a spatula or wooden spoon, gently mix until just combined. Do not overmix! This is a critical point for quick breads. Overmixing develops the gluten in the flour too much, which can result in a tough, chewy bread instead of a wonderfully tender one. A few streaks of flour are perfectly fine at this stage – they will disappear during baking, and it’s better to slightly undermix than overmix.
Step 6: Fold in the Squash (and Optional Add-ins)
Once the wet and dry ingredients are just combined, gently fold the grated yellow squash into the batter. Use a spatula to incorporate it evenly without overworking the batter. If you’re adding chopped walnuts, pecans, or chocolate chips, fold them in now too. Distribute them evenly throughout the batter so every slice gets some of that delicious goodness. Folding rather than stirring vigorously helps maintain the delicate structure of the batter.
Step 7: Bake Your Bread
Pour the batter into your prepared 9×5 inch loaf pan. Spread it evenly with a spatula to ensure an even rise. Place the pan in your preheated oven.
Bake for 50-60 minutes, or until a wooden skewer or toothpick inserted into the center of the loaf comes out clean or with just a few moist crumbs attached. If it comes out with wet batter, it needs more time. Towards the end of the baking time (around 40-45 minutes), if the top is browning too quickly, you can loosely tent it with aluminum foil to prevent burning while the inside finishes cooking.
Common Mistake & Beginner Tip: Don’t open the oven door too early! Quick breads can be sensitive to sudden temperature changes, especially during the crucial rising phase. Opening the door during the first 30-40 minutes of baking can cause them to sink dramatically in the middle due to the sudden cool air. Be patient!
Step 8: Cool and Enjoy!
Once baked, remove the loaf pan from the oven and let it cool in the pan on a wire rack for about 10-15 minutes. This initial cooling period in the pan allows the bread to set and firm up, making it much easier to remove from the pan without breaking. It also continues to cook slightly from its residual heat.
After 10-15 minutes, carefully invert the bread onto the wire rack to cool completely. Slicing warm quick bread can sometimes make it crumble or feel gummy, so patience is a virtue here! A fully cooled loaf will have the best texture and flavor. Once completely cool, slice with a serrated knife and serve. Enjoy your homemade, moist, and delicious Yellow Squash Bread!
Tips & Tricks for the Best Yellow Squash Bread
Achieving perfect results every time is easier with these extra **baking tips for beginners** and seasoned bakers alike. These pointers will help you master this and other quick bread recipes:
- Don’t Overmix: This is arguably the most crucial tip for quick breads. Overmixing develops gluten, leading to a tough, dry, and chewy texture. Mix just until ingredients are combined, no more. A few lumps are okay!
- Room Temperature Eggs: Eggs at room temperature emulsify better with other ingredients, creating a smoother, more uniform batter. If you forget to take them out, place them in a bowl of warm water for 5-10 minutes before using.
- Grating Squash Correctly: Use the larger holes on your box grater for medium-sized shreds. Remember, do NOT squeeze out the moisture from the grated squash! The squash’s natural water content is vital for a super moist loaf.
- Pan Size Matters: A 9×5 inch loaf pan is standard for this recipe. If you use a smaller pan, your bread will be taller and require a longer baking time; a larger pan will result in a flatter loaf with a shorter baking time. Always adjust your baking time and check for doneness accordingly.
- Test for Doneness Reliably: The toothpick test is your best friend. Insert a wooden skewer or toothpick into the very center of the loaf. If it comes out clean or with just a few moist crumbs attached, your bread is done. If it’s still gooey with wet batter, give it a few more minutes.
- Cool Completely for Best Texture: While it’s incredibly tempting to slice into warm bread, allowing it to cool completely on a wire rack helps it firm up, prevents crumbling, and allows the flavors to fully develop. It also makes for cleaner slices.
- Proper Storage: Store leftover bread tightly wrapped in plastic wrap or in an airtight container at room temperature for up to 3-4 days to maintain its freshness and moisture. For longer storage, freeze individual slices (wrapped in plastic wrap then foil) for up to 3 months. Thaw at room temperature before enjoying.
Essential Baking Tools for Your Kitchen
Having the right tools makes baking a breeze and ensures consistent results. Here are some essentials for this recipe:
- Mixing Bowl (You’ll need at least two: one large, one medium)
- Whisk (For dry ingredients and wet ingredients)
- Baking Pan (A 9×5 inch loaf pan is ideal)
- Measuring Cups (For flour, sugar, oil)
- Spatula (For mixing and scraping the bowl)
- Measuring Spoons (For smaller quantities like baking soda/powder and spices)
- Box Grater (Essential for grating the yellow squash)
- Wire Rack (Crucial for proper cooling of your baked bread)
Nutrition Information (Estimated Per Serving)
(Based on 12 servings per loaf, without optional add-ins)
| Nutrient | Amount |
|---|---|
| Calories | 280 kcal |
| Carbohydrates | 45 g |
| Protein | 4 g |
| Fat | 11 g |
| Fiber | 2 g |
| Sugar | 28 g |
Disclaimer: These values are estimates and may vary based on specific brands of ingredients, exact measurements, and optional additions (like nuts or chocolate chips will increase calorie and fat content).
Frequently Asked Questions (FAQs)
Q1: Can I use zucchini instead of yellow squash?
Absolutely! Zucchini and yellow squash are very similar in texture, moisture content, and mild flavor, making them almost perfectly interchangeable in most quick bread recipes. Your bread will still be delicious, moist, and delightful.
Q2: Do I need to peel the yellow squash before grating?
No, there’s no need to peel yellow squash for this recipe. The skin is thin and tender, and once grated and baked, it softens completely and practically disappears into the bread, adding a little extra fiber and nutrients without affecting the texture. Just give the squash a good wash before grating.
Q3: How should I store leftover Yellow Squash Bread?
Once completely cooled, wrap the bread tightly in plastic wrap or aluminum foil, or place it in an airtight container. It will stay fresh and moist at room temperature for 3-4 days. For longer storage, you can freeze individual slices or the whole loaf for up to 3 months. Thaw frozen bread at room temperature, or warm gently in a microwave or oven.
Q4: My bread sank in the middle. What went wrong?
This is a common issue for beginners, but don’t worry, it’s a learning experience! Several factors can cause a quick bread to sink:
- Opening the oven door too early: A sudden drop in temperature before the bread’s structure is set can cause it to collapse.
- Underbaking: If the center isn’t fully cooked, it won’t be able to support itself once removed from the oven. Always use the toothpick test.
- Expired leavening agents: Ensure your baking soda and baking powder are fresh. They lose potency over time.
- Too much liquid: While we don’t squeeze the squash, ensure your measuring is accurate for other wet ingredients.
- Overmixing: Can lead to a weak gluten structure that can’t hold the rise, causing the bread to collapse.
Q5: Can I make this recipe gluten-free?
Yes, you can! Substitute the all-purpose flour with a good quality 1:1 gluten-free baking flour blend that contains xanthan gum (this is important for structure). The texture might be slightly different, perhaps a bit denser, but it should still yield a delicious loaf. Ensure all other ingredients, like baking powder, are certified gluten-free if strict adherence is necessary.
Q6: Can I add other spices or flavorings?
Absolutely! This recipe is a fantastic base for experimentation. Feel free to add a pinch of ground ginger, allspice, or cardamom for lovely warmth. A touch of orange or lemon zest can brighten the flavor profile, or you could add a simple vanilla glaze or cream cheese frosting after cooling for extra sweetness and decadence. Get creative!
Ready to Bake Your Own Yellow Squash Bread?
There you have it! A comprehensive, beginner-friendly guide to making incredibly moist and flavorful Yellow Squash Bread. This recipe is more than just a way to use up summer produce; it’s an opportunity to discover the joy of baking and create something truly special from scratch. Don’t be intimidated – with these detailed instructions and helpful tips, you’re set for success, even if it’s your very first time baking a quick bread.
So, grab your apron, preheat your oven, and get ready to fill your home with the inviting aroma of freshly baked bread. We can’t wait to hear how your Yellow Squash Bread Recipes turn out! Share your baking triumphs in the comments below. Happy baking!