
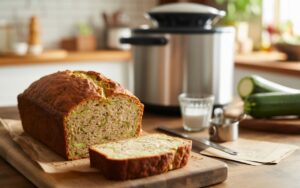
This recipe is one of the best easy baking recipes you’ll ever try. No fancy mixers, no complicated steps, just simple ingredients combined in your bread maker for a hands-off baking experience. We’ll walk you through every step, providing essential baking tips for beginners to ensure your success. Get ready to transform that garden abundance (or store-bought zucchini!) into a delightful treat that’s perfect for breakfast, a snack, or even dessert. Let’s get baking!
Ingredients List: What You’ll Need
Gathering your ingredients is the first step to baking success. For this bread maker zucchini bread, we’re using common pantry staples. Remember to measure accurately!
| Ingredient | Quantity | Unit |
|---|---|---|
| All-Purpose Flour | 2 ½ | cups |
| Granulated Sugar | ¾ | cup |
| Baking Powder | 1 | teaspoon |
| Baking Soda | ½ | teaspoon |
| Ground Cinnamon | 1 | teaspoon |
| Salt | ½ | teaspoon |
| Large Eggs | 2 | |
| Vegetable Oil (or melted coconut oil) | ½ | cup |
| Vanilla Extract | 1 | teaspoon |
| Shredded Zucchini (packed) | 1 ½ | cups |
| Chopped Walnuts or Pecans (optional) | ½ | cup |
| Chocolate Chips (optional) | ½ | cup |
Step-by-Step Instructions: Bake Your Best Zucchini Bread!
This is where the magic happens! Follow these detailed steps carefully for a perfect loaf every time. Don’t worry, your bread maker will do most of the hard work!
Preparation is Key (Before the Bread Maker!)
- Shred Your Zucchini: Wash your zucchini thoroughly. Using a box grater (medium holes) or a food processor with a grating attachment, shred the zucchini. Beginner Tip: Don’t peel the zucchini; the skin adds nutrients and color, and it softens perfectly during baking.
- Squeeze Out Excess Moisture: This is a **crucial step** for preventing a soggy loaf! Place the shredded zucchini in a clean kitchen towel or several layers of paper towels. Gather the ends and squeeze out as much liquid as you possibly can. You’ll be surprised how much water comes out! This ensures your bread is moist, not wet.
- Pre-Measure Everything: Before you even touch your bread maker, measure all your ingredients. This practice, known as “mise en place,” makes the baking process smoother and reduces the chance of forgetting an ingredient or making a mistake.
Loading Your Bread Maker
- Add Wet Ingredients First: Most bread makers recommend adding liquid ingredients first. Crack your two large eggs directly into the bread maker pan. Add the vegetable oil and vanilla extract. Beginner Tip: Ensure your eggs are at room temperature if possible; this helps them emulsify better with the other ingredients, leading to a more consistent batter. If they’re cold, simply place them in a bowl of warm water for 5-10 minutes.
- Add Dry Ingredients: Carefully spoon the granulated sugar, all-purpose flour, baking powder, baking soda, ground cinnamon, and salt over the wet ingredients in the bread maker pan. Beginner Tip for Measuring Flour: Do not scoop flour directly with your measuring cup, as this compacts it and results in too much flour. Instead, spoon flour into your measuring cup and then level it off with the back of a knife.
- Create a Well (Optional but Recommended): With your finger or a spoon, make a small indentation in the center of the dry ingredients, but don’t go all the way down to the wet ingredients. This is where you’ll add the leavening agents (baking powder and soda) to prevent them from activating too early.
- Add Shredded Zucchini: Distribute the squeezed, shredded zucchini evenly over the dry ingredients.
- Add Optional Mix-ins (If Using): If you’re adding chopped walnuts, pecans, or chocolate chips, sprinkle them on top of the zucchini. Some bread makers have a “fruit and nut dispenser” which will add them automatically at the right time. If yours doesn’t, you’ll add them manually during the second mixing cycle (usually after the first knead). Check your bread maker’s manual for specifics on when to add mix-ins for quick breads.
Setting Your Bread Maker
- Select the Right Cycle: Close the lid of your bread maker. Select the “Quick Bread,” “Sweet Bread,” or “Cake” cycle. This cycle typically includes mixing, a short rest, and then baking without a long rise time, which is perfect for non-yeast breads like zucchini bread. Common Mistake & Alternative: If your bread maker doesn’t have a specific “Quick Bread” or “Cake” setting, you can often use a “Dough” cycle (which just mixes and kneads) and then transfer the batter to a greased loaf pan to bake in a conventional oven at 350°F (175°C) for 45-60 minutes, or until a toothpick inserted into the center comes out clean.
- Press Start: Let your bread maker do its work! It will mix the ingredients, then bake the loaf.
After Baking
- Check for Doneness: Once the cycle finishes, open the lid. A toothpick inserted into the center of the loaf should come out clean. If it looks a little underdone, you can sometimes run the “Bake” cycle for an extra 10-15 minutes, but keep a close eye on it to prevent overbrowning.
- Cooling Time: Carefully remove the bread maker pan from the machine (use oven mitts, it will be hot!). Invert the pan onto a wire rack to release the loaf. If the paddle is stuck in the bottom of the loaf, gently remove it with a utensil. Allow the zucchini bread to cool completely on the wire rack before slicing. Beginner Tip: Slicing warm quick bread can make it crumbly and difficult to cut cleanly. Patience is key for perfect slices!
- Enjoy! Once cooled, slice and serve. This zucchini bread is wonderful plain, or with a pat of butter, cream cheese, or a dusting of powdered sugar.
Tips & Tricks for Bread Maker Zucchini Bread Success
Elevate your zucchini bread game with these actionable tips, perfect for any beginner baker!
- Don’t Overmix (Even in the Bread Maker!): While the bread maker does the mixing, for quick breads, overmixing can develop too much gluten, leading to a tough, dense loaf. The “Quick Bread” cycle is designed to prevent this, but if manually mixing, stop as soon as ingredients are combined.
- Squeeze Your Zucchini Dry: We can’t stress this enough! Excess moisture is the enemy of a perfectly textured quick bread. A dry zucchini ensures a moist, not soggy, loaf.
- Room Temperature Ingredients: Eggs and oil at room temperature emulsify better, creating a smoother batter and a more uniform crumb.
- Customize Your Add-ins: Get creative! Besides walnuts and chocolate chips, try dried cranberries, raisins, shredded coconut, or a touch of lemon zest for a bright flavor. Just don’t overload it – stick to about ½ to ¾ cup total mix-ins.
- Spice It Up: If you love spices, consider adding a pinch of nutmeg or allspice along with the cinnamon for a more complex flavor profile.
- Storage Savvy: Store your cooled zucchini bread tightly wrapped in plastic wrap or in an airtight container at room temperature for up to 3-4 days. For longer storage, slice the loaf, wrap individual slices, and freeze for up to 3 months. Thaw at room temperature or gently warm.
- Clean the Paddle: After baking and removing the loaf, soak the bread maker pan with a little warm, soapy water immediately. This makes cleaning the kneading paddle much easier if it’s stuck inside the pan.
Essential Baking Tools You Might Need
While your bread maker does most of the heavy lifting, a few basic tools will make your baking journey even smoother. Here are some essentials (with convenient Amazon links!):
- Mixing Bowl (for pre-mixing dry ingredients or prepping zucchini)
- Whisk (for combining dry ingredients)
- Baking Pan (only if you opt to bake in a conventional oven)
- Measuring Cups (for precise ingredient measurements)
- Spatula (for scraping down bowls and transferring ingredients)
- Box Grater or Food Processor (for shredding zucchini)
- Clean Kitchen Towel or Paper Towels (for squeezing zucchini)
- Wire Rack (for cooling your finished loaf)
Nutrition Info (Estimated per slice, 12 slices per loaf)
Please note that these are approximate values and can vary based on exact ingredient brands and quantities, especially if adding optional mix-ins.
| Nutrient | Amount |
|---|---|
| Calories | 250-280 kcal |
| Carbohydrates | 35-40 g |
| Protein | 4-5 g |
| Fat | 10-12 g |
| Fiber | 1-2 g |
| Sugar | 18-22 g |
FAQs: Your Bread Maker Zucchini Bread Questions Answered!
Baking can sometimes bring up questions, especially for beginners. Here are some common ones about making zucchini bread in a bread maker:
Q1: Can I use frozen shredded zucchini?
A: Yes, absolutely! If using frozen zucchini, make sure to thaw it completely first. Then, it’s even more crucial to squeeze out as much excess moisture as possible, as frozen zucchini tends to release more water than fresh. Pat it very dry before adding it to your bread maker.
Q2: My bread maker doesn’t have a “Quick Bread” or “Cake” setting. What should I do?
A: No problem! You have a couple of options. You can use the “Dough” cycle (which typically just mixes and kneads) to mix the batter. Once the mixing is done, transfer the batter to a greased regular loaf pan and bake it in a preheated oven at 350°F (175°C) for about 45-60 minutes, or until a toothpick inserted into the center comes out clean. Alternatively, some bread makers might have a “Basic” cycle that you can stop before the long rise and just use the bake function, but be careful not to overbake.
Q3: How do I prevent my zucchini bread from being soggy?
A: The #1 tip for preventing soggy zucchini bread is to **thoroughly squeeze out all excess moisture from the shredded zucchini**. Use a clean kitchen towel or several layers of paper towels and wring it out until no more liquid comes out. Also, ensure your bread maker is on the correct “Quick Bread” or “Cake” setting, which bakes at a higher temperature for a shorter time without a long proofing period, ensuring proper cooking.
Q4: Can I add other ingredients like nuts or chocolate chips?
A: Absolutely! This recipe is very adaptable. You can add ½ to ¾ cup of chopped walnuts, pecans, chocolate chips, raisins, or dried cranberries. If your bread maker has a “fruit and nut dispenser,” add them there. Otherwise, add them with the zucchini during the main mixing cycle. Don’t add too many, or it can affect the structure of the loaf.
Q5: How can I tell if my zucchini bread is fully cooked?
A: The best way is the “toothpick test.” Insert a clean toothpick or a thin skewer into the center of the loaf. If it comes out clean with no wet batter clinging to it, your bread is done. If it comes out with wet batter, it needs more time. The top should also be golden brown and the loaf should feel firm to the touch.
Conclusion: Your Delicious Zucchini Bread Awaits!
Congratulations, baker! You’ve successfully navigated the wonderful world of bread maker baking and created a truly delicious loaf of zucchini bread. This Zucchini Bread In Bread Maker Recipe proves that delightful homemade treats don’t have to be complicated. With your bread maker, fresh ingredients, and these simple instructions, you’re well on your way to becoming a confident baker.
Don’t be afraid to experiment with different spices or mix-ins next time. The joy of baking is in the process and the delicious results. We hope this detailed guide has given you all the baking tips for beginners you need to feel empowered in your kitchen. Enjoy your warm, comforting slice of homemade zucchini bread, and don’t forget to share your creations!